


This article will walk the reader through the steps involved for admins to clone and move their Magento site to a new and different domain. It applies to the following general product configuration categories:
- Move Magento to New Domain
- How to Move Magento
- Change Domain Magento
What You Need Before You Can Start
For this process of moving a Magento site to another Magento site, you will need to connect to the server using SSH. If you do not know how to use SSH, then the New User Tutorial: Basic SSH Usage article will help you.
As a first step, identify the Magento site you would like to move and where it is located. This is commonly known as the “Document Root” of the site.
Next, identify the target location for the new site. Once you have decided on the new target location for the site move, you will need to create the new and different site via the cloning and moving steps provided.
In this article, we will be moving growblop.com to a subdomain called staging.growblop.com. The Magento Version is 2.3.7-p2 for growblop.com.
Once you are connected to the server by SSH, you will need to change to your Magento site's directory. We are going to change to its “Document Root” by issuing this command:
cd /home/growblop/public_html
You can view the files and directories under the “Document Root” by using the “ls” command:
ls /home/growblop/public_html
Working with Databases
Using your favorite text editor such as “Nano”, open up the settings file that would have the database configuration settings. If you are not sure how to use the Nano text editor, the How to Install and Configure Nano on CentOS 8 article will help you.
A common example for the location of your settings file is /home/growblop/public_html/app/etc/env.php. Yours might have a different file name such as local.xml.
nano /home/growblop/public_html/app/etc/env.php
Once you open the settings file, you will have the database name, database user, and database password. Copy the “db name” and store this somewhere temporarily.
In this example, we have copied and temporarily stored the database name from the env.php file into a notepad page so that we do not have to open the Magento settings file again:
'dbname' => 'mage492',
You will need to make a database dump for this database. If you are not sure how to use the mysqldump command, the How to Backup and Restore MySQL Databases from the Command Line article will help you.
Let’s go ahead and make a database dump for the live database.
Change to this directory:
cd /home/growblop
Make the dump and call the dump anything you would like. In the example below, the dump is called mage492_clone.sql:
mysqldump mage492 > mage492_clone.sql
Cloning Your Site
Next, we will need to create the subdomain. If you are using a cPanel server, you will need to open up cPanel on your browser and navigate to Domains >> Subdomains, and create the new subdomain that you will use for the new Magento site.
Please take note of the “Document Root” location of the new subdomain.
We will need to use a method for syncing the files to the new staging.growblop.com “Document Root”. The most commonly used method is to use rsync. If you are not sure how to use the rsync command, the Install Rsync and Lsync on CentOS, Fedora or Red Hat article will help you. We will now issue this command:
rsync -avH /home/growblop/public_html/ /home/growblop/staging.growblop.com/
Now that the files are copied over to the new Magento subdomain site, we will have to create a new database, a new database user, and the new database user’s password.
If you are using a cPanel server, you will need to navigate to DATABASES >> MySQL Databases. Enter the new database name in the box and click “Create Database."
Next, under the MySQL Users, enter the new database user and create a strong password with it. Click on “Create User."
Next, you will need to add the permissions for the new database user with the new database. Under the “Add User To Database,” choose the user and the database and click on the “Add” button. This will open a new page.
Click on the “ALL PRIVILEGES” check box and click the “Make Changes” button.
You will need to open up the new Magento site’s settings file and change the dbname, username, and password to the new database, user, and password that you just created:
nano /home/growblop/staging.growblop.com/app/etc/env.php
Do not forget to save the file, and then to close the Magento settings file.
We can now import the live Magento site’s database dump that we created. My new database is called mage492_stage. To import the live Magento site’s database dump file into the new Magento site’s database, you will need to issue this command:
mysql mage492_stage < /home/growblop/mage492_clone.sql
With the files synced over and the database imported, we now have to change the URL in the database. The easiest way to do that is to use phpMyAdmin. Click on the new database name on the left column and it will then display all of the tables:

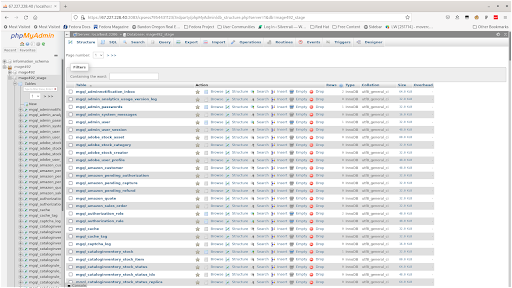
You will need to open up the core_config_data table. In the example below, the table is named mgql_core_config_table. You will need to change the URL to the new URL in the following two records:
“web/unsecure/base_url”“web/secure/base_url”
“web/unsecure/base_url”
Click on “edit” for the row with “web/unsecure/base_url”. Change the value section from http://growblop.com/ to http://staging.growblop.com/ and click on the “Go” button:
“web/secure/base_url”
Next, do the same for the row with “web/secure/base_url”. Change the value section from https://growblop.com/ to https://staging.growblop.com/ and click on the “Go” button.
Clearing the Cache
You have now just moved the live Magento site to a new Magento site. It may require that you clear the Magento cache. In order to do that, you will need to change to the new Magento site’s “Document Root” and clear the cache with these commands:
php /home/growblop/staging.growblop.com/bin/magento cache:clean php /home/growblop/staging.growblop.com/bin/magento cache:flush
You should now be able to visit the new Magento site in the browser.
Get Started With Managed Magento Hosting
If you are not a Nexcess customer yet, check out our fully managed hosting solutions, including hosting for Magento. Explore our plans to get started today.


