

This article will explain HTTP security headers, recommended best practices, and how to enable HTTP security headers to secure your website from vulnerabilities.
HTTP security headers are the necessary part of website security that allows your server to prevent web vulnerabilities like XSS, Clickjacking, Cross-Site Scripting attacks, and many other known threats before they impact your website.
Using HTTP security headers to avoid web vulnerabilities
HTTP security headers are directives used by web applications to make security protections in web browsers. They are also used to configure the web browser to allow valid TLS communication only and enforce valid certificates or even enforce using a specific server certificate.
Overview of the web vulnerabilities to avoid by using HTTP security headers
The list of web vulnerabilities that you can avoid by using HTTP security headers include the following:
- Content injection or content spoofing attacks
- Clickjacking attacks
- Cross-Site Scripting (XSS) attacks
- Protocol downgrade attacks like Padding Oracle on Downgraded Legacy Encryption (POODLE) attacks
- Cross-Site Request Forgery (CSRF) attacks
- Reflected Cross-Site Scripting (XSS) attacks
Content injection or content spoofing attacks
Content spoofing attacks, also known as content injection attacks, are when the website visitor for the web application is able to modify the contents of the web page.
This type of attack will happen when the web application is unable to handle data supplied by the end-user. The attackers inject malicious text or HTML content via a parameter value into a legitimate website, which is then reflected in the webpage.
Clickjacking attacks
Clickjacking or UI redressing is an interface-based attack that tricks website visitors into clicking a webpage element that is invisible as another page or HTML element. The invisible page could be a malicious or legitimate page the visitor did not wish to visit. The attackers insert their malicious links into legitimate pages or links or buttons on a website. If the website visitor clicks on these links or buttons, the attackers will get access to the confidential information of that visitor. This attack is commonly performed by hiding the target website's UI and arranging the visible UI so that the visitors aren't aware of clicking the target website.
Cross-Site Scripting (XSS) attacks
Cross-Site Scripting (XSS) is an attack that allows an attacker to inject malicious executable scripts into the code of a trusted web application or website. This type of attack will occur if the web application or website does not employ enough validation or encoding. The attackers frequently initiate XSS attacks by sending malicious links to a user and attracting the user to click them.
Protocol downgrade attacks like Padding Oracle on Downgraded Legacy Encryption (POODLE) attacks
The attacker will then force your web browser to downgrade the server's security protocol to SSL 3.0 from TLS 1.0 to steal sensitive data, such as passwords, session cookies, or other authentication tokens that help them to impersonate a user and gain access to a website.
Cross-Site Request Forgery (CSRF) attacks
The Cross-Site Request Forgery (CSRF) attack forces an authenticated user to execute unwanted actions or submit a request on a web application or website where they’re currently authenticated. In a CSRF attack, an attacker uses social engineering techniques to handle an authenticated user into performing malicious actions without their awareness or consent. By simply clicking on a suspicious link in an email or chat message, the website user may accidentally give an attacker the ability to operate their identity and access privileges.
Reflected Cross-Site Scripting (XSS) attacks
Attacks that use a malicious script that is reflected from a web application to the victim's browser are known as reflected XSS attacks or non-persistent attacks. A link that sends a request to a website with a vulnerability that allows the execution of malicious scripts activates the script.
A guide to preventing website vulnerabilities by using HTTP security headers
When a user visits a website in the browser, the browser sends some request headers to the server, which then responds with the content along with HTTP response headers. These HTTP response headers are used by the client and server to share information as a part of the HTTP protocol.
Some HTTP response headers contain content metadata such as Content-Encoding, status codes, Cache-Control, etc. Along with the HTTP response headers, there are also HTTP security headers that tell the browser how to behave during communication with the site. Browsers have defined the behavior of the web page according to the HTTP response headers during communication with the server.
The recommended HTTP security headers are as follows:
- HTTP Strict Transport Security (HSTS - Strict-Transport-Security)
- Cross-Site Scripting Protection (X-XSS-Protection)
- Website IFrame Protection (X-Frame-Options)
- Preventing Content-Type Sniffing (X-Content-Type-Options)
- Content Security Policy (CSP - Content-Security-Policy)
- Referrer-Policy
- Permissions-Policy
HTTP Strict Transport Security (HSTS - Strict-Transport-Security)
HTTP Strict Transport Security (HSTS) header is a security enhancement that configures the web browser to always use a valid secure connection (HTTPS) with the web application. This ensures the connection cannot be established through an insecure HTTP connection which could allow cybersecurity attacks like Man-in-the-middle attacks, Session Hijacking, etc.
If the server TLS certificate becomes expired or untrusted, the web browser will no longer connect to the web application. Also, if the user tries to access the web application using an HTTP:// URL, the web browser will automatically change it to HTTPS://. This will help us to prevent cybersecurity attacks.
You will need to ensure all your website pages are accessible over HTTPS before implementing the HSTS header. Otherwise, they will be blocked. Currently, all major web browsers support HTTP strict transport security.
You can implement HTTP Strict Transport Security (HSTS) in Apache by adding the following entry in the Apache configuration file:
Header set Strict-Transport-Security "max-age=31536000; includeSubDomains; preload" env=HTTPS
For Nginx, you can add the following entry in the Nginx configuration file to implement HTTP Strict Transport Security (HSTS):
add_header Strict-Transport-Security 'max-age=31536000; includeSubDomains; preload;' always;
Cross-Site Scripting Protection (X-XSS-Protection)
Cross-Site Scripting Protection (X-XSS) header helps to protect your websites against Cross-Site Scripting or script injection attacks. When the hacker inserts malicious JavaScript code into an HTTP request to access confidential information such as session cookies, the X-XSS Protection header allows you to block cross-site scripting from loading on your website when they detect reflected Cross-Site Scripting (XSS) attacks. The X-XSS Protection header (filter) is enabled by default in popular web browsers such as Chrome, Safari, etc.
The available options to implement Cross-Site Scripting Protection (XSS protection) are as follows. You can use it as per your requirement:
- X-XSS-Protection: 0 — To disable Cross-Site Scripting Protection.
- X-XSS-Protection: 1 — To enable Cross-Site Scripting Protection and remove the unsafe part.
- X-XSS-Protection: 1; mode=block — To enable Cross-Site Scripting Protection and prevent the entire page from rendering when a Cross-Site Scripting (XSS) attack is detected.
You can implement Cross-Site Scripting Protection (X-XSS-Protection) in Apache by adding the following entry in the Apache configuration file:
Header set X-XSS-Protection "1; mode=block"
For Nginx, you can add the following entry in the Nginx configuration file to implement Cross-Site Scripting Protection (X-XSS-Protection):
add_header X-XSS-Protection "1; mode=block";
Website IFrame Protection (X-Frame-Options)
Website IFrame Protection (X-Frame-Options) header protects your website from malicious script injection, cross-domain iframes, or click-jacking attacks by disabling iframes on your website. An attacker applies multiple layers on a button or link to redirect website users to another page and steal their vital information. By implementing the X-Frame-Options header, you instruct the web browser whether a web page should be allowed to render a <frame>, <iframe>, <embed>, <object>, or element on the website or not. Currently, X-Frame-Options is supported by all major web browsers.
The available options to implement Website IFrame Protection (X-Frame-Options) are as follows. You can use it as per your requirement:
- DENY — Do not allow iframes to render
- SAMEORIGIN — To allow rendering iframes only with the same origin
- ALLOW-FROM DOMAIN — To allow rendering iframes only from DOMAIN (Replace DOMAIN with your site URL)
You can implement Website iFrame Protection (X-Frame-Options) in Apache by adding the following entry in the Apache configuration file:
Header set X-Frame-Options "SAMEORIGIN"
For Nginx, you can add the following entry in the Nginx configuration file to implement Website IFrame Protection (X-Frame-Options):
add_header X-Frame-Options "SAMEORIGIN";
Preventing Content-Type Sniffing (X-Content-Type-Options)
Browser Sniffing Protection or Content-Type Sniffing (X-Content-Type-Options) header is used to protect the web browser from MIME-type sniffing vulnerabilities. It can occur when a website allows uploading content to a website, but the attackers inject a malicious executable script. This can allow them to perform cross-site scripting and compromise the website. By implementing the X-Content-Type-Options header, you instruct the web browser to follow the MIME types indicated in the header. This will help reduce the danger of drive-by downloads and help handle the content properly.
You can implement the X-Content-Type-Options header in Apache by adding the following entry in the Apache configuration file:
Header set X-Content-Type-Options "nosniff"
For Nginx, you can add the following entry in the Nginx configuration file to implement the X-Content-Type-Options header:
add_header X-Content-Type-Options nosniff;
Regarding nosniff, only use the declared MIME-type.
Content Security Policy (CSP - Content-Security-Policy)
Content-Security-Policy (CSP) header is used to instruct the web browser to load the allowed content defined in the policy. This header will use the whitelisting approach, which instructs the web browser on where to load the images, CSS, etc. Implementing Content-Security-Policy (CSP) properly will help to prevent the exploitation of Cross-Site Scripting (XSS), ClickJacking, and HTML injection attacks.
You can implement the Content Security Policy in Apache by adding the following entry in the Apache configuration file:
Header set Content-Security-Policy "script-src 'self';"
For Nginx, you can add the following entry in the Nginx configuration file to implement the Content Security Policy:
add_header Content-Security-Policy “script-src 'self'”;
Some directives that can be used to implement the Content Security Policy are as follows. You can use it as per your requirement:
- script-src ‘self’ test.example.com — to enable loading scripts from the own domain and test.example.com.
- default-scr ‘self’ test.example.com — to define loading all resource types from the own domain and test.example.com.
- style-src ‘self’ test.example.com — to enable loading stylesheets from the own domain and test.example.com.
- object-src ‘none’ — to disallow loading of all objects such as <applet>, <embed>, and <object>.
- block-all-mixed-content — to prevents the browser from loading mixed content (such as HTTP and https mixed elements).
- frame-ancestors ‘self’ — this defines that this page may only be used as a frame on pages of the own domain.
- img-src ‘self’ test.example.com — to enable loading images from the own domain and test.example.com.
- media-scr ‘self’ test.example.com — To enable loading media elements from the own domain and test.example.com.
- connect-src ‘self’ test.example.com — to enable connections via script interfaces such as XMLHttpRequest or WebSocket to the own domain and test.example.com
- form-action ‘self’ — ensures that form. actions can only be of the own domain.
- child-src ‘self’ — define that in <frame> and <iframe> elements only pages from the own domain may be loaded.
- font-src ‘self’ test.example.com — to enable loading fonts from the own domain and test.example.com.
- upgrade-insecure-requests — to download all resources via an https connection.
- manifest-src ‘self’ — to enable loading manifests from the own domain.
Referrer-Policy
The Referrer-Policy header includes the address of the web page that a user follows to access the currently requested web page. It also controls how corresponding information (sent with the Referrer header) should be included with the requests.
The Referrer-Policy header is used for analytics, optimized caching, logging, tracking, or stealing information. Because the Referrer may leak confidential information (such as user-specific URLs). You can set the Referrer Policy to a more restrictive value.
You can implement the Referrer-Policy in Apache by adding the following entry in the Apache configuration file:
Header set Referrer-Policy "strict-origin-when-cross-origin"
For Nginx, you can add the following entry in the Nginx configuration file to implement the Referrer-Policy:
add_header Referrer-Policy "strict-origin-when-cross-origin";
Some directives that can be used to implement the Referrer-Policy are as follows. You can use it as per your requirement:
- no-referrer — Do not send any referrer information on requests.
- no-referrer-when-downgrade — Do not send the referrer information when the actual connection is an HTTPS request, and the new request is HTTP.
- origin — Send the origin as a referrer without including any path information.
- origin-when-cross-origin — When a new request is made on a different domain, send the origin as the referrer and all information in cases of same-origin requests.
- same-origin — Send the referrer only when the request remains within the current domain.
- strict-origin — Send the origin as the referrer when the request is not downgraded from HTTPS to HTTP.
- strict-origin-when-cross-origin — Send the origin as the referrer to cross-origin requests and the full referrer on same-origin requests but only when the request is not downgraded.
- unsafe-url — Send the full URL as the referrer at all times.
Permissions-Policy
Permissions Policy Header helps to restrict unauthorized usage or access of the web browser's or the client's features by web resources. This policy ensures user privacy by limiting or specifying the features of the web browsers that the web resources can use.
Permissions Policy provides a set of standard HTTP security headers that allow website owners to limit which features of web browsers can be used by the page, such as a microphone, camera, full screen, location, etc.
You can implement the Permissions-Policy in Apache by adding the following entry in the Apache configuration file:
Header set Permissions-Policy "geolocation=(),midi=(),sync-xhr=(),microphone=(),camera=(),magnetometer=(),gyroscope=(),fullscreen=(self),payment=()"
For Nginx, you can add the following entry in the Nginx configuration file to implement the Permissions-Policy:
add_header Permissions-Policy "geolocation=(),midi=(),sync-xhr=(),microphone=(),camera=(),magnetometer=(),gyroscope=(),fullscreen=(self),payment=()";
Some directives that can be used to implement the Permissions Policy are as follows. You can use it as per your requirement:
- Accelerometer — controls the requesting information about the device's accelerometer.
- Autoplay — controls the autoplay of video and audio on the page.
- Camera — controls the use of video input devices.
- Fullscreen — controls the webpage using Fullscreen mode.
- Geolocation — controls the use of the Geolocation Interface.
- Gyroscope — controls the device's gyroscope to collect information about the orientation of the device.
- Magnetometer — controls the device's magnetometer (compass) to collect information about the orientation of the device.
- Microphone — controls the use of audio input devices.
- Payment — controls the use of the Payment Request, which makes stored credit cards and addresses available to merchants.
- Sync-xhr — controls the synchronous XMLHttpRequest requests to retrieve data from a URL without having to do a full-page refresh.
- Midi — controls the use of the Web MIDI API.
- USB — controls the use of the WebUSB API.
Every directive can have one of these three values:
- 'self' — only the current website is permitted to make use of this feature.
- * — all scripts on the page have access to this feature.
- <url> — allows feature to function for a particular URL with any part of the URL being optional or a wildcard (*). (mohammednoufal.com, *.mohammednoufal.com, https://mohammednoufal.com/test.js)
How to enable HTTP security headers?
To enable HTTP security headers, you can either use the .htaccess file or a WordPress plugin (for WordPress sites).
Adding HTTP security headers using the .htaccess file
You can find your .htaccess file under the Document Root of your website by connecting to it using an FTP client or via SSH and editing it. Once you have added the HTTP security headers as per your requirements, save the file to reflect the changes.
Adding HTTP security headers using WordPress plugin
You can enable HTTP security headers for your website using WordPress Plugin Redirection. Please follow the below steps to enable it.
Redirection plugin setup step #1
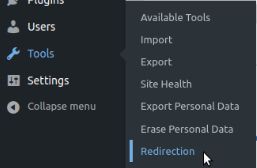
Once you have installed and activated the plugin, it will show the basic setup wizard to set up the plugin. If you set up the plugin, go to Tools >> Redirection page:

Redirection plugin setup step #2
Click on the Site tab:


Redirection plugin setup step #3
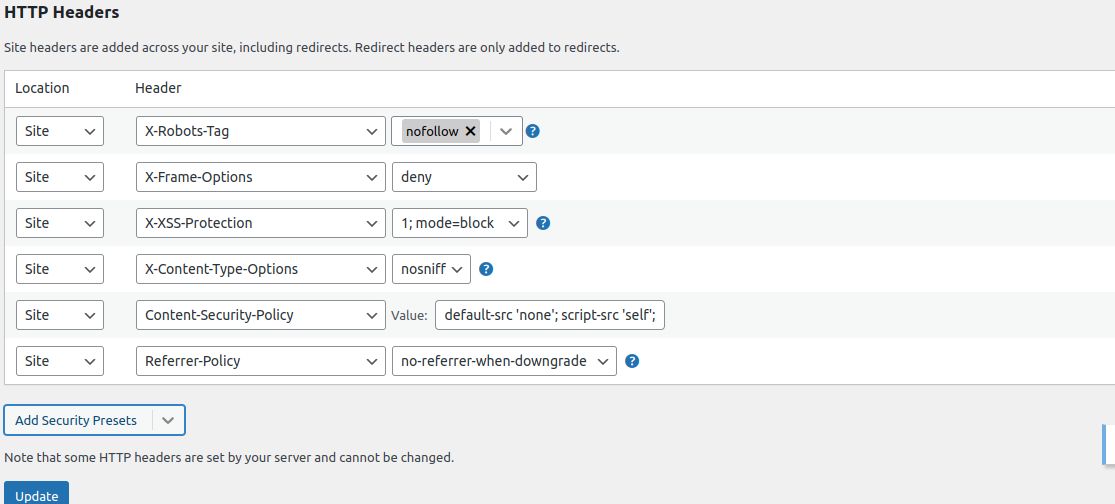
Under the Site page, you will see the HTTP Headers section. Click on the Add Header button and select the Add Security Presets option from the dropdown menu:


Click again on Add Security Presets, and then you will see a preset list of HTTP security headers. You can review the HTTP security headers and change them per your requirements. Once you change it, click on the Update button to save the changes:

If you are facing any issues while adding HTTP security headers for your website or it is not working as expected, you can provide us the list of HTTP security headers that you want to enable for your website, so that we can add them to the Apache configuration file from our side.
How do you check if you have HTTP security headers already enabled?
You can use online tools like KeyCDN's HTTP Header Checker tool (https://tools.keycdn.com/curl) or scan your website with Security Headers (www.securityheaders.io) or Chrome DevTools response headers or FireFox’s Developer Console.
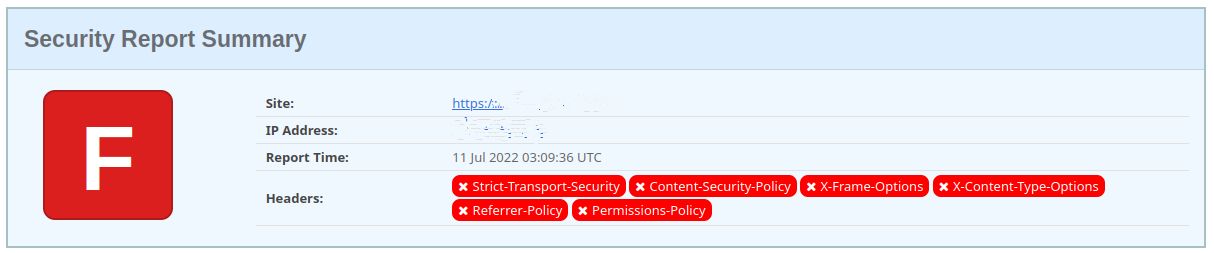
If the HTTP Security Header is not enabled for your website, here is the output of the Security Headers scan result:

Here is a sample of HTTP security headers that are optimized for security. You can review them and change them if needed:
<IfModule mod_headers.c>
Header set Strict-Transport-Security "max-age=31536000; includeSubDomains"
Header set X-Frame-Options SAMEORIGIN
Header set X-Xss-Protection "1; mode=block"
Header set X-Content-Type-Options nosniff
Header set Content-Security-Policy "script-src 'self';"
Header set Referrer-Policy "strict-origin-when-cross-origin"
Header set Permissions-Policy "accelerometer=Origin(), autoplay=(), camera=(), gyroscope=(), magnetometer=(), microphone=(), payment=(), publickey-credentials-get=(), usb=()"
</IfModule>
Once you have enabled HTTP security headers for your website, here is the output of the Security Headers scan result.
Conclusion
If you are looking for a suitable hosting plan for your website, you are in the right place. Let Nexcess help you achieve your ecommerce business goals.
Get fully managed web hosting
Expert support, elite performance, and ultra-flexible infrastructure. Nexcess raises the bar on hosting.
We offer a wide variety of cloud hosting plans for multiple web applications. We make applications easy with environment optimizations for Magento, WooCommerce, WordPress, ExpressionEngine, Craft CMS, OroCRM, and more. You can choose a suitable plan from our cloud hosting plans.
If you need assistance enabling the HTTP security headers discussed in this article, or if you are uncomfortable with performing any of the steps outlined above, Nexcess has what you need. Our support teams are ready to help guide you. Contact our team today to see how!
Nexcess products are built for security
At Nexcess, your security matters.
Our infrastructure built with your company's security in mind.
Recent articles
- Adding Google reCAPTCHA to your WooCommerce store
- Enabling and scheduling a WooCommerce coupon code
- New Relic monitoring of WordPress and database performance


