

Drush | Drupal is a command-line shell and scripting interface designed to make things easier for people who spend their working hours at the command line.
Using Drush & Drupal from the Command Line
Drupal takes precedence over WordPress and Joomla in a number of scenarios when it comes to building websites. Why you ask?
When web developers were questioned on this subject, Drupal was described as flexible, scalable, and feature-rich, although the platform is a bit more advanced and complex. The following article will explore using Drupal in the context of your Nexcess Web Hosting Plan!
Is Drupal Still a Viable Platform for Running a Website?
Although often labeled a Content Management System (CMS), Drupal is really a Content Management Framework (CMF) with a more robust set of security, management, and configuration features that make it more secure and adaptable than most CMSs.
Drupal is used to run some of the largest blogs and websites across the Internet. After more than twenty years of existence, it remains popular due to its stability, adaptability, and an enthusiastic and super active open-source user community.
Is Drupal the Best Free Open-Source Content Management System (CMS)?
When comparing the three leading free open-source CMSs of WordPress, Joomla, and Drupal, each one has a bundle of strengths and weaknesses built in. Drupal is most often the best choice if your website needs a lot of custom functionality and will require a world-class foundation in the area of security.
Aimed at an audience seasoned developers rather than novices, Drupal demands a lot of custom work and coding to be implemented optimally, but it can deliver an amazing website for the long haul. Over the last 20 years, Drupal has proved its worth with the test of time and will most likely be around for another 20 years!
A Guide to Learning Drupal
Learning Drupal can seem difficult and daunting. Its ample feature set is like the ecosystem of a wealthy woodland with all types of fruit and wildlife, however, for those who are not skilled in exploring it, the foliage can seem thick, dark, and foreboding. However, the right Drupal site-building guide could make the complexity of building a site effortless.
What You Need to Get Started with Drupal on Nexcess
Below are the optimal steps involved for Nexcess Cloud clients to make use of Drupal for constructing their website:
1) After you have created a Nexcess Account, log in to your account by going to your Client Portal and using your credentials.
Starting with a new hosting partner can be overwhelming. For that exact reason, we have prepared a Nexcess Portal Guide to make each client’s introduction to our Nexcess Portal easier.
How to Become a Nexcess Portal Pro
You signed up for an account with Nexcess but now what do you do? New systems can be intimidating to learn, so we’ve put together this guide to help explain what is in the portal and where to find it.
2) From within the Client Portal, navigate to the Plans section found on the left-side menu:
3) Once you have navigated to this section, click on the Create Plan button.
4) You will find the list of Nexcess applications to choose from on the next page. Select Drupal from the dropdown menu: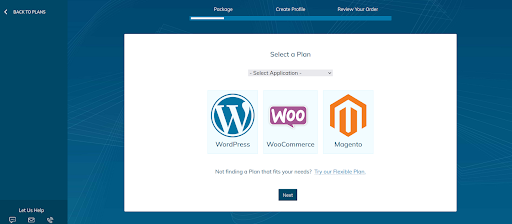
5) After that, you can choose the desired plan size option by clicking Select:
6) If you have already chosen a plan and billing model, click Next under the plans table to proceed to checkout.
Do you need to dive more deeply into the differences between Drupal and WordPress?
Refer to following blog to help you with your decision:
Cagematch: Drupal Vs WordPress
Once Drupal is installed for your domain, using Drush would be the simplest way to manage Drupal. This article's approach will be to guide you through taking care of Drupal in the simplest manner, including the use of Drush.
For the people who prefer to work with a legitimate Command Line Interface (CLI), Drupal does not disappoint when it offers admins the Drush tool and set of commands. They utilize the straightforward Drush API.
Drupal | Drush Tutorial
This tutorial will review a portion of the essential Drush commands and work with a standard Drupal implementation to represent them.
What is Drush?
The Drupal Shell, also known as Drush and Drush | Drupal, is a command-line utility and UNIX scripting interface for Drupal.
Drush is an alternative to the Drupal program user interface when working with Drupal 8 or higher. In addition, the Drush framework is advantageous when migrating complex settings since it lets you show coordinated changes and allows you to roll them back.
Learning to use Drush and the instructions that come with the Drush core will assist website admins and builders accelerate their everyday Drupal work. It is a handy interface for everyone, not only developers. Drush | Drupal comes with plenty of useful commands for interacting with code, which we will cover in this Drush | Drupal Tutorial.
Drush Version
Most web hosting service providers support the Drush | Drupal tool. Working with Drush is easy and brings a new level of efficiency to your administrative work. Before getting started, you should check the Drush Version installed by using the command shown in the code snippet and image below:
drush --version


[a6816d38@cloudhost-112190 html]$ drush --version
 Drush Version   :  8.3.0

Drupal Installation
Once the Drupal installation is complete, you can verify the status of installation using the command shown in the code snippet and image below:
drush status


[a6816d38@cloudhost-112190 html]$ drush status

Drush should show data about your Drupal installation as displayed in the code snippet and image below:
[a6816d38@cloudhost-112190 html]$ drush status
 Drupal version                  :  8.9.20
 Site URI                        :  http://default
 Database driver                 :  mysql
 Database hostname               :  localhost
 Database port                   :  3306
 Database username               :  a6816d38_eaad5d
 Database name                   :  a6816d38_eaad5d
 Database                        :  Connected
 Drupal bootstrap                :  Successful
 Drupal user                     :
 Default theme                   :  bartik
 Administration theme            :  seven
 PHP configuration               :  /etc/opt/remi/php73/php.ini
 PHP OS                          :  Linux
 Drush script                    :  /usr/local/bin/drush
 Drush version                   :  8.3.0
 Drush temp directory            :  /tmp
 Drush configuration             :
 Drush alias files               :
 Install profile                 :  standard
 Drupal root                     :  /chroot/home/a6816d38/a2ce6fbfb9.nxcli.net/html
 Drupal Settings File            :  sites/default/settings.php
 Site path                       :  sites/default
 File directory path             :  sites/default/files
 Temporary file directory path   :  /tmp
 Sync config path                :  sites/default/files/config_zBr_LCkOWxYWOKKv5EIO4aXmdPPz2GbR0Z84EFNPBhTRqNiTy-Hd9ATuDNM5aCkKkxRtz87LpA/sync

Drupal Cache Clearing
Flushing the cache is something we often do with Drush. There is a simple command for cache clearing shown in the code snippet and image below:
drush cc


[a6816d38@cloudhost-112190 html]$ drush cc

Query Output
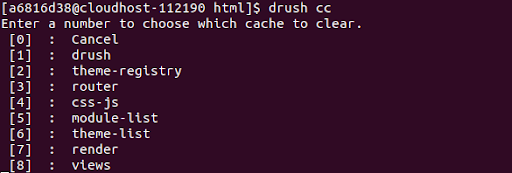
This query output shown in the code snippet and image below will show you a list of the types of cache you can delete:
[a6816d38@cloudhost-112190 html]$ drush cc
Enter a number to choose which cache to clear.
 [0]  :  Cancel
 [1]  :  drush
 [2]  :  theme-registry
 [3]  :  router
 [4]  :  css-js
 [5]  :  module-list
 [6]  :  theme-list
 [7]  :  render
 [8]  :  views
You can type a number that indicates a specific cache type. By running the command shown in the code snippet and image below, all the cache types will be cleared:
drush cc all

[a6816d38@cloudhost-112190 html]$ drush cc all

For Drupal 8 and above, you will want to apply the cache-rebuild command shown in the code snippet and image below instead:
drush cache-rebuild


[a6816d38@cloudhost-112190 html]$ drush cache-rebuild

Command Output
This output shown in the code snippet and image below will display the cache rebuild status:
[a6816d38@cloudhost-112190 html]$ drush cache-rebuild
Cache rebuild complete.

Drupal Search Index Rebuild
Using a cron job, Drupal rebuilds its search index at fixed intervals. However, the index can be rebuilt immediately if you prefer on command. To execute this kind of immediate reindexing action, type the command shown in the code snippet and image below:
drush search-reindex


[a6816d38@cloudhost-112190 html]$ drush search-reindex

When you are prompted to take action, type Y to continue. Reindexing may take some time to finish depending on the size of your website.
Downloading a Module
Modules add new features or alter existing functionality in Drupal. You can use modules contributed by others or create your own. For example, you could use the command shown in the code snippet and image below to make use of a module:
drush dl module_name


[a6816d38@cloudhost-112190 html]$ drush dl module_name
Replace the module_nam with the name of the module you want.
To download several modules at once, add them to the end of the command. For instance, to download the views and token modules at the same time, type the drush dl views token command shown in the code snippet and image below :
[a6816d38@cloudhost-112190 html]$ drush dl views token
There are some instances of modules like that of composer_manager, which require additional PHP configuration steps to be taken (for example, allow_url_fopen must be enabled). The allow_url_fopen configuration can be enabled by adding the code shown in the code snippet below in the .user.ini file:
allow_url_fopen = On;
If you encounter any errors, contact support for further assistance.
Enabling a Module
In order to enable the downloaded module, use the below command shown in the code snippet below:
drush en module_name
Type Y to install any dependencies for the module, and then press Enter. Drush will display [ok] when the module has been successfully enabled.
Disabling a Module
In order to disable the existing module, use the below command shown in the code snippet below:
drush dis module_nameType Y when you see the Do you really want to continue? prompt. Then press Enter. Drush will display [ok] when the module has been successfully disabled.
Module List
To view the lmodules, installed, disabled, enabled, and not installed, use the below command shown in the code snippet and image below:
drush pml


[a6816d38@cloudhost-112190 html]$ drush pml

Uninstall a Module
To uninstall a module from Drupal, use the following command shown in the code snippet below:
drush pm-uninstall module_nameThis action will also eliminate the database tables corresponding to that module.
About Drupal Themes
Modules can be installed easily as documented in the previous sections. So how does one install themes? Drupal Themes can be installed by following the exact same procedure as used for Drupal Modules. The acts of activating and downloading themes follow the same steps as those used for installing modules.
Detailed information on Drupal Module Projects and how to search for modules can be found at Drupal.org.
Drupal Updates
A Drupal Core Update can be performed via Drush. Ensure that you have backed up your database and website first. The command shown in the code snippet below can be used to check if your Drupal site needs any updates:
drush up


[a6816d38@cloudhost-112190 html]$ drush up
After Drush checks for updates, the Do you really want to continue? prompt and page shown will inform you if there are any updates. Press Y and continue. In the case of no updates, Drush will display No code updates available and exit.
Creating the User
It is an essential part of Drupal development to deal with user accounts. You can create the user using the below command shown in the code snippet and image below:
drush user:create username


[a6816d38@cloudhost-112190 html]$ drush user:create Nexcess_support

Command Output
This output shown in the code snippet and image below will show you the user creation status:
[a6816d38@cloudhost-112190 html]$ drush user:create Nexcess_support
 User ID       :  3
 User name     :  Nexcess_support
 User roles    :  authenticated
 User status   :  1

Setting the Password for the User
A user's password can be set using the user-password command shown in the code snippet. The alias for this command is upwd:
drush user:password username "Password"


[a6816d38@cloudhost-112190 html]$ drush user-password Nexcess_support --password=">Ws2ATXT3@Q.3qd7"
OR
[a6816d38@cloudhost-112190 html]$ drush upwd Nexcess_support --password=">Ws2ATXT3@Q.3qd7"
You can also use the same command to change the password for existing users.
Status Output
This output shown in the code snippet and image below will show you the user creation status:
[a6816d38@cloudhost-112190 html]$ drush user-password Nexcess_support --password=">Ws2ATXT3@Q.3qd7"
Changed password for Nexcess_support

You can view the information on a specific user using the following command shown in the code snippet and image below:
drush user:information username


[a6816d38@cloudhost-112190 html]$ drush user:information Nexcess_support

Information Output
This output shown in the code snippet and image below will show you the user information:
[a6816d38@cloudhost-112190 html]$ drush user:information Nexcess_support
 User ID       :  3
 User name     :  Nexcess_support
 User roles    :  authenticated
 User status   :  1


[a6816d38@cloudhost-112

Import and Export Drupal Database
The backup and restoration steps involved with a Drupal databases are made easy with Drush.
Type the command shown in the code snippet and image below to take backup of Drupal database:
drush sql-dump --result-file=Nexcessdbname.sql


[a6816d38@cloudhost-112190 html]$drush sql-dump --result-file=a6816d38_eaad5d.sql

Command Output
This output in the image below will show you status of the database dump:

The above command will save the SQL code used for the database in the file name a6816d38_eaad5d.sql. Any name can be given to the file in the file name format of Nexcessdbname.sql.
To restore the database from a backup file, use the appropriate commands and steps as found at Drupal.org.
How to Back Up & Restore a Drupal Site
The Drush | Drupal software makes it easy to back up and restore an entire Drupal site. Backup sets include the site's files, databases, and code.
Use the command shown in the code snippet and image below to archive the entire site:
drush ard


[a6816d38@cloudhost-112190 html]$ drush ard

Command Output
This output in the code snippet and image below will show you status of the back up and restore action:
[a6816d38@cloudhost-112190 html]$ drush ard
Database dump saved to /tmp/drush_tmp_1643564131_61f6cc6356866/a6816d38_eaad5d.sql                                                                                                              [success]
Archive saved to /home/a6816d38/drush-backups/archive-dump/20220130173523/a6816d38_eaad5d.20220130_173523.tar.gz                                                                                [ok]
/home/a6816d38/drush-backups/archive-dump/20220130173523/a6816d38_eaad5d.20220130_173523.tar.gz

To restore the Drupal site from a set of archived files, use the appropriate commands and steps as found at Drupal.org.
Drush & Drupal Conclusion
In essence, Drush | Drupal is a command-line shell and scripting interface designed to make life easier for people who spend their working hours at the command line.
You can use the CLI to set up Drush aliases, which allow you to run Drush commands on specific platform environments.
Yet there are a lot of advanced commands that are worth learning. For more information about Drush, please visit Drush.org.
Drupal at Nexcess
Check out the Drupal Plans on Nexcess:
- Nexcuss Drupal Hosting: Drupal Development Realized With the Promise of Cloud Hosting
- Nexcess Drupal Enterprise Hosting: Drupal Enterprise Hosting Managed Drupal Clusters Engineered To Support Your Development
Do you have any concerns about moving from Drupal to WordPress? Let's discuss them.
24-Hour Assistance
If you need any assistance with the above-mentioned, don't hesitate to reach out. For 24-hour assistance any day of the year, Nexcess customers can contact our support team by email or through your Client Portal.
Consider Hosting with Nexcess
Try the best-in-industry hosting! Check out our Fully Managed WordPress Plans !
Any contact form plugin will be of no use to your WordPress site if it is not hosted with a decent hosting company. Here at Nexcess, we provide the best WordPress and WooCommerce hosting, fully optimized for speed and performance.
On top of that, we offer automatic WordPress core and plugin updates, free SSL certificates, and an unsurpassed support team. Additionally, 30-day backups included in every plan will ensure the safety and integrity of your data. Hosting optimized for the industry's leading platforms, including Managed WordPress Hosting, Managed WooCommerce Hosting, and Managed Magento Hosting: Faster Speeds, Stronger Security, Inherent Scalability and Trusted Support. Our range of hosting plans caters to any business scale. We do all the heavy lifting for you to focus on growing your business. In addition, we automatically update ore components and plugins to the latest version and ensure your hosting environment is properly optimized, secured, and updated. Nexcess infrastructure was specially designed to keep up the best speed and performance in the industry. No traffic surge can threaten your website to go down thanks to our autoscaling technology which adds more resources to your server to handle the load. In addition, we offer always-on security monitoring and support from web hosting experts 24/7/365 and a built-in CDN with 22 locations and advanced caching for ultra-fast loading. Need a No-Code Website Building Solution? Are you on an accelerated schedule and already ready to move forward? If you need to get started with your Nexcess StoreBuilder Solution sooner rather than later, check out these resources: Read more about the Fully Managed Cloud Environment by Nexcess and its benefits for your business. A Cloud Hosting Solution That Lets You Do Business Your Way We believe in the promise of cloud: scalability, security, performance, and ease of use. Together with our team, clients, and partners, we’ve built something better. Choose From Multiple Applications Whether you’re a small business or a high-traffic eCommerce store, our cloud hosting solutions are designed around your needs: auto scaling, PCI compliance, and comprehensive development tools provide you with maximum dynamic flexibility in a fully managed cloud environment. And there are many more! We also have a variety of Nexcess support articles about how best to implement our product offerings housed in the Nexcess Knowledge Base, including how to get your site going with a number of different configuration options. These resources include a great article on setting this up for Migrating to Nexcess with managed WordPress and managed WooCommerce hosting. Because we're different! Chris Lema captures "the why" in his passionate and stirring recount of a Nexcess support-related story. Need more help? The Applications, WooCommerce, and WordPress sections within the Nexcess Knowledge Base are important resources for those seeking additional knowledge. Not a Nexcess customer yet? Check out our fully managed hosting solutions. The option to chat with an expert is also available.
Build Better Sites and Stores With Fully Managed Hosting from Nexcess
All hosting plans include The Nexcess 30-Day Web Hosting Money Back Guarantee.
Are you looking for a cheat sheet for the steps involved for How to launch a WordPress site? 1. Define your purpose
2. Choose your domain name
3. Select your web hosting provider
4. Install WordPress
5. Pick out your WordPress theme
6. Install WordPress plugins
7. Customize your WordPress siteNext Steps with a Nexcess Cloud Hosting Solution?
We make applications easy with environment optimizations for:Why Choose Nexcess?
Useful YouTube > Nexcess Channel Links
Resources for More Information
The Applications section also contains valuable insights for those seeking additional knowledge about our other various hosted applications and platforms. Check out our related video playlists and articles below:
New Customers: Fully Managed Hosting Solutions
Related Articles


