


How to install Let's Encrypt, a type of self-generated SSL certificate available for Nexcess non-cloud clients.
What is Let's Encrypt?
Let’s Encrypt is an automated certificate authority (CA) that provides a free and easy way to generate the SSL certificates required for enabling HTTPS for your website. This method replaces the standard method of purchasing SSL certificates, but it has limitations as outlined in the next section.
SSL certificates: Let's Encrypt versus traditional
Let's Encrypt is designed to be easy and free. To accomplish this, it makes several concessions when compared to traditional SSL certificates:
-
Let's Encrypt certificates require renewal every 3 months. If you have any questions or concerns, please contact our 24-hour Support team by email or through the Client Portal.
-
Let's Encrypt does not offer as many options for customization, such as premium, wildcard, and extended validation certificates.
-
Let's Encrypt certificates will not provide your site with a Trust Seal or the Green Address Bar, though your site web address will include "https://" and show as "Secure" in a visitor's browser.
-
Let's Encrypt certificates do not include a warranty; traditional SSL certificates do.
-
Most certificate authorities (CAs) provide support with the creation and installation of SSL certificates; Let's Encrypt does not offer such support.
- More information about how to enable Let's Encrypt SSL cetifications on Managed WordPress and Managed WooCommerce plans click here.
Enabling Let’s Encrypt
ATTENTION: This method only works for Nexcess clients on physical (non-cloud) servers.
If you are a Nexcess client, you can use SiteWorx to provide the necessary information to Let’s Encrypt.
- If you have not already done so, contact our support team, who will enable Let’s Encrypt if they are able.
- Log in to your SiteWorx account.
- If you do not know your password, click Forgot your password on the login page.
- If you do not know the web address for your SiteWorx login page, either refer to your Welcome Email or contact our 24-hour support team for assistance.
- From the SiteWorx main menu, select Hosting Features > Domains > SSL.

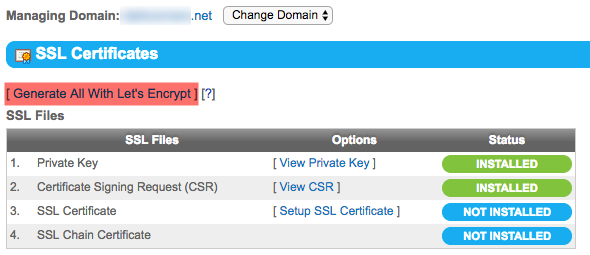
- In the SSL Files section, click Generate All With Let’s Encrypt.
- From the Common Name list, select the domain name to be used by the Let’s Encrypt certificate, then click Generate. If you wish to select multiple domain names, select each by pressing Ctrl or Cmd while clicking the domain name.

- If successful, your SSL Certificates panel will resemble what appears below:

For 24-hour assistance any day of the year, contact our support team by email or through your Client Portal.


