

The Hosts File is an essential tool to change how your computer views a particular website.
While most users will never need to alter their Hosts File, a web developer or user may need to modify the file to view a new site that is still under development.
To make your computer display your test website rather than the live site, you must add the test site's IP address, along with the domain name, to the Hosts File.
As long as that information is contained in your Hosts File, your browser will redirect the request to display the site on the specified IP address.
This allows us to test functionality without modifying the DNS for our production site.
We've included step-by-step instructions for locating the Hosts file, but you can also watch this video on how to edit the hosts file on Macs:
Hosts File Location on Macs
But where is the Hosts file on our Mac located, and how do we edit it? The Hosts file on a Mac is found in the /etc/hosts folder.
To edit the file, follow the steps below.
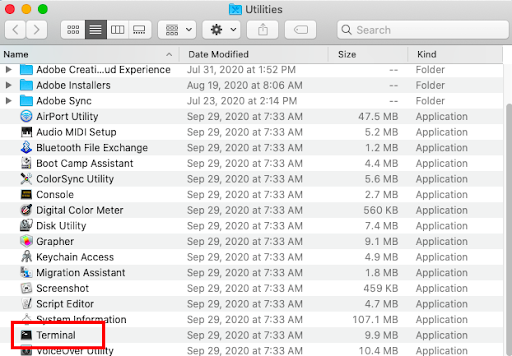
1. Launch the macOS Terminal application.
2. Go to the Finder, then Click Go.
3. Click Utilities.


4. Double-click Terminal to launch the Terminal window.

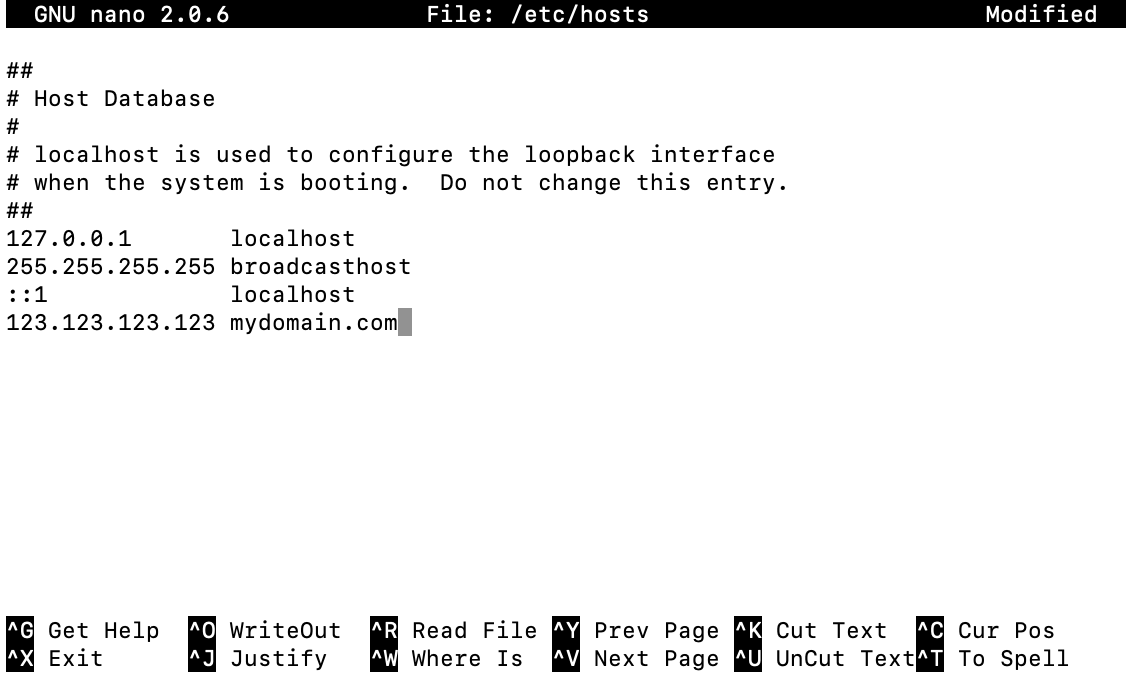
5. Now, enter the following command: sudo nano /etc/hosts
6. Then, enter the sudo password for your user to allow edit access to the file.
7. Next, use the arrow keys to move the cursor to the bottom of the file. On a new line, enter the testing server's IP address and the domain name you want to use for that IP address. (In the example below, we used the IP address 123.123.123.123 and the domain name mydomain.com)

8. Next, press Control+O to overwrite the existing file, then press Enter to confirm the overwriting. This saves the changes to the file.
9. Now, press Control+X to exit the nano editor.
10. Finally, to update our browsers DNS records and make these changes go live in your browser, enter the following command: sudo killall -HUP mDNSResponder


Final Thoughts: Finding a Hosts File on Macs
You have successfully edited your Hosts File and can now begin loading your test site from your testing IP address rather than your live server.
In need of a new hosting solution?
Consider hosting with Nexcess.
A reliable and high-performance web host is critical to your website's success. With Nexcess’ fully managed hosting, we take care of what matters most, so your website remains worry-free.
Get started with Nexcess' hosting solutions today.


