

Are you looking for a faster-loading WordPress site? A slow-loading website can be frustrating when the world around your demands for efficiency and fast load times. Having a fast-loading site improves both user experience and search engine ranking.

To optimize your site and improve page speed, you should have a Content Delivery Network (CDN), especially if you have visitors across the globe away from your hosting server.
What is a Content Delivery Network (CDN)?
When it comes to your website's performance, page speed is critical. A slow-loading site is one of the most common reasons customers leave you. Unfortunately, many businesses are unaware of how website loading time can affect search engine rankings and customer retention. Although many reasons may impede the speed of your website, you can work on increasing its load time by utilizing a Content Delivery Network (CDN).
The Content Delivery Network (CDN), also referred to as the "Content Distribution Network (CDN)," is a global network of servers through which you can enhance the speed of your site by hosting and distributing your static content from across the globe. As a result, CDNs help decrease network latency by loading content from servers close to visitors, thus lowering TTFBs. In addition, by reducing the distance data must travel between browsers and the host's servers, CDNs increase performance of your website by quickly serving up content to its visitors.
Benefits of integrating Cloudflare CDN with your WordPress site
You can significantly improve the performance of your WordPress site by integrating Cloudflare. A free CDN service like Cloudflare lets you use a global server network to deliver your website through its Automated Platform Optimization (APO) feature, thus fastening load times for your WordPress site.
Cloudflare is a distributed network of servers located all over the world that acts as a middleman between you and the server hosting the website you want to visit. In addition, Cloudflare automatically caches your website and removes the cached versions as soon as your site's images, text, or other content is updated:

With this simple-to-use Cloudflare plugin, all the controls can be managed directly from your WordPress dashboard. If you'd like to activate it without further customization, you can apply default settings with a single click and let it work its magic.
Those with an established online shop or blog could benefit from a Cloudflare paid plan at some point. If your site accepts private user information and online payments, you'll also want to consider it because it works hard to ensure your users' security.
Cloudflare WordPress setup: Cloudflare SSL/TLS settings
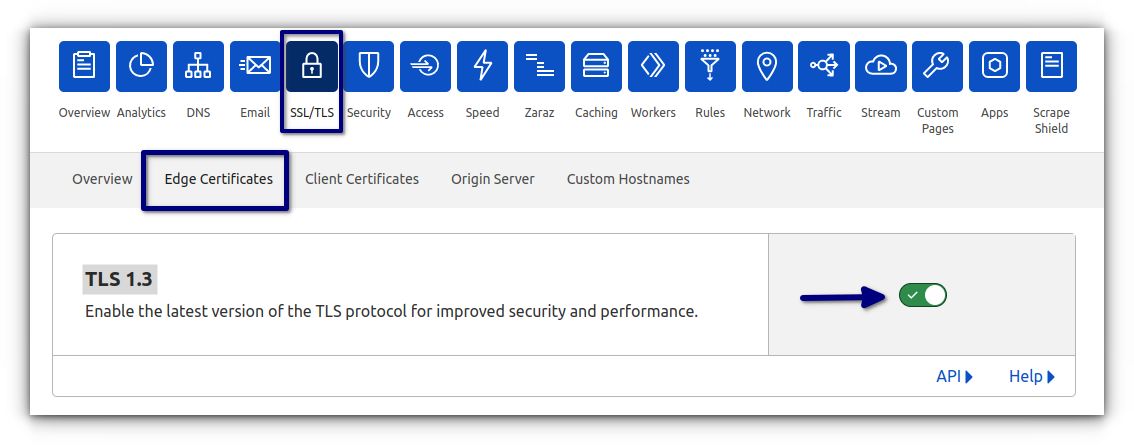
TLS 1.3
With TLS 1.3 enabled, HTTPS connections are much faster and more secure, reducing latency and improving the overall user experience. You can enable this version of TLS by navigating to SSL/TLS Tab > Edge Certificate > TLS 1.3 > Toggle > On Position:

The performance gains from TLS 1.3 are worthwhile.
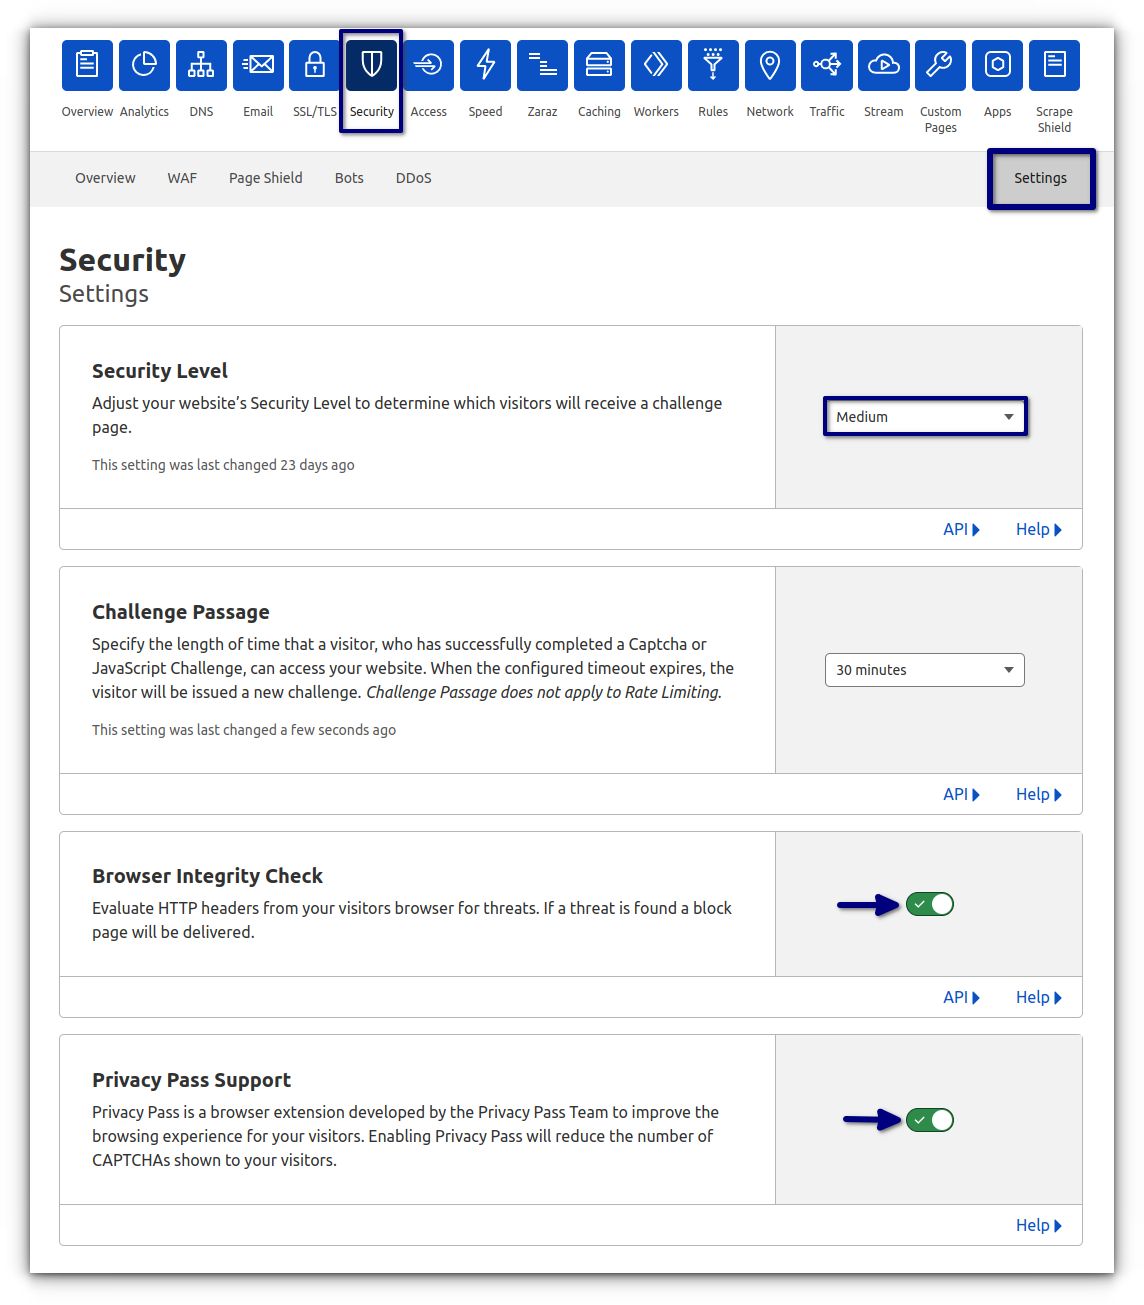
Cloudflare WordPress setup: Cloudflare security settings
Security level
The level of security will determine which visitors will be exposed to the challenge page. Cloudflare's recommended value for this setting is Medium, as it will protect your site to the fullest without causing inconvenience to your visitors.
Anything above the security levels of Essentially Off, Low, or Medium will impact your site performance and degrade user experience. If you want to understand more about the multiple Cloudflare Security Levels, you can refer to their linked article on the topic.
Additional security settings
The additional security settings are recommended:
- Challenge Passage: Recommended setting is between 15 to 45 mins
- Browser Integrity Check: Enabled
- Privacy Pass Support: Enabled
To apply the above settings, go to the Security Tab > Settings:

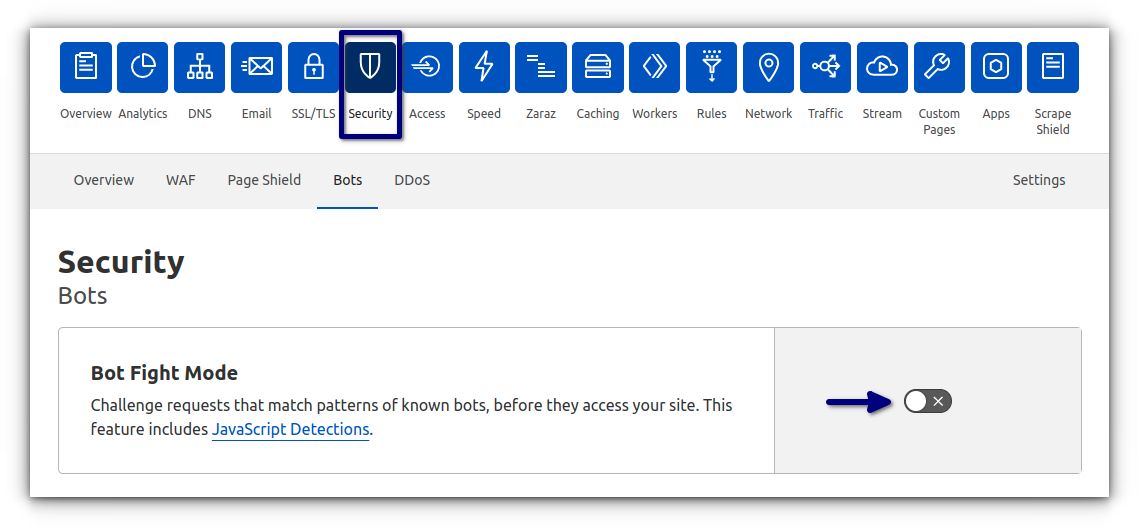
Cloudflare's Bot Fight Mode
Bot Fight Mode helps detect and mitigate bot traffic on your domain. When enabled, it identifies known bot traffic matching patterns. This option should be disabled unless you are dealing with security issues, as enabling Bot Fight Mode can affect performance and significantly increase CPU usage.
To activate Bot Fight Mode, go to the Security Tab > Bots > Bot Fight Mode > Toggle > On Position:

Cloudflare's Web Application Firewall (WAF)
Cloudflare's WAF Application Firewall monitors all incoming web traffic from the internet to a website and automatically blocks malicious traffic. In addition, the firewall is equipped with a ruleset that identifies patterns and signals that are used to filter unwanted traffic. Those on Cloudflare's free plan can now access a Web Application Firewall (WAF), which includes a ruleset that can block known threats automatically.
To create firewall rules, go to the Security Tab > WAF > Firewall Rules > Create Firewall Rule:

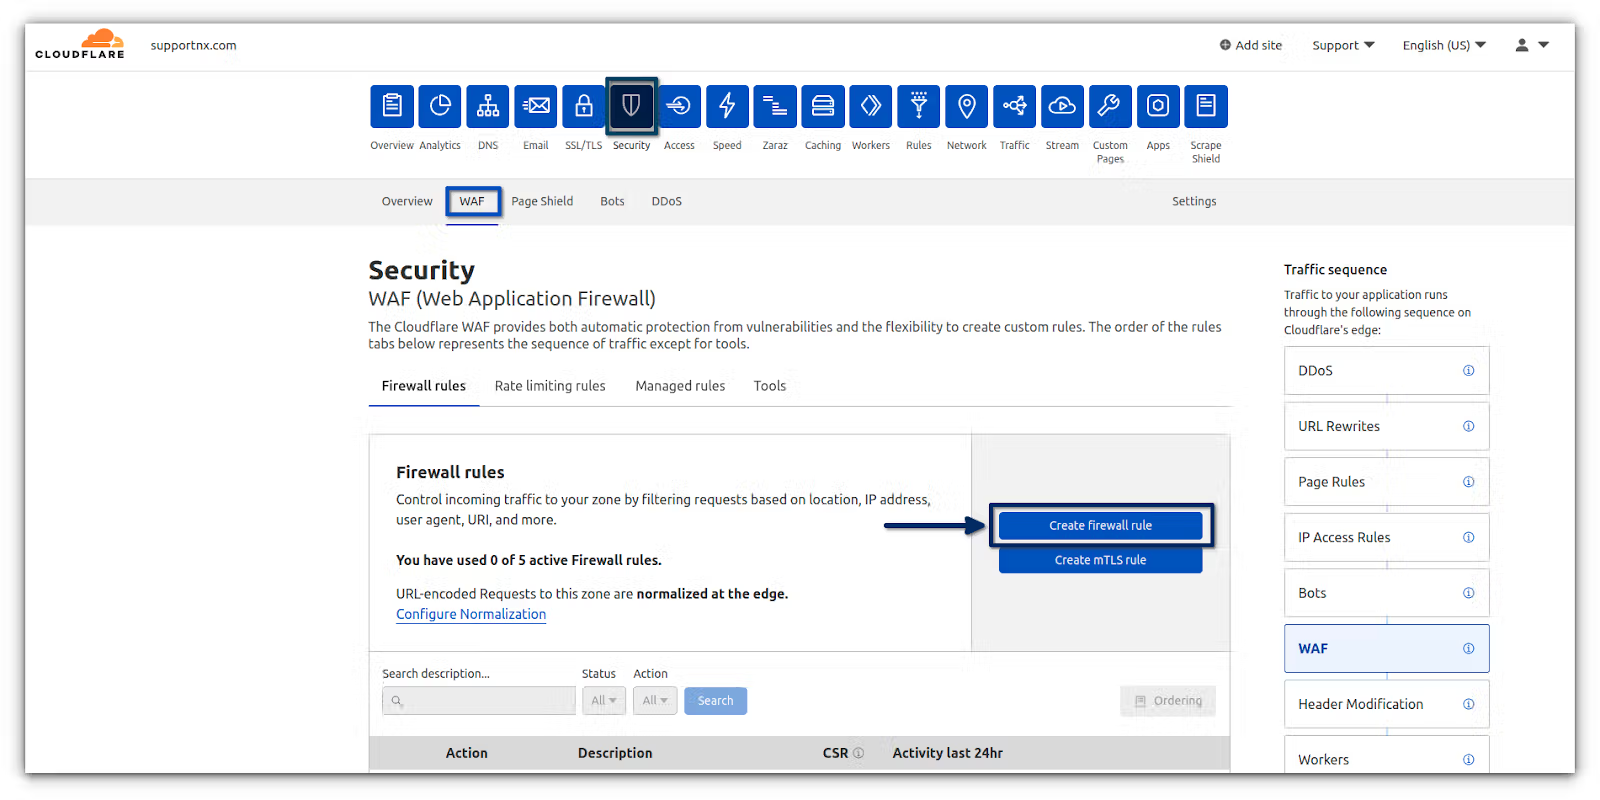
Here you can start adding new customized firewall rules.
DDoS attack protection
If your website is subjected to a DDoS attack, then Cloudflare can assist in combating DDoS attacks on your website. The Cloudflare service contains an option designed to be used when faced with a DDoS attack. To enable it, go to Overview Tab > Quick Actions > Under Attack Mode > Toggle > On Position:

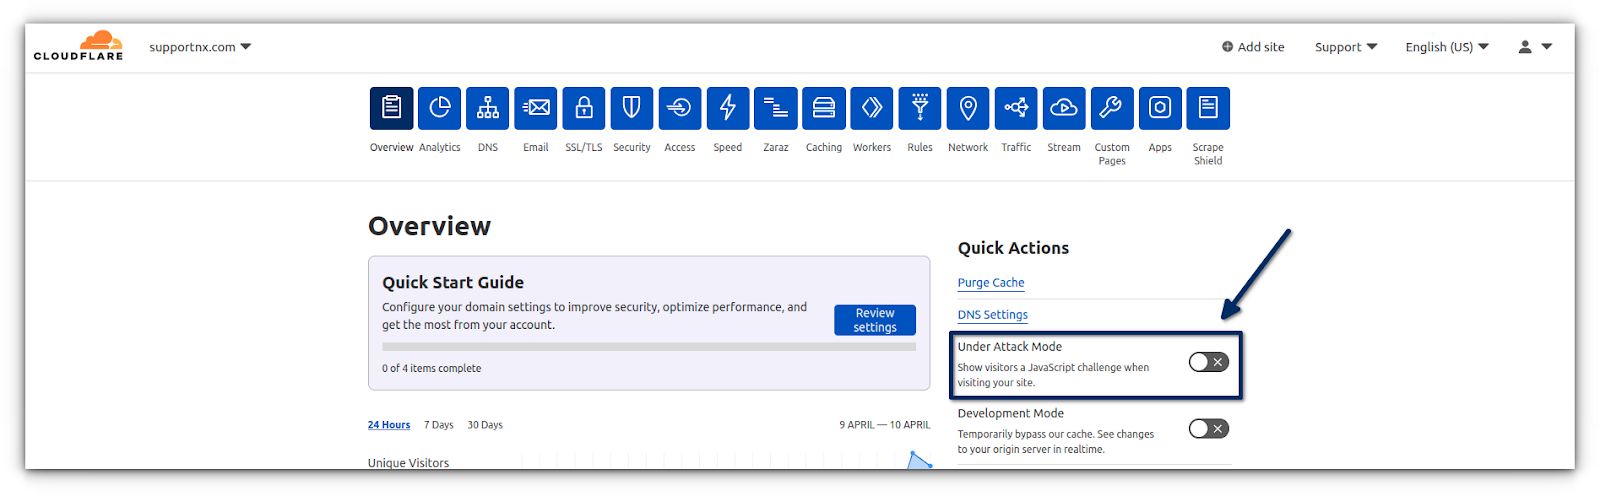
Once this option is enabled, website performance will significantly deteriorate. Each visitor to your website will be presented with a processing page for several seconds where Cloudflare will verify and confirm if the hit originated from a legitimate visitor, not a bot.
Cloudflare WordPress setup: Cloudflare network settings
HTTP/3
The HTTP/3 is the next version of the HTTP protocol. Although it has yet to be widely adopted on the web, its usage is proliferating. HTTP/3 differs from previous versions of the protocol by using User Datagram Protocol (UDP) called QUIC instead of TCP.
As a result, the protocol is fast and secure, especially for today's Internet, as HTTP/3 can establish a secure session much faster than HTTP/2, which uses TCP and TLS. In general, your website users will benefit from significant improvements in performance, reliability, and security with HTTP/3 and QUIC.
0-RTT Connection Resumption
With 0-RTT Connection Resumption, the client and server can use cached information from a previous TLS session to establish a new one without needing to re-negotiate their parameters.


Ensure both HTTP/3 (QUIC) and 0-RTT are enabled for your WordPress website. This option is under the Network section on your Cloudflare Dashboard shown above.
Cloudflare WordPress setup: Cloudflare caching settings
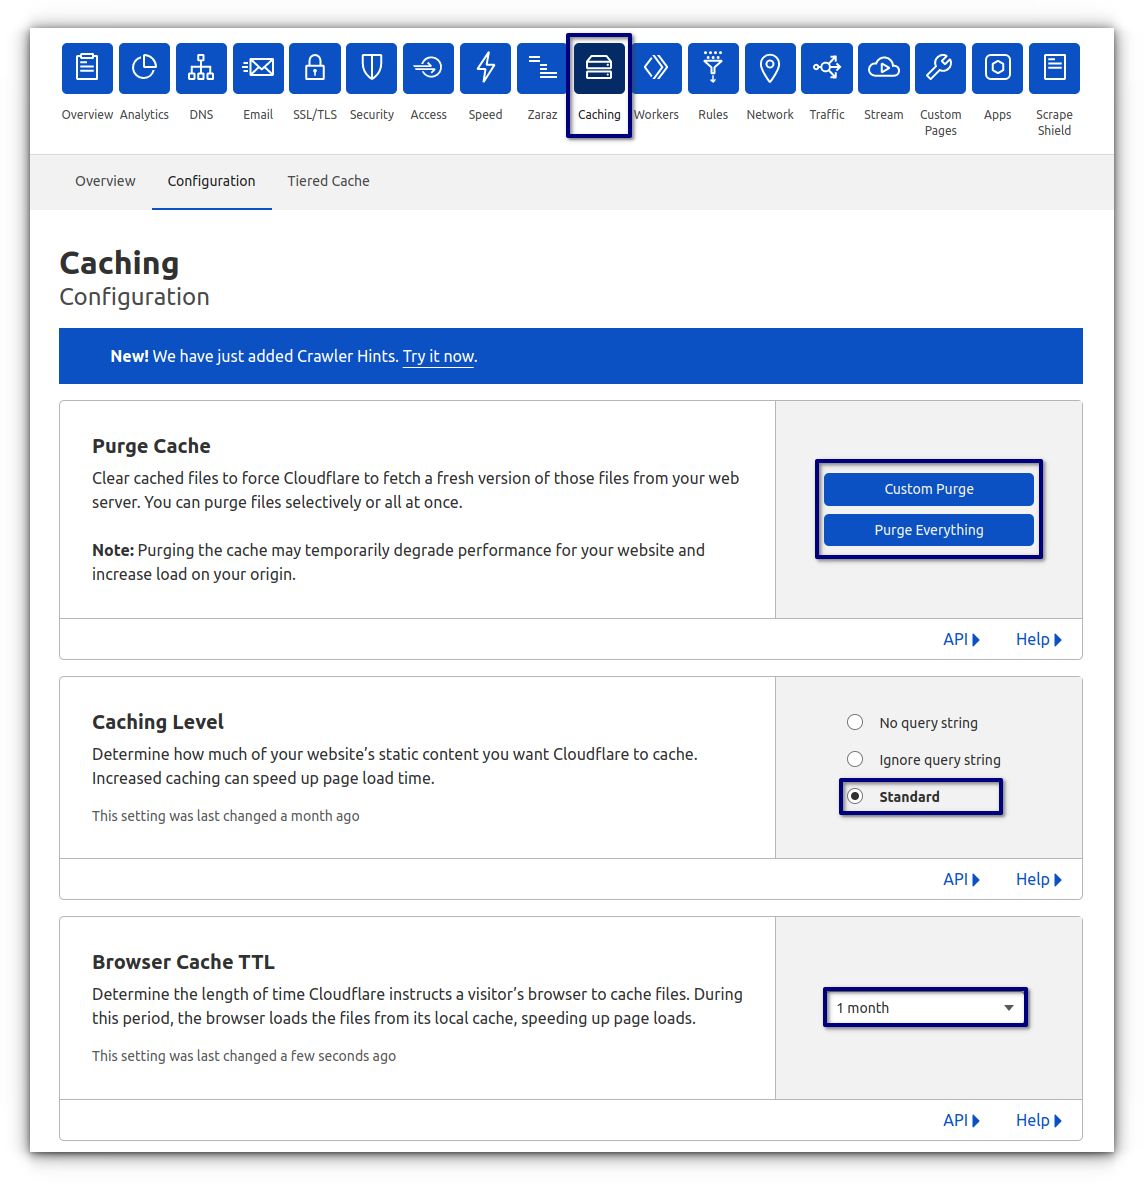
Purge Cache setting
The Purge Cache section allows you to purge the Cloudflare cache in the way you configure. Optimizing this configuration is useful when making changes to your website or content.
Caching Level setting
The Caching Level section determines how much static content Cloudflare will cache. The recommended level of caching is the Standard level because it is the safest that can cache content with or without query string.
Browser Cache TTL setting
The Browser Cache TTL section specifies how long cached files will stay in your visitor's browser cache. Recommended length of time is one month or more. Setting the browser cache Time to Live (TTL) more than a month can help you with the following warning:
Page Speed Insights
"Serve static assets with an efficient cache policy'."
Please note that Google requires that your cache headers be at least 30 days old or older.
To enable all of the above settings, navigate to the Caching Tab > Configuration:

Cloudflare WordPress setup: Cloudflare Page Rule settings
With Cloudflare, all customers can cache HTML files allowing static HTML to be stored at Cloudflare's edge servers without regenerating it at every request. Learn more about Caching static HTML with WordPress/WooCommerce. in the related article.
To cache additional content at Cloudflare, you must add a Cache Everything Page Rule. Unless you create this rule, dynamic assets will not be cached even if they return a Public Cache-Control Header. The Cache Everything Page Rule removes cookies from the origin web server response when combined with an Edge Cache > Time to Live (TTL) > 0 (greater than zero).
In the case of a site running WooCommerce, you would want to exclude the cart, checkout, and my account pages from static HTML caching with regard to Cloudflare.
To enable Cloudflare full page caching (Cache Everything Page Rule) on your WordPress site, Go to Rules > Page Rules > Create Page Rule and add a page rule like the one shown below.
Make sure your actual domain name replaces the example text string of https://mydomain.com/* that is shown in the screenshot below:

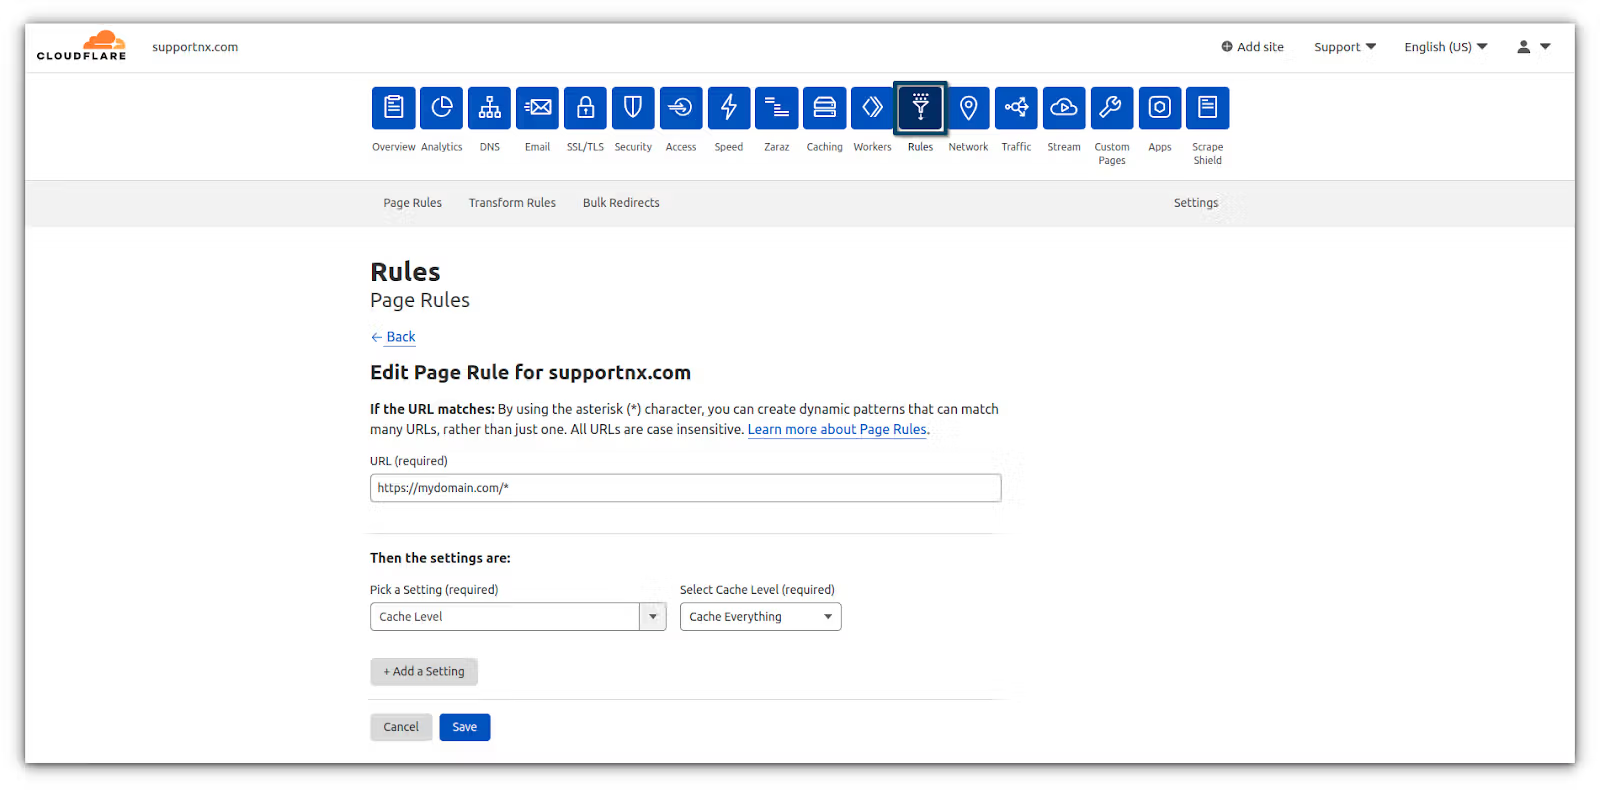
To configure the Cache Everything Page Rule in Cloudflare follow these steps:
- Log into your Cloudflare account and select the domain where you want to add the page rule.
- Click Rules > Page Rules > Create Page Rule.
- Under the "If the URL matches" section, enter the URL or URL pattern that should match the rule (for example, https//:yourdomain.com/*).
- Under the “Then the settings are” section, choose Cache Level and Cache Everything in the Cache Level dropdown list.
- Click on the Save button, and then the Deploy button to save the page rule.
- When multiple page rules are in place, the top page rule in the page rule list will be triggered first. So, you will need to select the page rule trigger to order the selection list.
- Now your website page header should show cf-cache-status as MISS or HIT. Verify the headers by checking the cache response returned by Cloudflare.
Cloudflare WordPress setup: Cloudflare speed settings
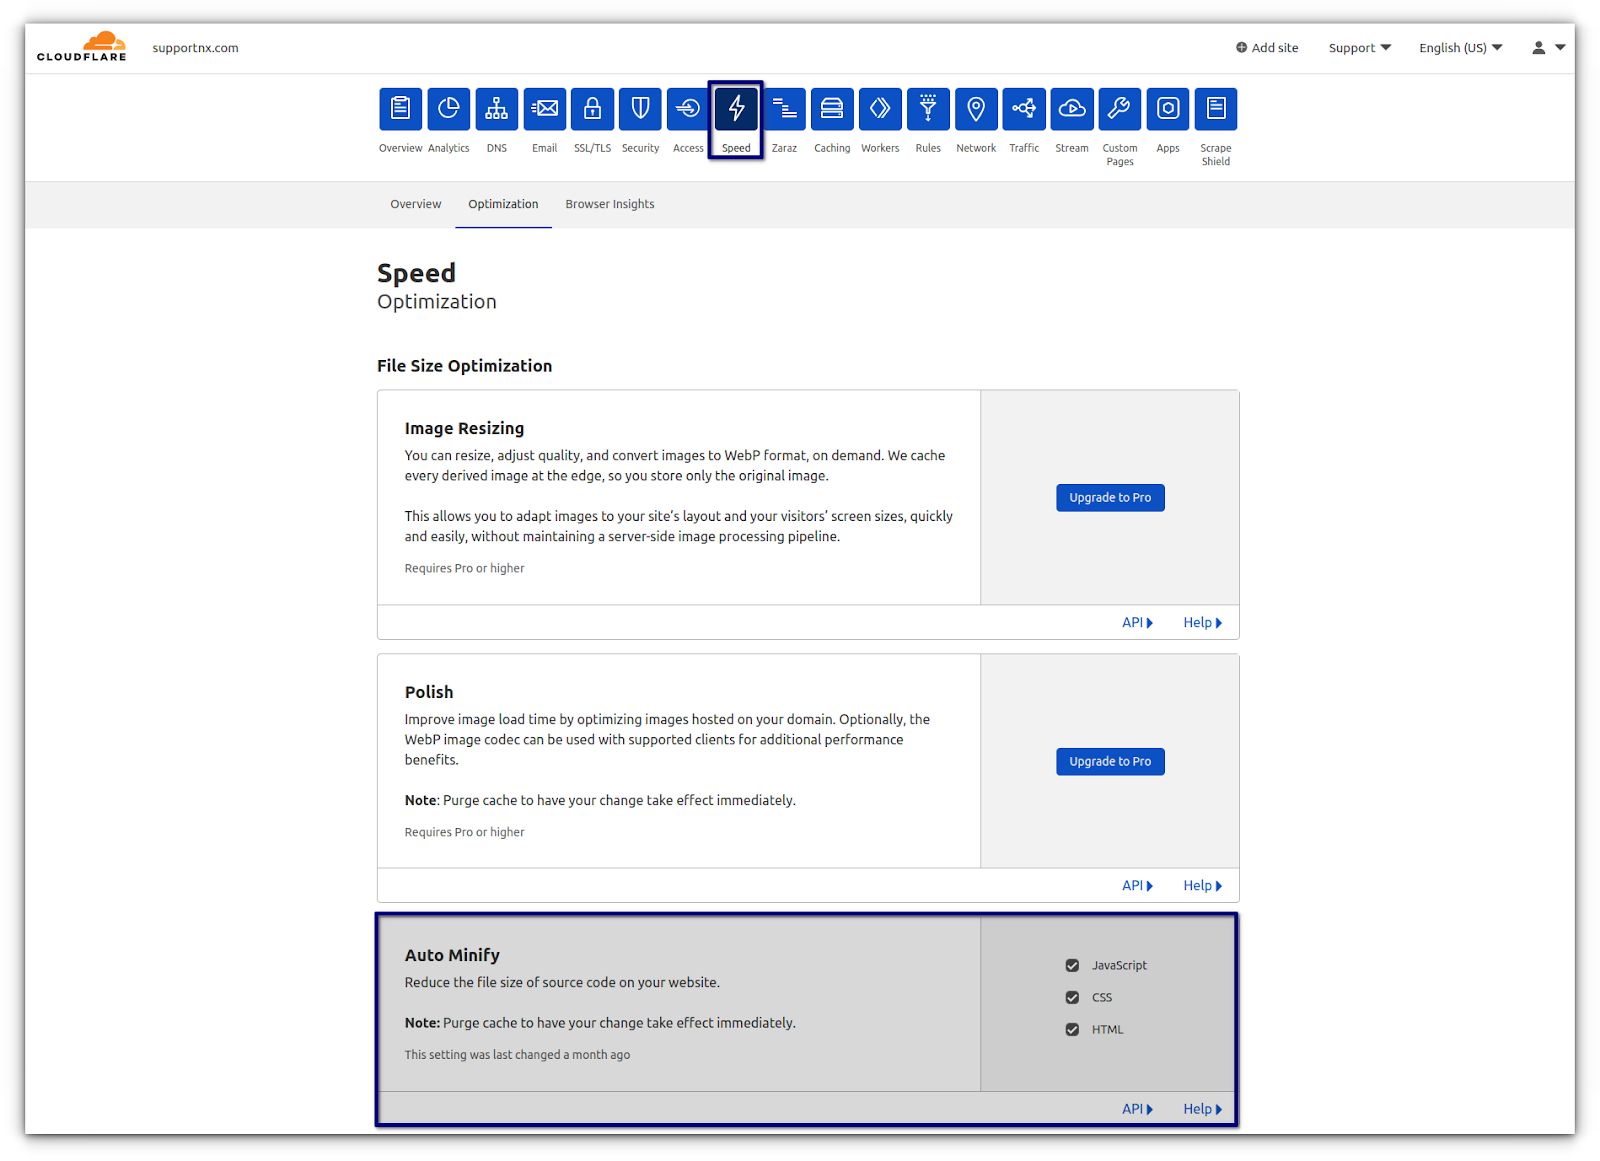
Auto Minify
To make your website load faster, you can minify your JavaScript, CSS, and HTML. Minifying HTML or CSS means removing spaces, comments, newlines, block delimiters, etc., in the code not needed to run correctly. Removing these unnecessary characters reduces the file size, thus speeding up the load time.
Cloudflare supports three different file types for minification:
- JavaScript
- CSS
- HTML
To enable Auto Minify, go to Speed > Optimization > Auto Minify. Then choose the auto-minify options you want to enable by checking the boxes to the left:

Brotli
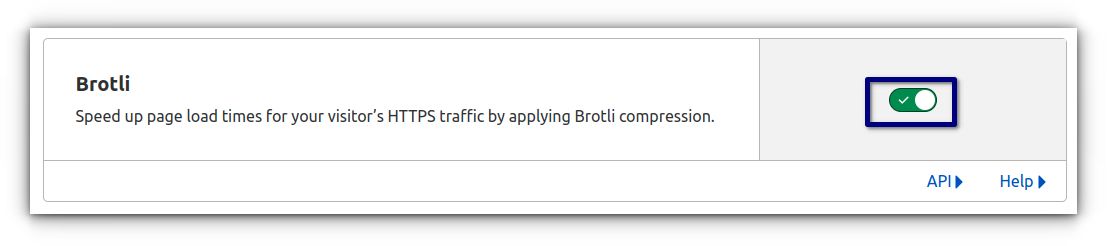
It is recommended that you enable Brotli. This compression algorithm is a new form of compression that is faster than GZIP. By enabling Brotli compression, you can reduce the size of files on your site and have them transmit faster to users' devices:

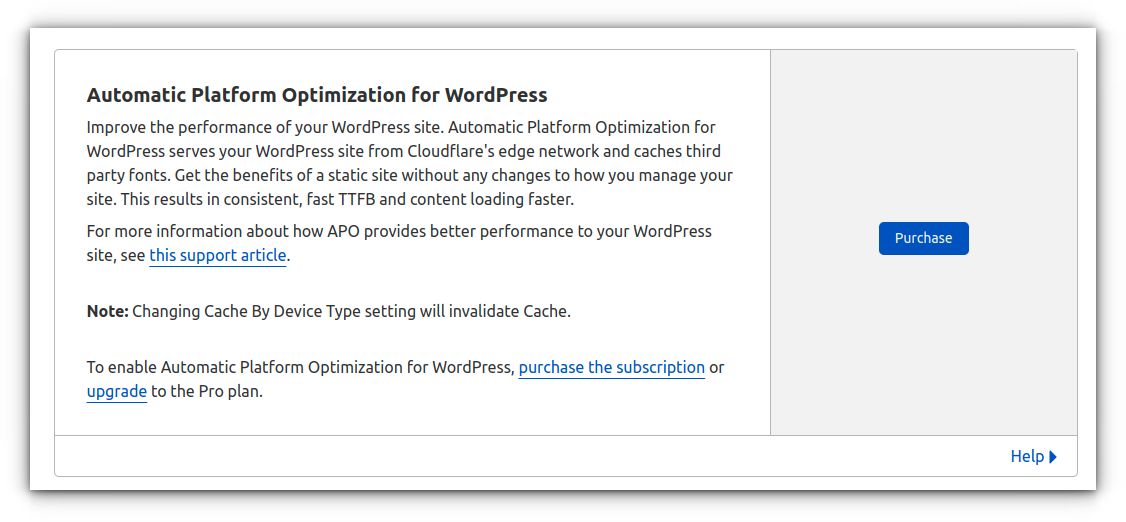
Automatic Platform Optimization (APO)
You can boost your WordPress site’s performance to the next level with Automatic Platform Optimizations (APO). With this feature enabled, Cloudflare can store both static and dynamic content and serve your entire WordPress site from its edge network, regardless of where your visitors are located, with the ability to keep copies of your site's data. In other words, by enabling APO, HTML assets no longer need to be served directly by the origin server from a single location. So even your web origin server will continue to be used to create and publish content, it won't directly serve HTML directly to your website visitors.
Automatic Platform Optimization (APO) for WordPress comes without additional charges for Cloudflare Pro, Business, or Enterprise customers. Cloudflare supports APO, with a $5/month add-on for free users.
To enable APO, go to Speed > Optimization. Then, scroll down a bit to find Automatic Platform Optimization for WordPress in your Cloudflare dashboard:

How to verify if APO integration works
Once you have activated the Cloudflare APO feature, you can verify its functionality by publishing a change on your WordPress site and looking into the page's response headers. For example, if APO is working, you will see:
cf-cache-status
cf-apo-via
cf-edge-cache
Visit Cloudflare’s Verify APO works page to learn more.
You can also verify the same via cURL:
$curl -svo /dev/null -A "CF" https://www.example.com -H 'accept: text/html' 2>&1 | grep 'cf-cache-status\|cf-edge\|cf-apo-via'
The result should look like this:
< cf-edge-cache: cache,platform=wordpress
< cf-cache-status: HIT
Limitations with APO
Although Cloudflare APO gives you the experience of set it and forget it on your WordPress website, a few limitations are observed.
Common problem #1: Cloudflare APO takes precedence over Page Rules
If you already have Cloudflare page rules configured on your domain and then activate the APO feature, the precedence for those page rules will be after the APO feature.
The Order of Precedence follows this hierarchy with page rules being ignored when higher level rules are in place:
Firewall Rules > APO > Page Rules
For instance, if you have a page rule called Cache Everything'or a Cache Bypass Page in place for a specific URL and you also have the APO feature activated, any page rules added for the site will be generally ignored by the APO.
An immediate fix would be to disable the APO feature and to keep using the Cloudflare page rules instead that have been set up.
Common problem #2: Cloudflare APO is designed for WordPress-based sites only
Cloudflare APO is only for WordPress and no other CMS platforms. Activating this for other CMS can cause issues as discussed in the following article:
Speed up WordPress with Cloudflare APO
Cloudflare WordPress setup references
- https://support.cloudflare.com/hc/en-us/articles/236166048-Caching-Static-HTML-with-WordPress-WooCommerce
- https://support.cloudflare.com/hc/en-us/articles/218411427-Understanding-and-Configuring-Cloudflare-Page-Rules-Page-Rules-Tutorial-
- https://blog.cloudflare.com/automatic-platform-optimizations-starting-with-wordpress/
- https://developers.cloudflare.com/automatic-platform-optimization/reference/page-rule-integration
- https://docs.wp-rocket.me/article/1444-is-wp-rocket-compatible-with-cloudflare-apo
Cloudflare CDN setup on your WordPress site
The steps listed below outline the general workflow for setting up Cloudflare CDN on you WordPpesss site:
Step 1: Creating a Cloudflare account
Step 2: Adding domain name to Cloudflare
Step 3: Choose your plan
Step 4: Review DNS settings
Step 5: Change your nameservers
Step 6: Setup HTTPS/SSL with Cloudflare
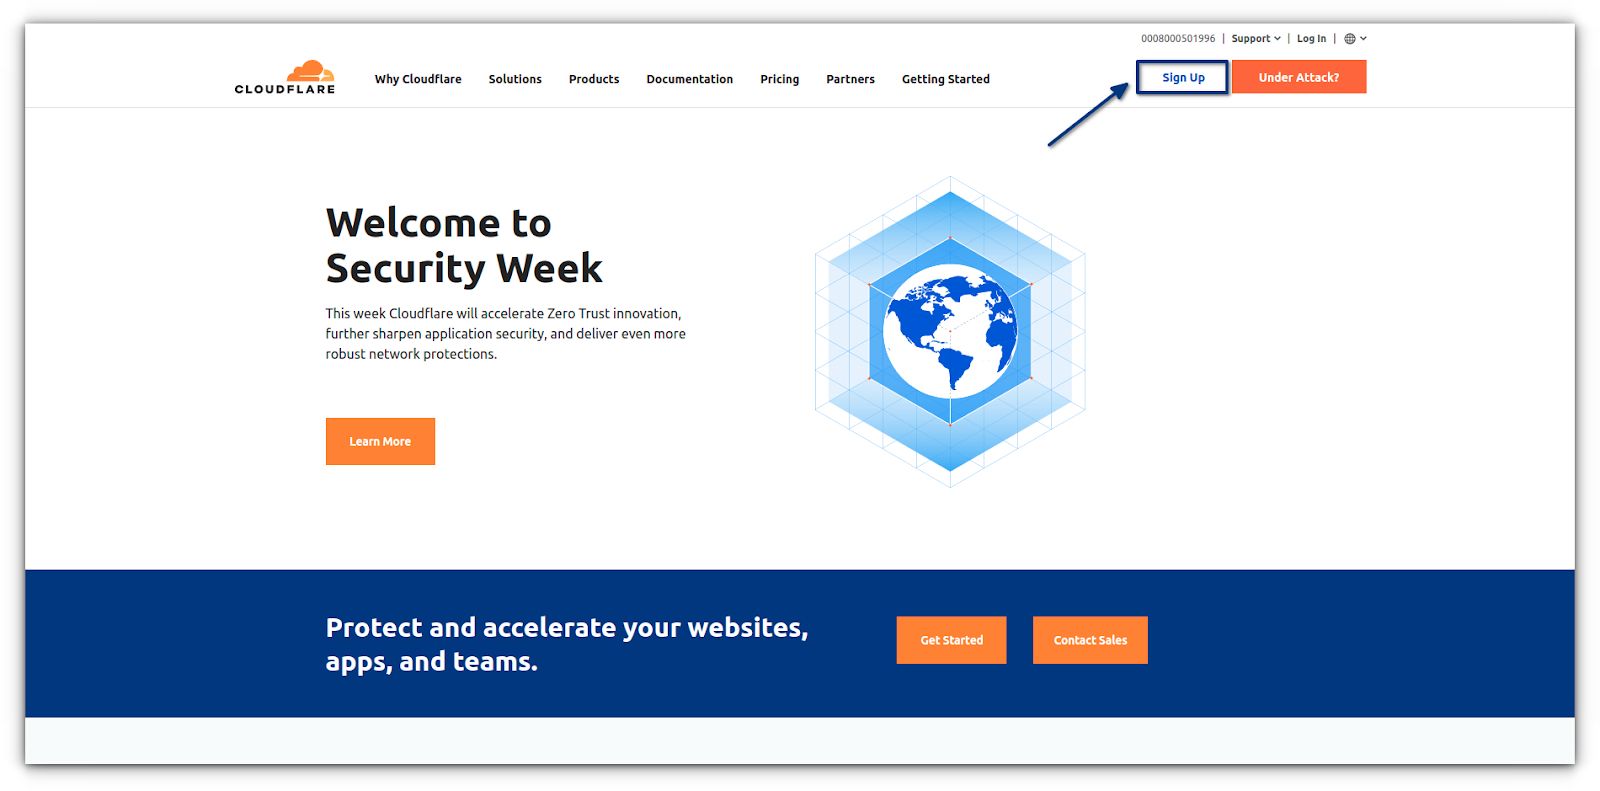
Cloudflare WordPress setup step #1: Creating a Cloudflare account
If you do not have a Cloudflare account already, then to begin, you need to visit the Cloudflare website and click on the Sign Up button:

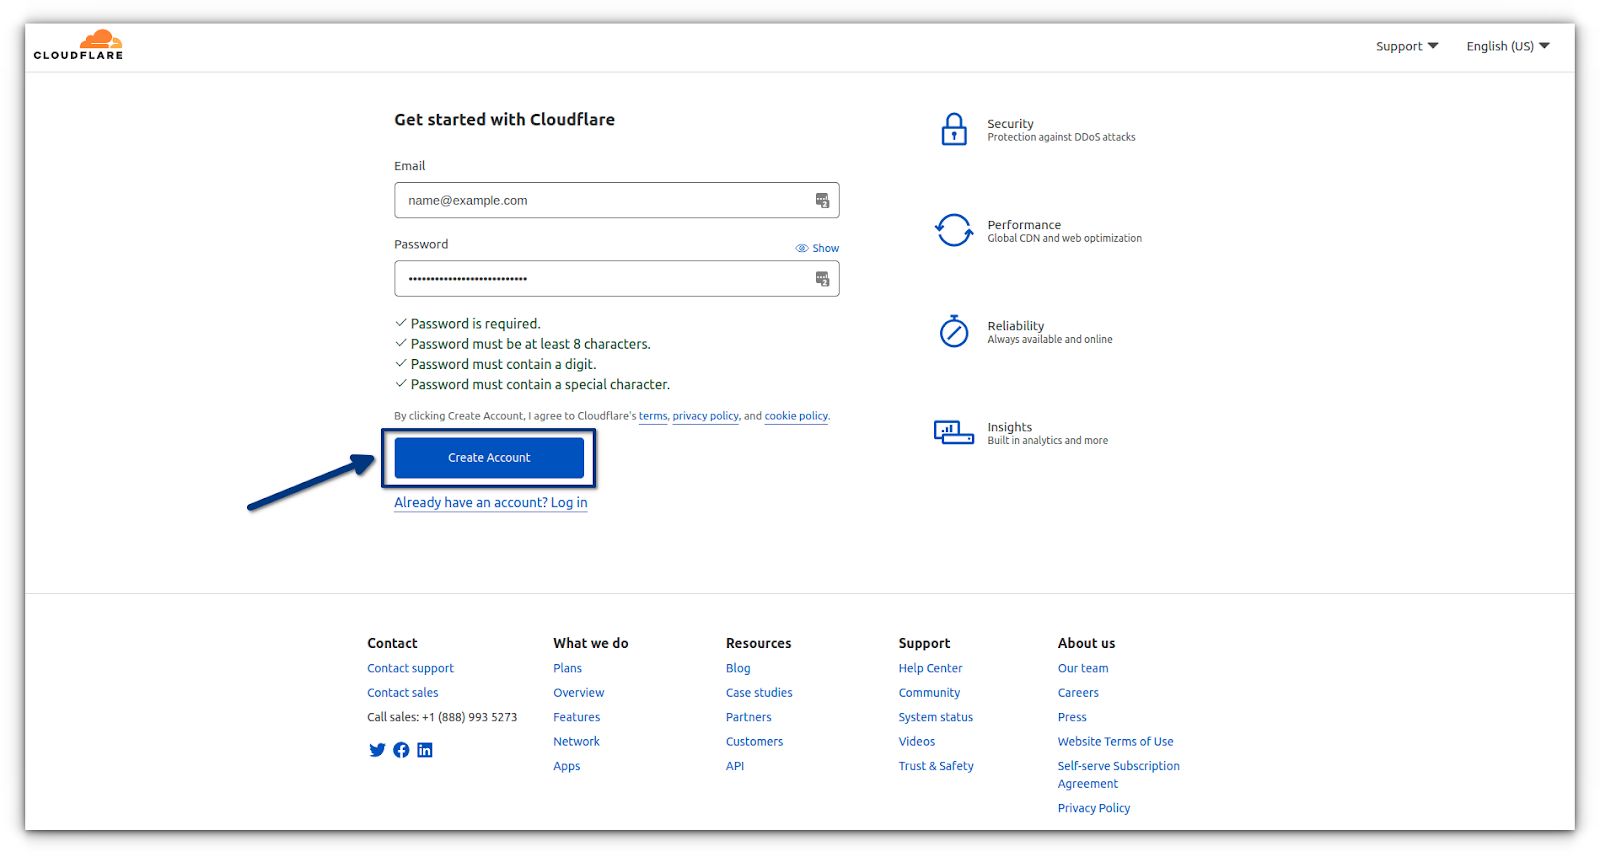
Enter your email address and password on the next page to create a Cloudflare account. Simply enter the information required, and then click on the Create Account button:

You now have a Cloudflare account but you will need to add your website to access the services.
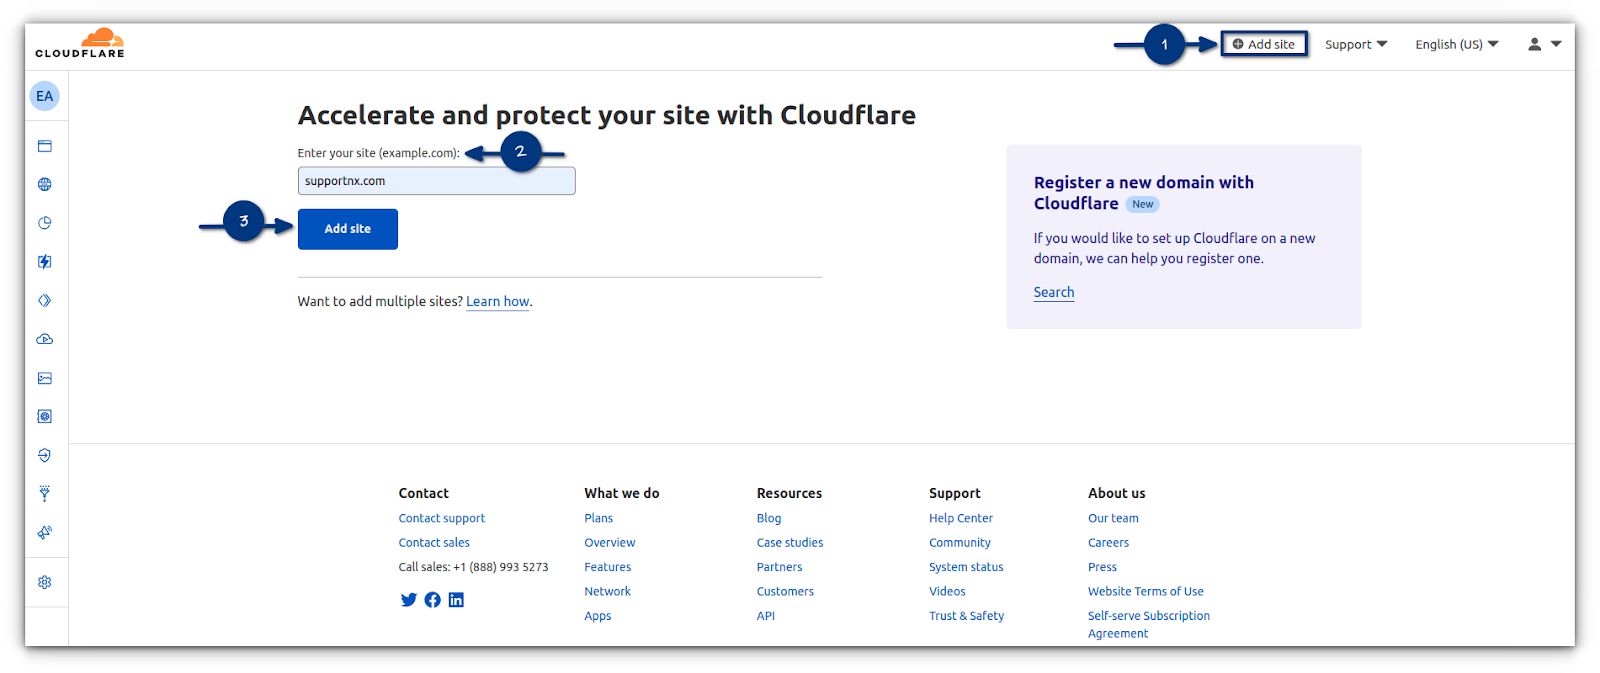
Cloudflare WordPress setup step #2: Adding domain name to Cloudflare
Once you have created an account at Cloudflare, find the +Add Site button at the top right of the screen. Enter your domain name into the box. If you are pasting it, remove the http:// and www parts from the front of the domain. Cloudflare allows users to add as many websites as they want, even for the free version:

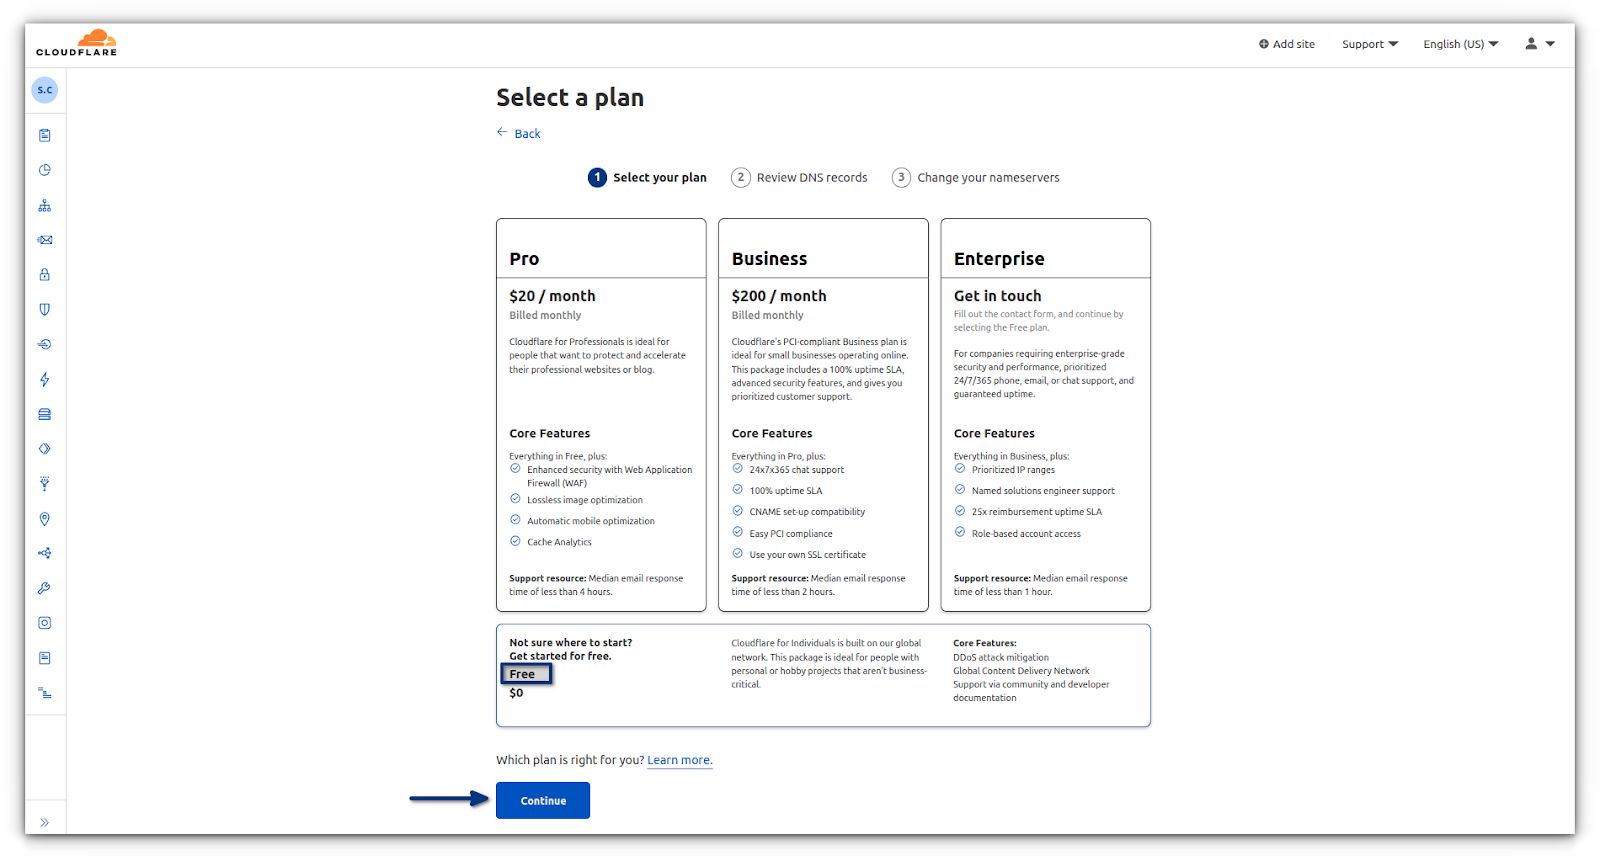
Cloudflare WordPress setup step #3: Choose your plan
We recommend choosing the free version as it comes with all the needed basic features like SSL, DDoS protection and etc., to protect your website from online threats and enhance its loading speed.
A high-traffic website or online store can benefit from Cloudflare's Pro or Business plans, which include automatic website updates and more security features. You can review their plans using the https://www.cloudflare.com/plans/ URL:

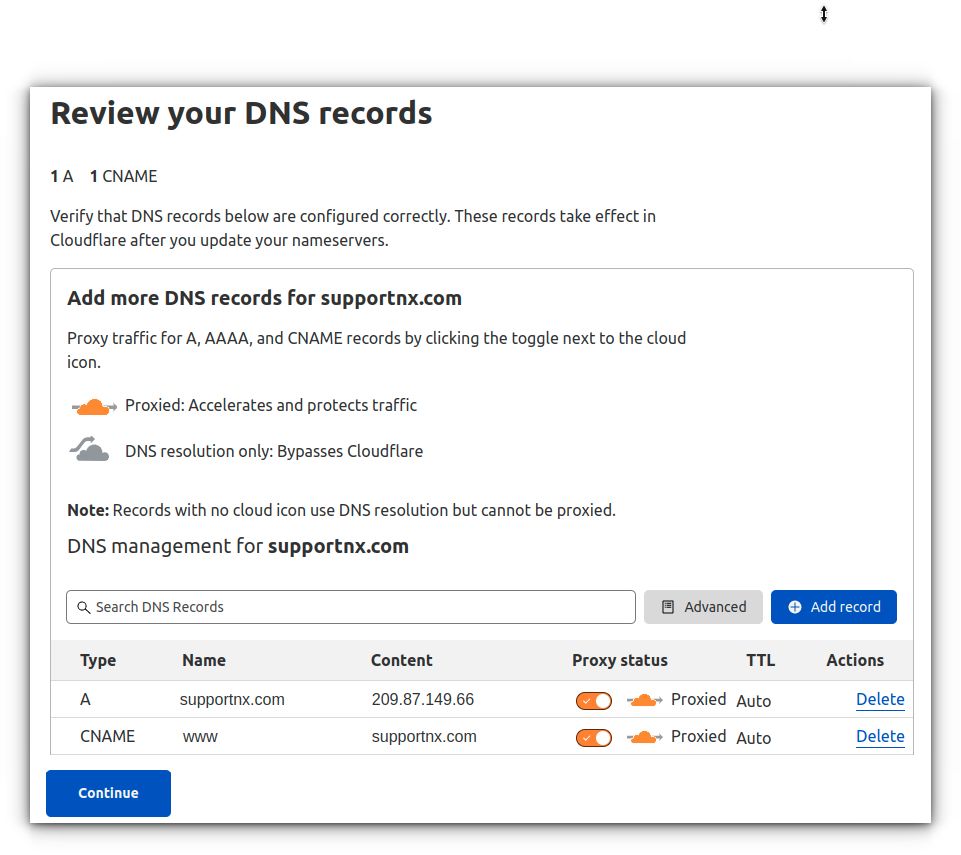
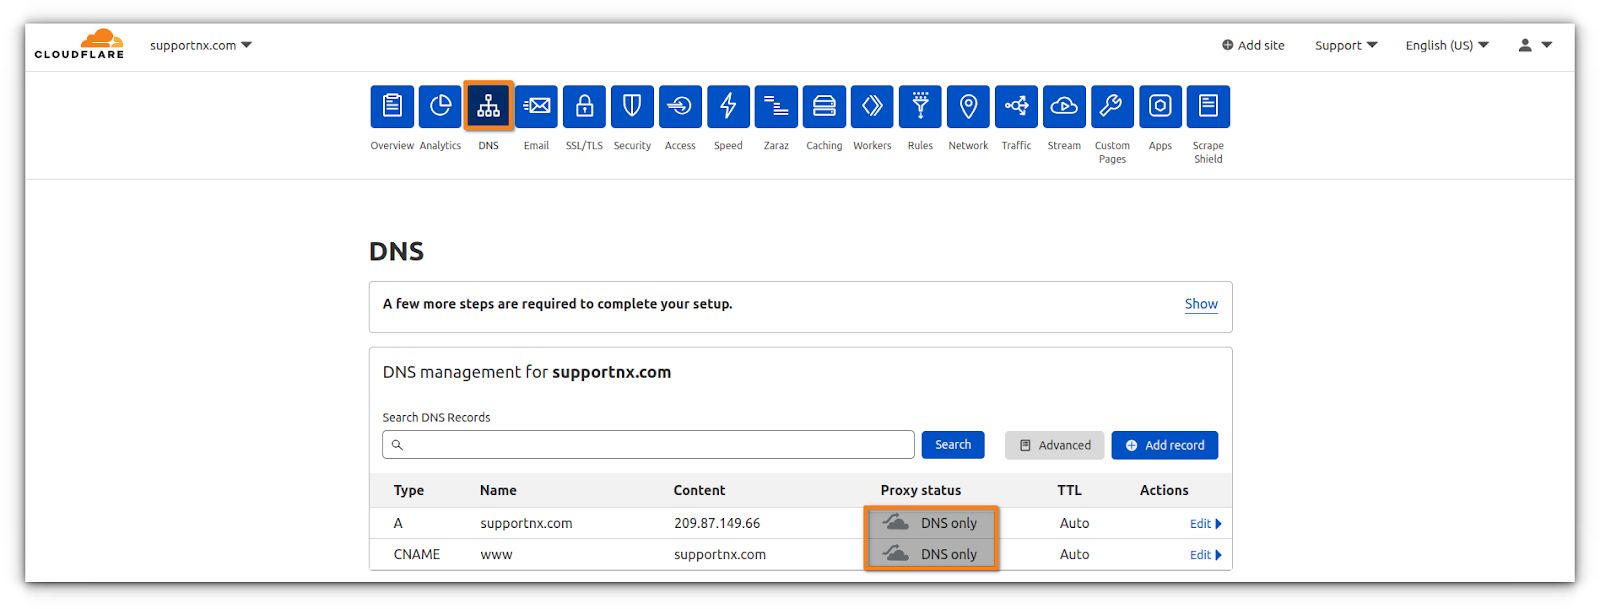
Cloudflare WordPress setup step #4: Review DNS settings
Upon adding the domain to your Cloudflare account, their system will show you a list of DNS records found. This will include subdomains as well. DNS records that you want to be routed through Cloudflare will have an orange cloud icon. DNS records bypassing Cloudflare will be identified by a gray cloud:

Cloudflare WordPress setup step #5: Change your nameservers
Lastly, you need to point your domain name to the Cloudflare nameservers. These should be done at your current domain registrar. If your domain is hosted by Nexcess, follow our guide on how to configure Nameservers:

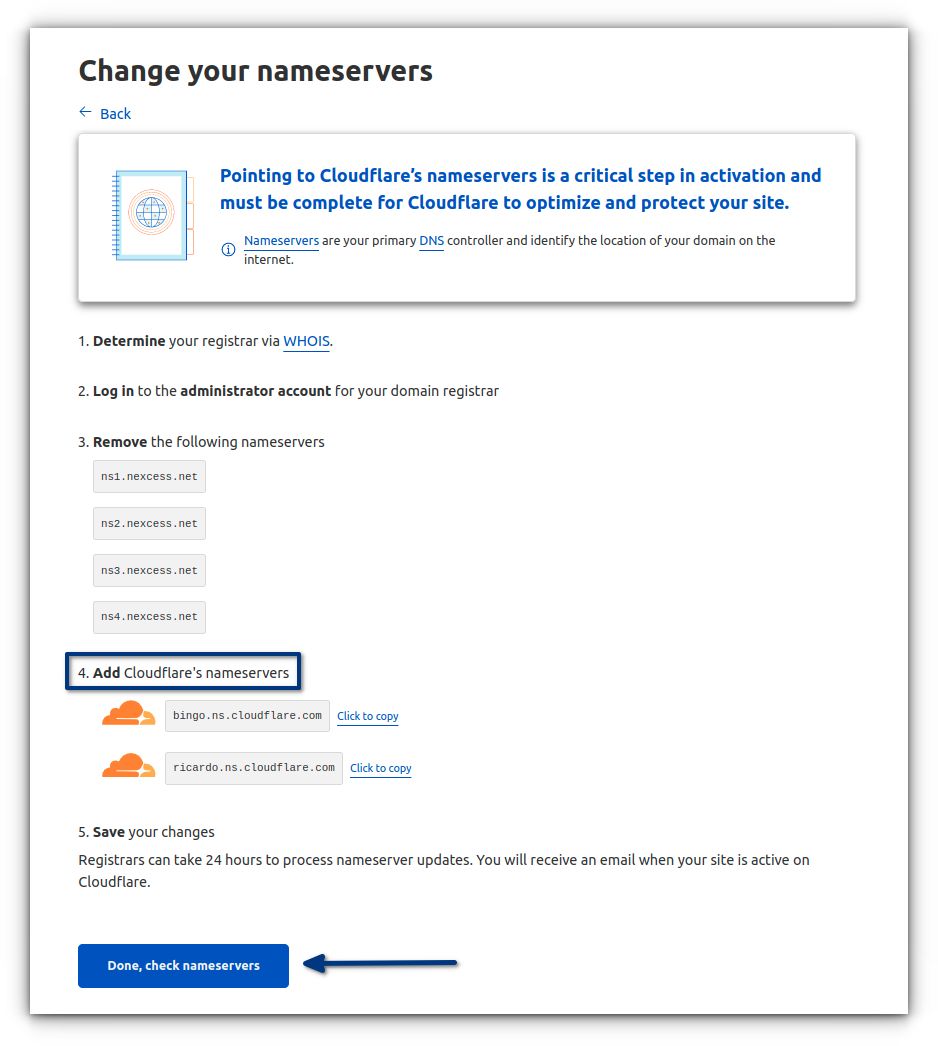
Remain patient at this stage. It usually takes 24 hours for nameservers to update.
Nameserver updates are periodically checked by Cloudflare. To initiate a check, click on Done - Check Nameservers. During this process, your page will not face any downtime.
To change name servers at popular registrars, refer to the corresponding resource below:
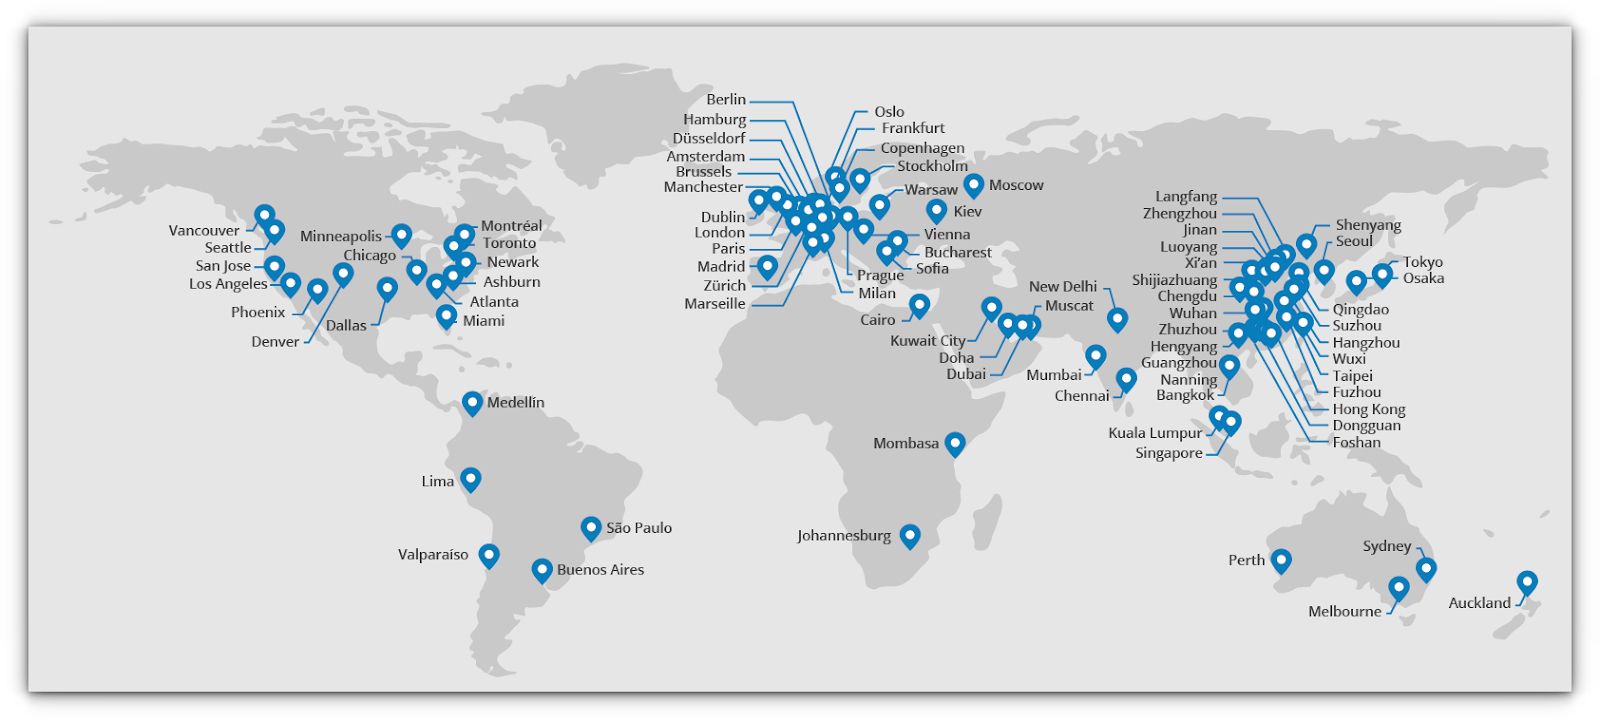
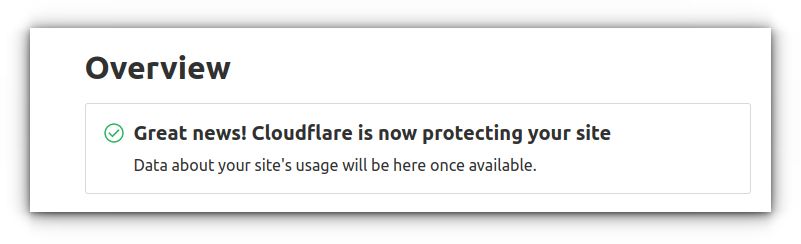
Excellent! You now have your WordPress site hosted on Cloudflare’s 206+ data centers. They add new data centers regularly:

Cloudflare WordPress setup step #6: Configure HTTPS/SSL with Cloudflare
Once your domain name is proxied behind Cloudflare, we recommend you follow this extra step to force all traffic over HTTPS.
The Hypertext Transfer Protocol Secure (HTTPS) encryption method protects website data through an SSL certificate. It is essential to set this up to protect website data from data breaches. Cloudflare offers you a free SSL certificate that you can use to protect and switch your website from HTTP to HTTPS:

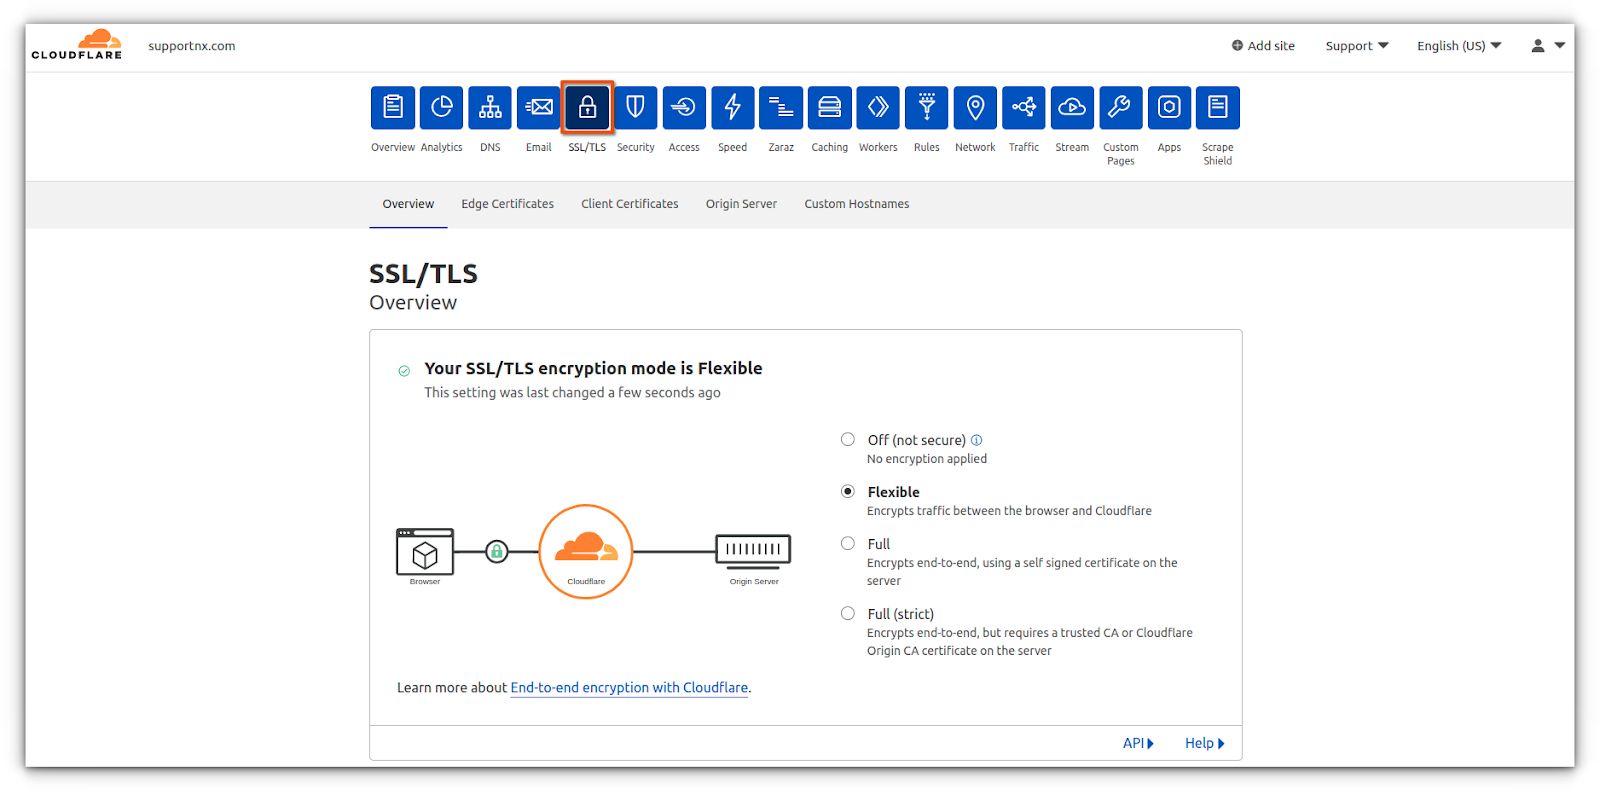
6a. To activate an SSL certificate for your website, go to the SSL/TLS tab on your Cloudflare dashboard. There you can see four modes of SSL/TLS encryption mode: Off, Flexible, Full, and Full (Strict).
6b. Choose the Full option if you have an SSL certificate installed on your domain already or Flexible if you don’t.
6c. If you plan to go with the Full option and you want to cover your domain with the free Let's Encrypt SSL that Nexcess provides, you will need to temporarily disable Cloudflare protection until the Let's Encrypt SSL certificate is deployed:

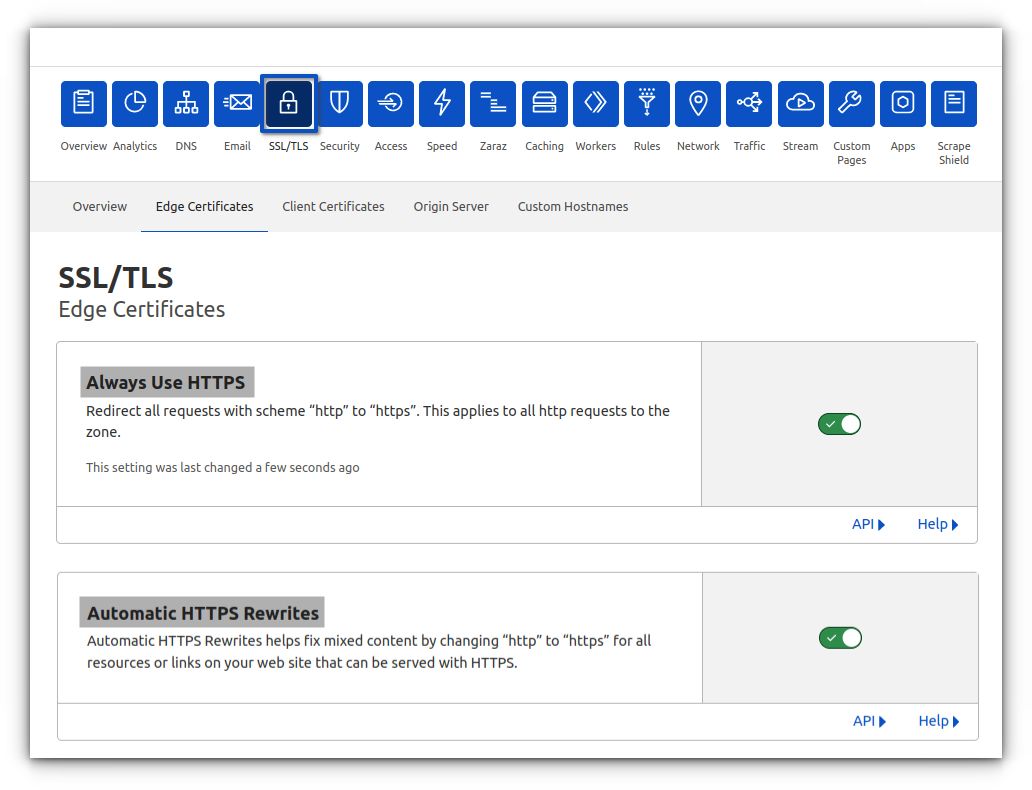
6d. Head to the Edge Certificates section and turn on Always Use HTTPS. It might take a while for the changes to be visible, so check it after a few hours. Once you see a confirmation message and a padlock icon near the site’s URL, you’ll know it’s active.
Cloudflare plugin: Installing and configuring
Unlike Cloudflare's own dashboard, this plugin only offers three options — Home, Speed, and Analytics. In addition, it does not include all the settings you would find in Cloudflare's dashboard.
Cloudflare WordPress setup using the plugin step #1: Install the Cloudflare plugin
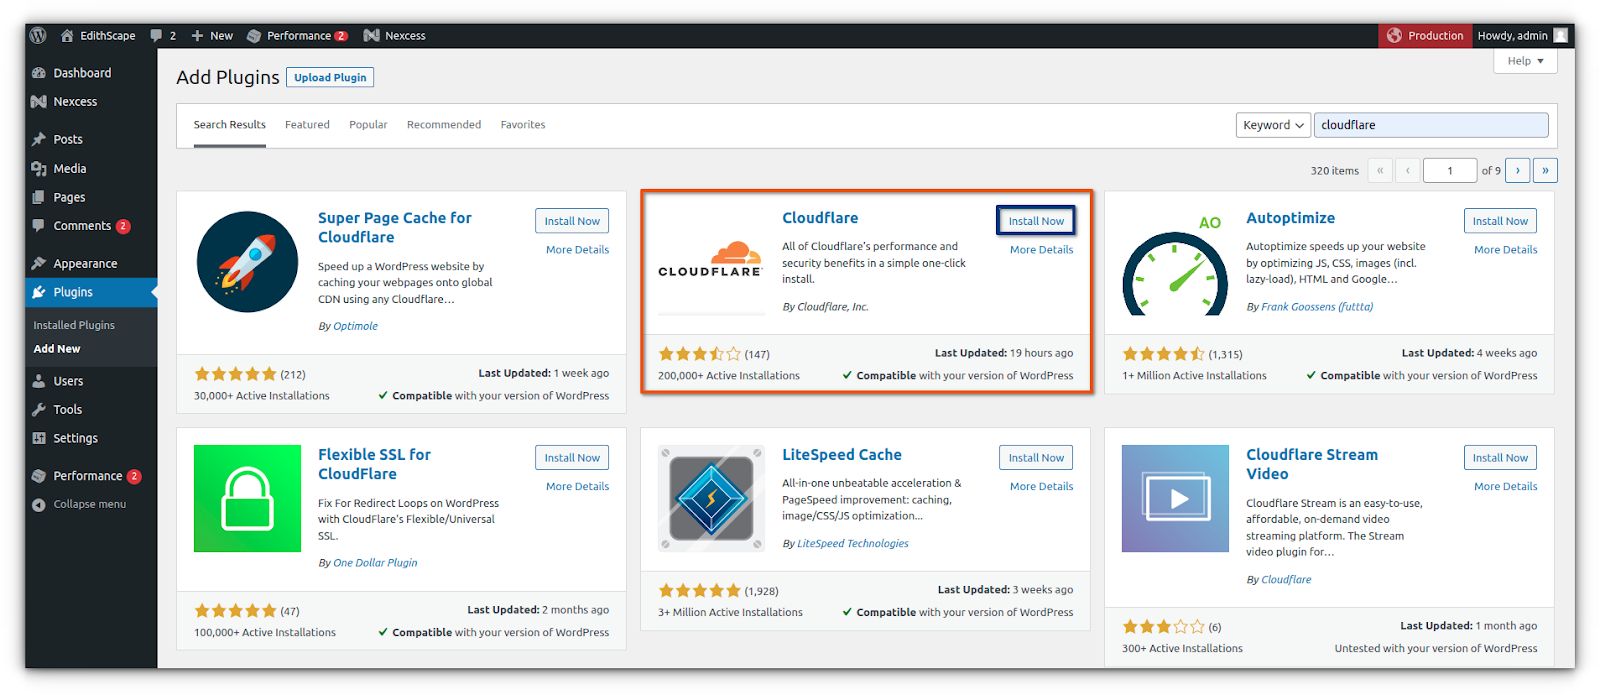
Cloudflare offers a dedicated WordPress plugin that is listed at WordPress.org. You can install and activate the Cloudflare plugin from your WordPress Admin Dashboard by simply searching for the “Cloudflare” text string:

Cloudflare WordPress setup using the plugin step #2: Connect to the Cloudflare account
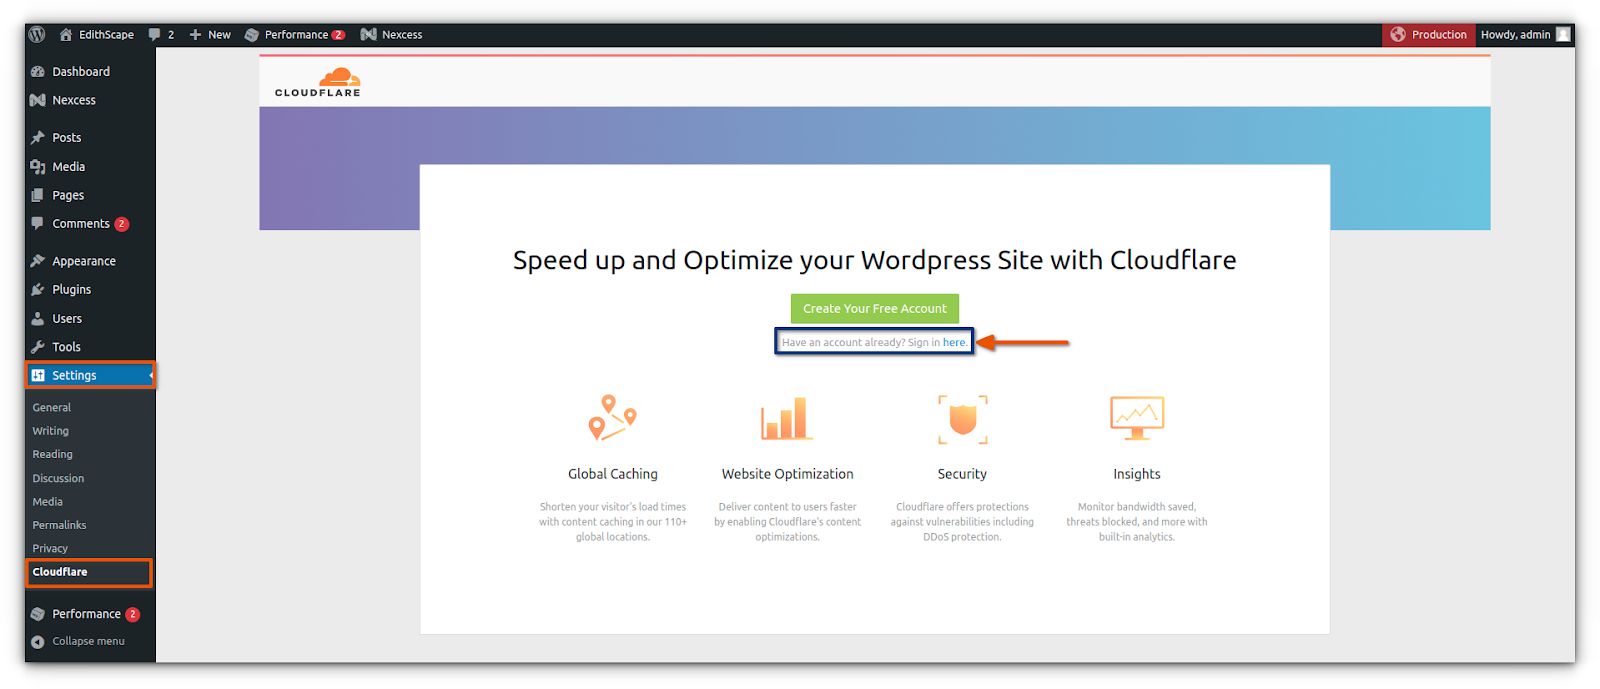
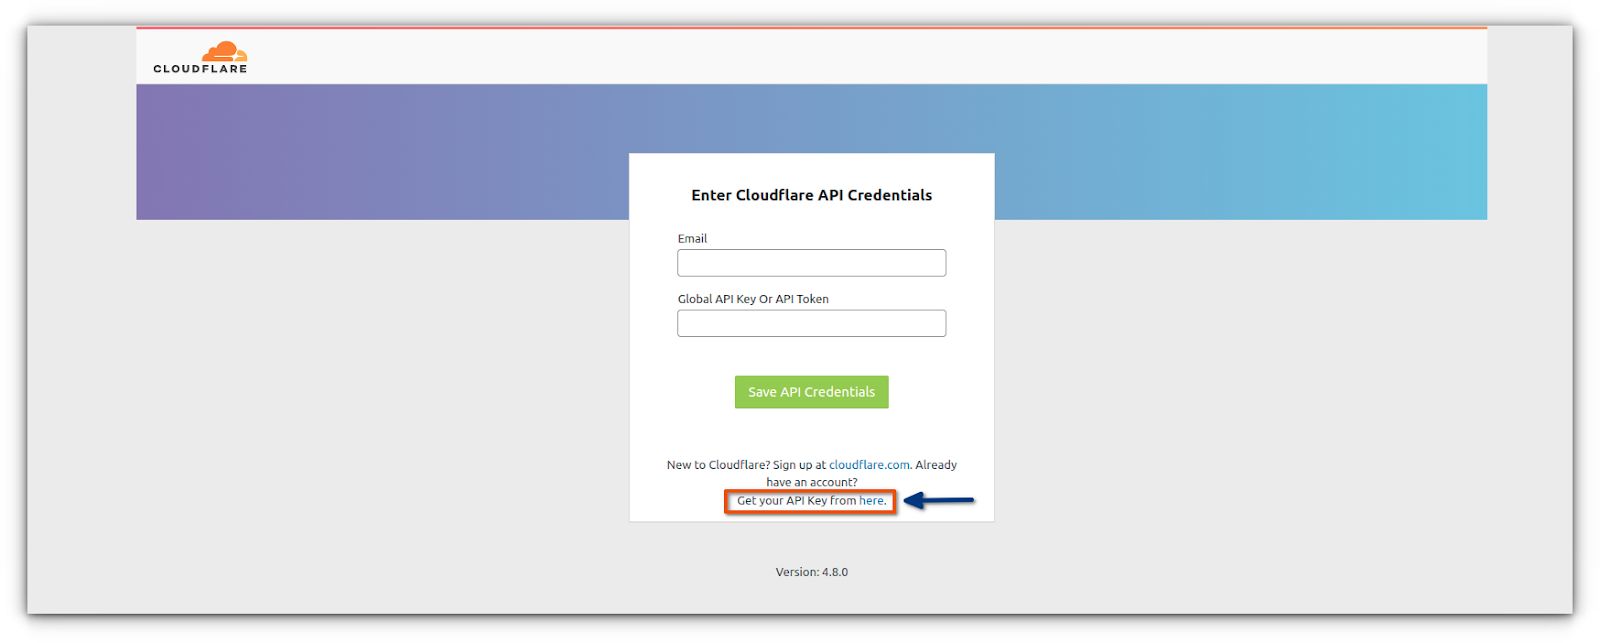
To set up the Cloudflare plugin with your WordPress site, go to Settings > Cloudflare and click the Sign In Here option:

Upon clicking on sign-in option, enter the email address of your Cloudflare account, along with the Cloudflare API key. If you still need to get the API key, click on Get your API Key from here:

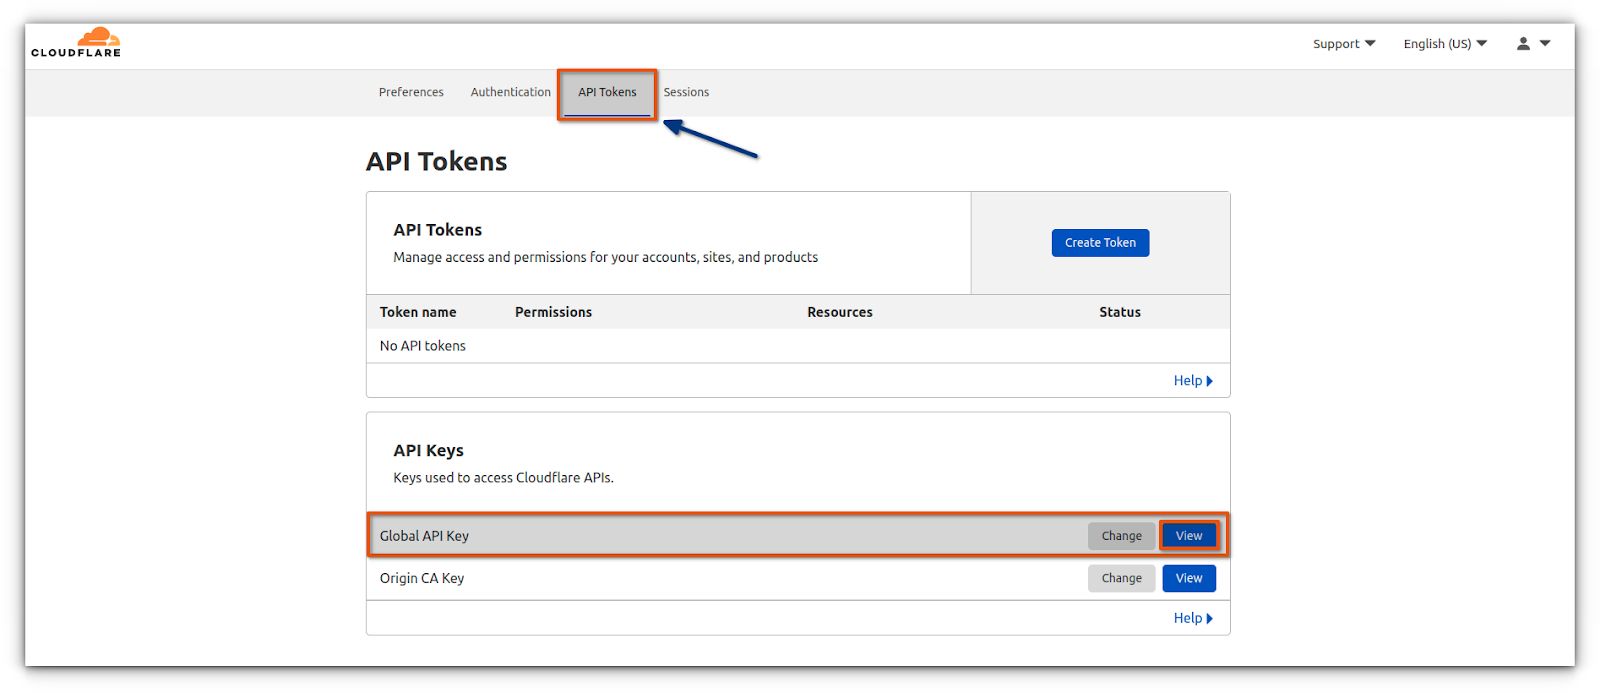
By Clicking on Get your API Key from here, you will be taken to your Cloudflare dashboard. As shown below, go to the API Tokens tab, select View from the Global API Key option, and copy the provided API key. You will be asked to enter your Cloudflare password to view the API key:

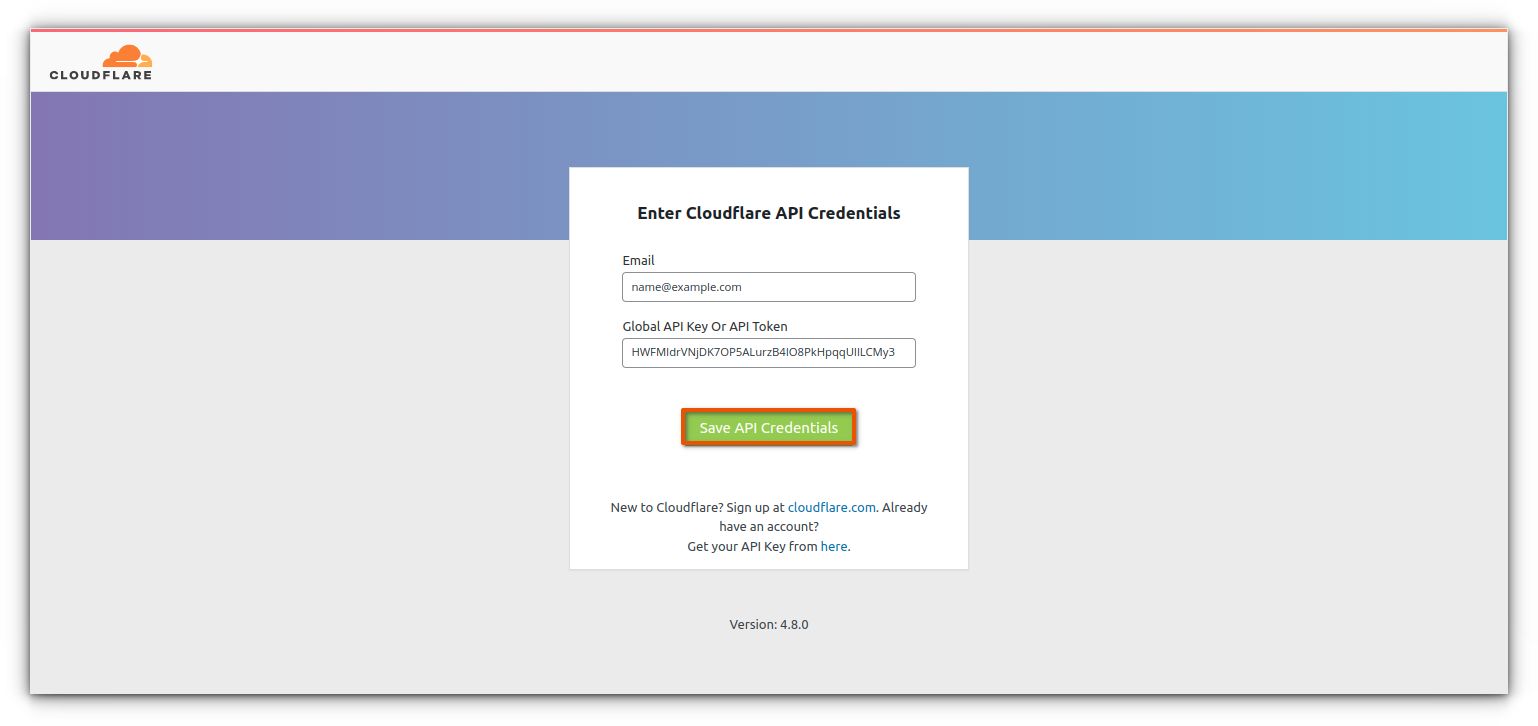
Return to the plugin settings page and paste the API key in the login field. Then click the Save API Credentials button:

Cloudflare WordPress setup using the plugin step #3: Optimize Cloudflare settings
Once the email address and API key are successfully entered, you will be able to see the Cloudflare settings on your WordPress dashboard:

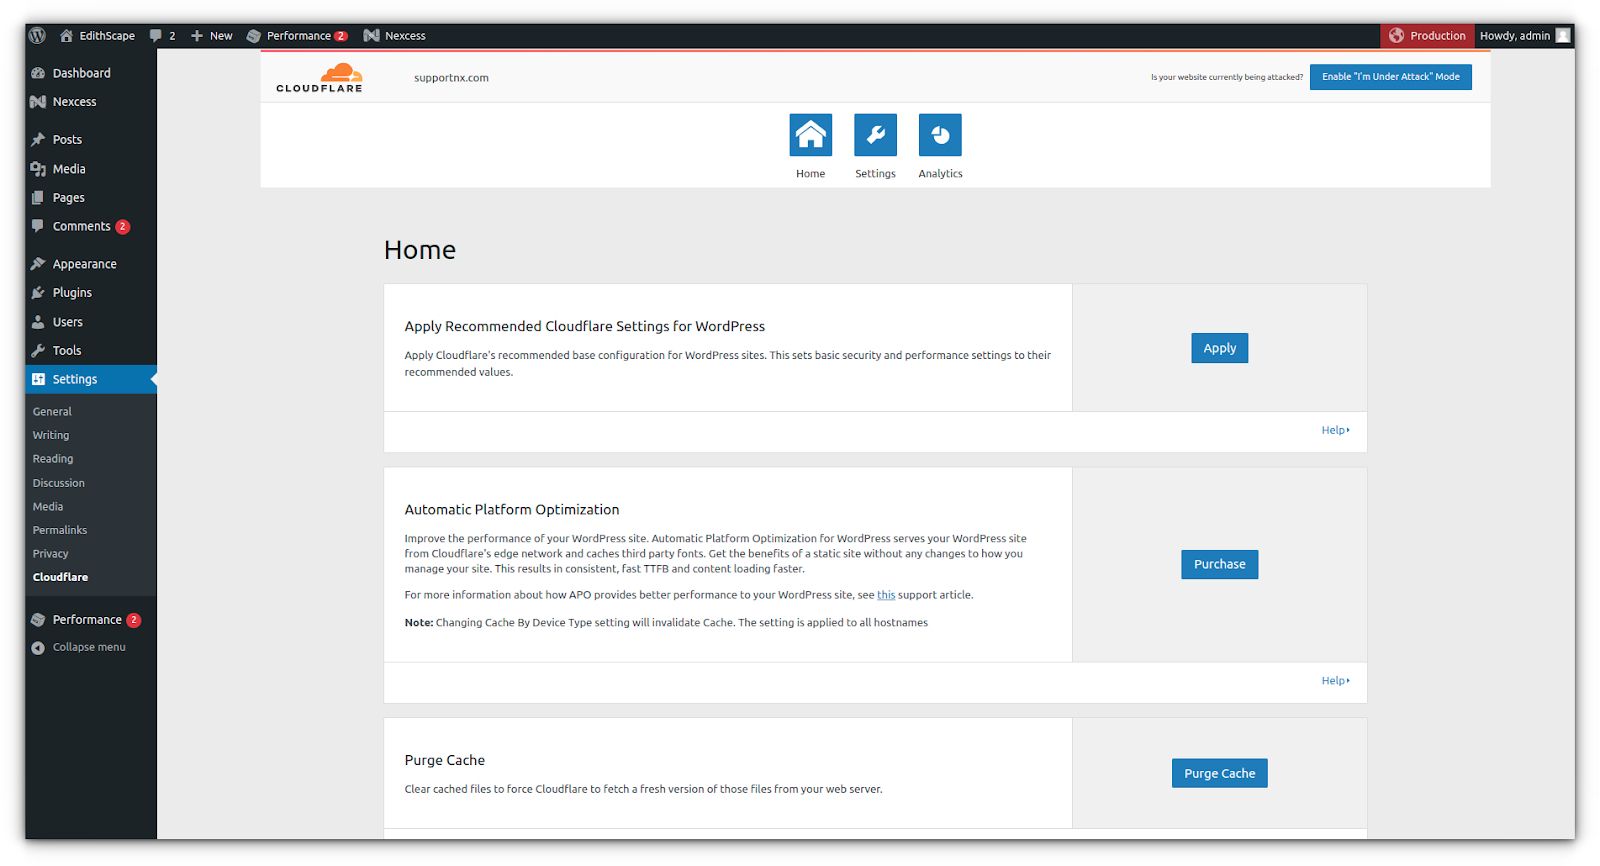
Apply recommended Cloudflare settings for WordPress
With these settings, Cloudflare will automatically apply the caching and security level settings, Auto Minify settings, and IP geolocation settings to enhance the performance of your WordPress site.
About the Automatic Platform Optimization (APO) feature
With APO enabled, Cloudflare can serve your entire WordPress site from its edge network, regardless of where your visitors are located, with the ability to keep copies of your site's data. With Automatic Platform Optimization, Cloudflare stores both static and dynamic content in its edge network. Cloudflare supports APO with a $5/month fee for free users.
About the Purge Cache feature
The caching process involves copying the website data and storing it temporarily for easy access. When the cache is purged, Cloudflare will delete all previously stored information and fetch information.
Setting up Let’s Encrypt for your WordPress site with Cloudflare
If your WordPress site is hosted on Nexcess, you can enable free Let's Encrypt SSL on your domain. Please note that you will not be able to enable this Let's Encrypt SSL while Cloudflare SSL and Cloudflare is proxying your site:

Follow the steps below to enable Let's Encrypt:
- Log into your Cloudflare dashboard and select DNS.
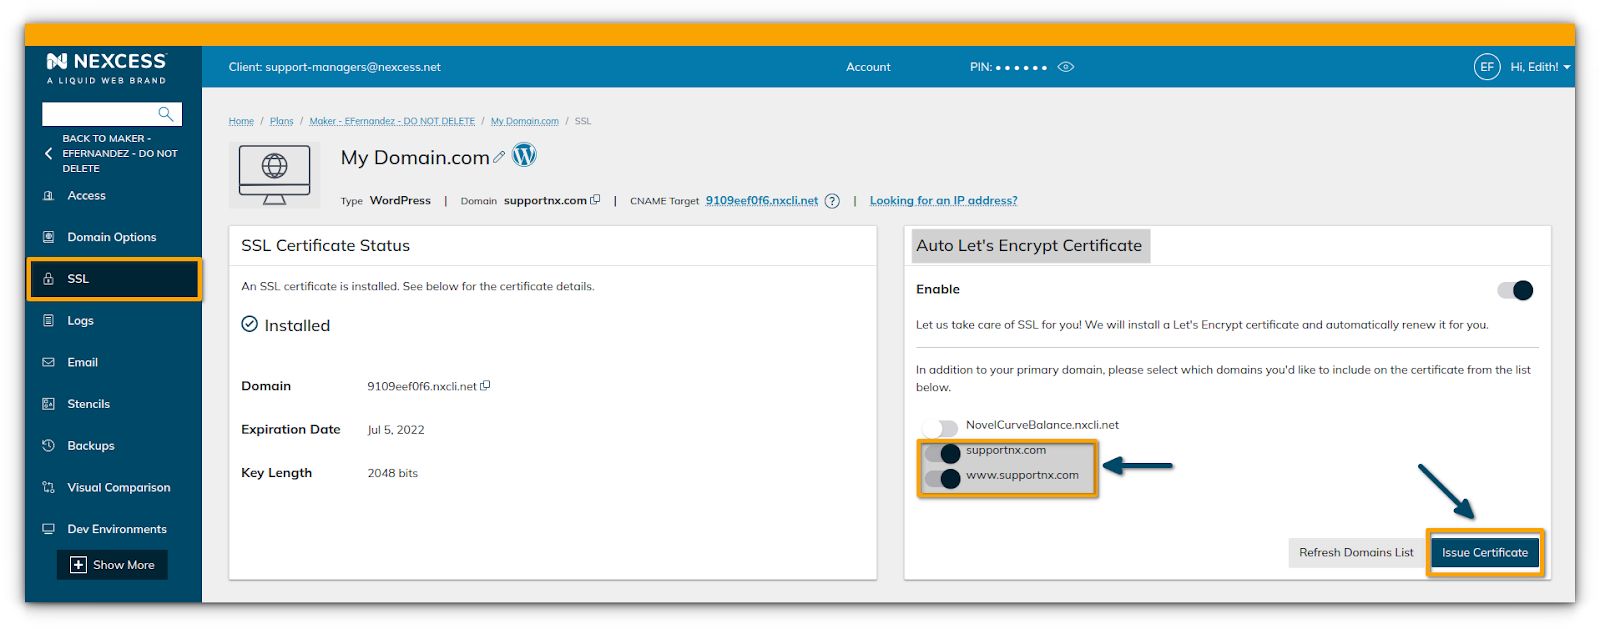
- Disable the Cloudflare proxy status for both www and non-www domain names. When the Cloudflare proxy is turned off, you'll see a gray cloud instead of an orange one. Now that the Cloudflare proxy is briefly disabled, you can enable the free Let's Encrypt SSL on your domain from your Nexcess client portal by following these steps.
- Navigate to the SSL tab from the Nexcess Client Portal by following the below instructions.
- From the homepage, select the Plans > Plan > Sites option and then select the domain name on which you want to install SSL.
- Choose SSL from the menu options.
- Enable the Auto Let's Encrypt Certificate option by toggling the switch to the right.
- Now ensure the SSL toggle for www and non-www domain names are enabled.
- Click Issue Certificate to issue a new Let's Encrypt certificate.

This process shouldn't take more than a few minutes for your Let's Encrypt SSL certificate to be installed. Once the SSL has been enabled on your domain, reactivate the Cloudflare proxy for your domain.
Cloudflare WordPress setup: Using a Cloudflare origin certificate
If you do not want to buy a commercial authority SSL certificate or have trouble renewing your Lets Encrypt SSL certificate every 90 days, you can choose Cloudflare's free certificate of origin without a cost to you.
To learn more about how to set up a Cloudflare origin certificate, visit the Cloudflare SSL with Cloudflare origin certificate article in the Nexcess Knowledge Base.
Conclusion
A Content Delivery Network (CDN) is an important service that can optimize your site to the next level. You can use Cloudflare to speed up and secure your WordPress website for free if you are looking for a reliable content delivery service with excellent security and performance improvements. Apart from changing the domain’s nameserver, you really don't need to be tech-savvy to use Cloudflare. Once this service is activated, you should be good to go.
WordPress at Nexcess comes with exclusive managed WordPress hosting tools
Hosting optimized for WordPress. Speedy, secure, scalable, and more PHP workers than any other provider.
Cloudflare CDN can be set up for free on your website. Here's a brief recap of these steps:
- Create a Cloudflare account,
- Add your domain name to your Cloudflare account.
- Choose a plan.
- Review DNS settings for both the apex domain and the www domains.
- Point your domain name to the Cloudflare nameservers.
- Configure the HTTPS/SSL settings appropriately.
Consider hosting with Nexcess
Not a Nexcess customer yet? Check out our fully managed hosting solutions. Nexcess offers a fully Managed WordPress hosting and Managed Magento hosting service for speed, security, and scale.
We offer different plans to suit your needs, suitable for both small and large businesses. Our plans include Varnish, PHP 7+, an integrated CDN, and image compression for top-tier performance.
Nexcess fully managed hosting means you’re in good hands — the entire technical part of your website is covered, enabling you to focus on the core of your business. Nexcess also offers 24/7/365 customer and technical support for all your questions or issues.
Check out the fully managed hosting plans from Nexcess to get started today.
CDN-related resources at Nexcess
Below are some helpful resources when working with CDNs at Nexcess:
- How to reconfigure your site from using CDN
- What does purge the CDN mean? Purging the Nexcess CDN
- How does a CDN work to speed up your ecommerce site?
- How to access your CDN from your Nexcess Client Portal
- What is a Content Delivery Network (CDN)?
SSL-related resources at Nexcess
For you benefit, we have compiled the following list of SSL-related resources that you may find useful:
- What are SSL certificates?
- How to enable Let’s Encrypt
- How to purchase SSL certificates from your Nexcess Client Portal
- How to install SSL certificates in SiteWorx
- How to install SSL certificates in Nexcess Cloud
- How to import SSL certificates in your Nexcess Client Portal
- How to cancel an SSL certificate
- Standard SSL: What is a standard SSL certificate?
Our blog and help articles
Our Nexcess platform is built for performance. The Nexcess hosting platform was architected for speed and reliability. Team up with Nexcess as your technology partner for enhancing your site every day. The Nexcess Blog and Nexcess Knowledge Base resources can help you in this effort.
Support at Nexcess
Nexcess web hosting means you’re in good hands. Nexcess offers 24/7/365 technical support for all your questions or next steps.
Reach out to our team today! Our support teams have skilled staff with in-depth knowledge of multiple web hosting applications, especially WordPress.
Check out the fully managed hosting plans from Nexcess to get started today.
Recent articles
- Cloudflare SSL with Cloudflare origin certificate
- What is Cloudflare CDN? How to use Cloudflare CDN
- Nexcess hosting and Nexcess Client Portal guide


