
There are over 2.3 million ecommerce stores hosted on the WooCommerce platform, and for good reason. WooCommerce is a free WordPress plugin that makes creating your own store quick and easy. WooCommerce currently powers over 7% of all ecommerce on the web and over 22% of the top 1 million online stores. With numbers like these, it’s hard to ignore the impact WooCommerce can have on your business.
What is WooCommerce? How It Works and 10 Reasons to Choose WooCommerce
With Nexcess, WooCommerce solutions combine great functionality, an intuitive interface, and a powerful managed hosting platform to provide merchants with an ecommerce foundation that drives growth.
In previous posts, we’ve explored the top reasons for choosing WooCommerce for your online store, highlighting the flexibility, compatibility, and easy access of this plugin. However, the question remains: How can you set up your WooCommerce store to start selling quickly and effectively?
In this WooCommerce tutorial we’ll take you through the entire process of getting your store set up: from ordering your managed WooCommerce solution with Nexcess to creating your first product and customizing your storefront’s look and feel. By the end, you’ll have a fully operational storefront that’s bringing in revenue and attracting customers.
9 Ecommerce Optimization Tips for Fast & Effective Sites >>
What You Need:
- A hosted WordPress or WooCommerce solution
- An active internet connection (unless you’re going to be testing on a local account)
- Around 20 minutes of your time
- A fiery passion for ecommerce (optional)
Step 1: Ordering a Managed WooCommerce Solution
What’s a WooCommerce store without a hosting platform? To get started you’ll need a strong foundation to build your WooCommerce store on as your hosting provider will help dictate the speed, security, and scalability of your store, and have a direct impact on the support you can receive.
There are a number of different hosting solutions available to merchants and freelancers. However, we recommend opting for a WooCommerce cloud solution. Start by visiting our WooCommerce managed hosting page, and selecting the right size solution for your needs.
When selecting a managed WooCommerce solution, there are a number of factors to consider to select the right size for you. The most important of these factors is the number of users that visit your store at any one time. As a hosting provider, we can let you in on a little secret: hosts often grade cloud solutions based on the number of PHP workers they can support, which refers to the number of concurrent users who can perform an action on your site at any one time. Learn more about what PHP workers are and how they affect your site’s performance. It’s important to note that the information in this WooCommerce Tutorial will apply to your setup process, regardless of the solution size you choose.
Not sure what size is right for your store? Talk it over with a member of the Nexcess team. We’ll provide advice on sizing, integrations, and anything else you need to know.
If this is your first storefront then we recommend opting for a smaller plan. A smaller plan will help you to get started and once you start to see more traffic, you can instantly upgrade your plan in your Client Portal with just a click.
Once you’ve completed this stage, you’ll be able to log into your Client Portal and access your WooCommerce admin panel. From there, the first thing you’ll need to do is set up your store’s main properties with the WooCommerce setup wizard.
For WooCommerce setup documentation regarding site migration, visit our Knowledge Base to learn more.
Step 2: The WooCommerce Setup Wizard
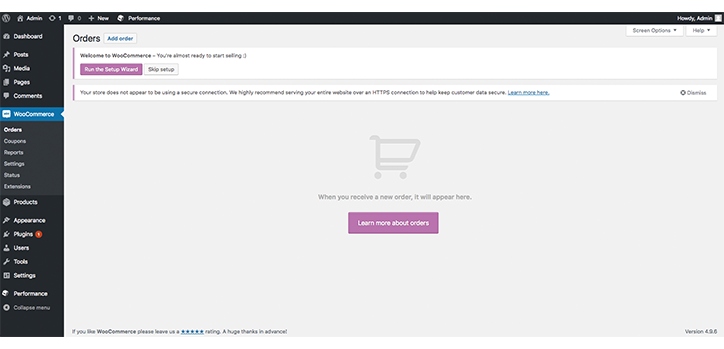
Once you’ve installed and activated WooCommerce, you’ll need to complete a short WooCommerce setup wizard. To do this, locate the left hand panel and find WooCommerce. Click it. If WooCommerce isn’t present then refresh the page and it should appear.
After you’ve navigated to the WooCommerce page, you’ll find a button under the page title called Run the Setup Wizard. Click this and prepare to let WooCommerce know everything you want your store to be (almost).
Remember, everything you set throughout this WooCommerce setup process can be changed at a later date. WooCommerce is an incredibly flexible solution for merchants and it’s almost impossible to get locked into any one particular solution.
Begin Your WooCommerce Store Setup
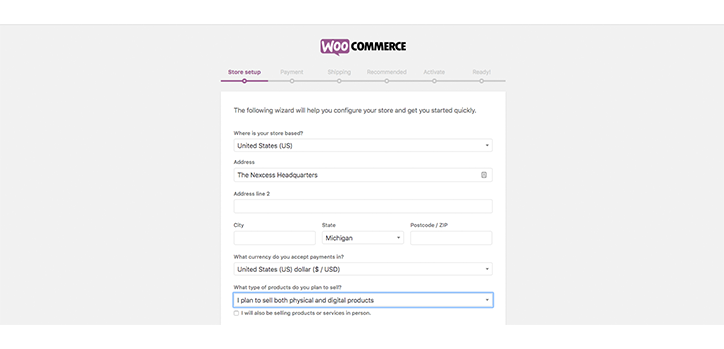
The first group of information we need to let WooCommerce know is where we are, who we are, what type of product we’re selling, and what type of currency we’ll be primarily using for transactions. Don’t worry if you have multiple currencies you’ll be able to update that with a plugin, which we’ll cover later. For now, opt for your local currency.
The information entered at this stage in the setup process doesn’t have to be entirely accurate, although it will prevent revisiting setup at a later date if it is. Once you’re finished, click Continue to be taken to the Payment page (for configuring how people will be paying you).
Set up WooCommerce Payments
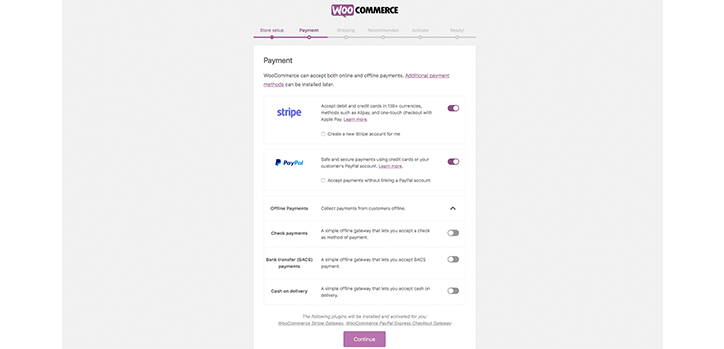
Payment gateways are the third-party processors that allow you to accept payments online. These are essential to your online store, and you’ll need to set them up right away. WooCommerce offers some powerful and flexible payment gateway options by default. Both Stripe and PayPal allow you to accept credit cards and PayPal orders. They also sync well with your external accounts.
However, Stripe and PayPal aren’t the right solutions for everyone. Depending on whether you’re already used to an alternate payment gateway or you don’t like the transaction fees of the default, there are several alternatives available.
Cost is going to be an important consideration with regard to your payment gateway. Some SaaS platforms, which attract merchants with low monthly subscriptions, quickly become much more expensive once you add costly transaction fees to the mix.
WooCommerce does not, by default, charge transaction fees. From a WooCommerce pricing perspective, this often makes it more cost-effective than SaaS alternatives.
If you decide to change from the default payment gateways, ensure that you research transaction fees, security, and support. There are 100+ payment gateway options available as WooCommerce extensions each with its own set of conditions and features.
IIf you’re unsure on which payment gateway option to choose, then we recommend first-time store owners use Stripe and PayPal. Both are industry-leading businesses that guarantee payment security for your customers.
It’s important to remember that while payment gateways will collect some useful data, you may want to consider adding sales plugins to really dive into your store’s analytics. But we’ll talk more on how to set up WooCommerce sales plugins a bit later. For now, let’s talk shipping.
Setting up Shipping
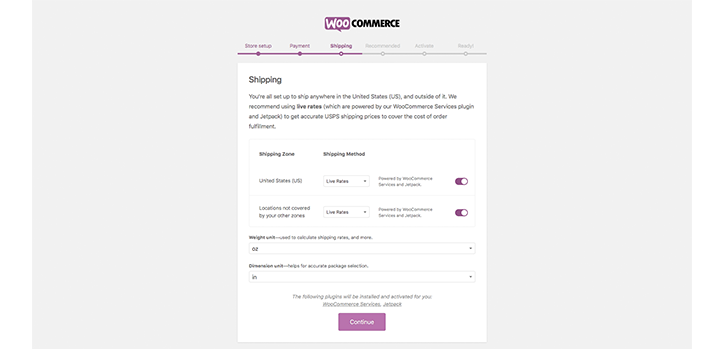
In addition to payment gateways, another essential step in our WooCommerce tutorial is shipping. Once you’ve chosen your payment gateway, it’s now time to set up your shipping information. Here, you’re going to need to input your shipping zones to help calculate shipping rates. If you’re a beginner, we advise leaving these as their default options.
Remember, WooCommerce shipping options can all be edited at a later date or expanded upon with additional plugins if you need.
You’ll also need to input the weight and dimension units you’re using. We recommend going with the most frequently used unit in your primary geographic location. For instance, if you are running a store in the US, oz and inches are likely the best fit. If, however, you’re running a store in the UK, it’s better to opt for kg and cm. Metric or Imperial, you decide.
Once you’ve finished with this screen, again, click Continue.
Optional Plugins and Additional Resources
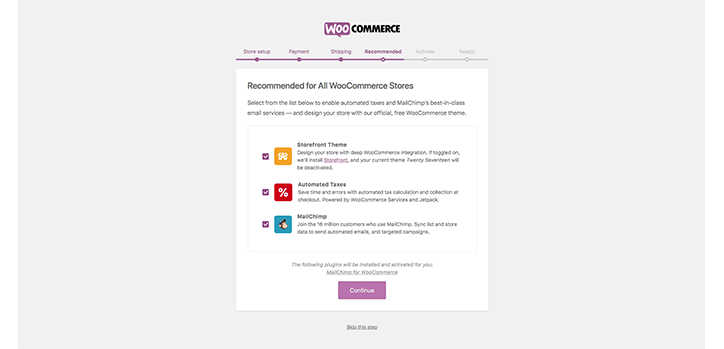
The final stage of the WooCommerce setup includes installing some optional plugins to install if you think they may fit your store. We’ll leave this up to your better judgment on whether you think they are suitable. If you’re unsure, we recommend getting in touch with a developer to see how these plugins will benefit you.
Once you’ve finished, you can then activate your WooCommerce install at the next screen and you’re ready to move on to Step 3 of our WooCommerce Tutorial.
Step 3: Creating Your First Product
What use is an ecommerce store without products? While you may have your products ready to go, whether they’re digital or tangible, you’ve yet to upload them to your online store.
This step will help you to create your first product on your WooCommerce store so that it’s ready to go live.
We’ll be covering the areas of:
- Name
- Description
- Pictures
- SKU
- Inventory
- Shipping costs
Remember, WooCommerce has a lot of added functionality over just plain WordPress. This functionality has been designed specifically for the purposes of ecommerce. In order to master how to use WooCommerce, we’re going to want to use as much of this as possible.
Before you get started with this step, there are a few things you’re going to need:
- Some product photography – WooCommerce has a great blog post on how to create inexpensive product photography. Alternatively, you can use photos of products from suppliers.
- Content and copy for product descriptions and names.
- An idea of what SKUs you’re going to use (if you’re running a big store).
Now that you’ve gotten all of that sorted, head to WooCommerce down the left sidebar => Products => New Product.

This top section of the page will be very familiar to WordPress users as it’s essentially the WordPress WYSIWYG editor.
Entering Information
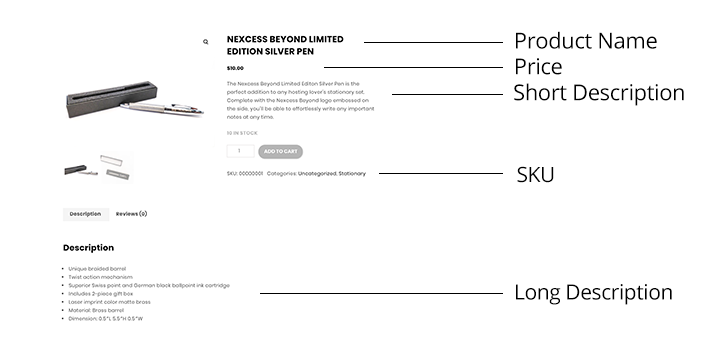
You can enter your product name at the top and a product description at the bottom. Note that the product description here will be the long product description located below the product — not the short description located next to the image.
Once you’ve finished entering in your content, you’re ready to move onto some of WooCommerce’s finer product setup features.
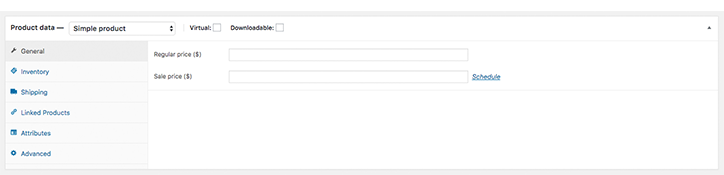
Advanced product data gives you a chance to select the price for your item, set inventory, organize its SKU, and more.
Along the top, you’ll notice two tick boxes for Virtual and Downloadable. If you are selling items that don’t require shipping, you can tick these and WooCommerce will ignore shipping rates.

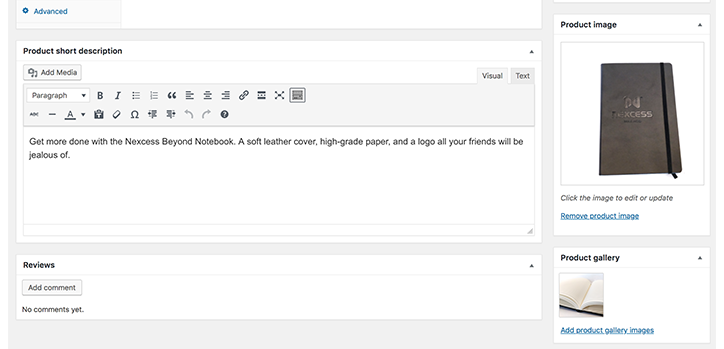
The “Product short description” box is where you can set the short description as shown above. It’s advisable to keep this section short as it will act as one of the first things a prospective buyer will see. Keep it catchy and fun – product specifics are better suited for the long description section.
Now that you’ve established the basics of your first product in your online store, let’s move on to Step 4 of our WooCommerce Tutorial.
Step 4: Adding Images, Product Galleries, Categories, and Tags
The next step for adding your first WooCommerce product to your catalog is including images and categories. To do this, you just need to head to the right side of your WYSIWYG-like WooCommerce editor.
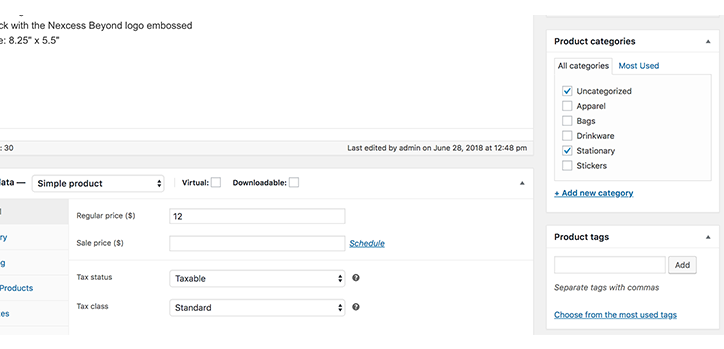
Here you’ll find your existing category options and have the opportunity to add new ones if you wish. Using categories is incredibly helpful for aiding customers in their conversion journey and making sure they enjoy an easy and intuitive user experience, as they allow you to group similar items together. Including common tags on your products can also help with your customers find similar groupings of products. Tags can also help boost your site’s SEO performance and add another layer of navigation for your customers. We highly recommend you use both — especially if you’re running a large store.
Once you’ve added applicable categories and tags, you’re ready to upload images of your product. As one of the most significant page elements involved in affecting conversions, your product photography should be high quality. WooCommerce has put together a great guide on how to go about improving product photography for your ecommerce store.
To add your primary product image, scroll to where it says Product Image and upload and select your image. Below this, you can add additional images to be featured in the product gallery. The ability to add multiple photos is great, as you can exhibit different aspects of your item. In creating a page for the incredible Nexcess swag notebook, we’ve shown what it looks like from the front in the product image, and then a look at the inside in the product gallery.
Step 5: Exploring WooCommerce Themes
So, you’ve set up WooCommerce, you’ve created your first products, and you’re ready to really take your online store to the next level. The final step in our WooCommerce tutorial takes a look at using themes to your advantage.
It’s important to customize the look and feel of your site so it stands out before taking your WooCommerce store live. To do this, you’re going to want to explore the best WooCommerce themes already available — or possibly customize your own.
This guide will not go into how to create your own WooCommerce themes – that’s for another article – but we will direct you to where you can go to change your theme settings and choose from a selection of pre-built themes.
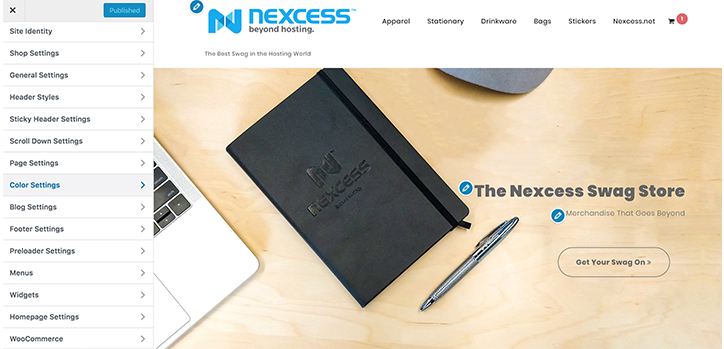
To do this, head to Appearance down the left side of your WooCommerce dashboard. From here, you can select Themes to look at a range of different pre-built WooCommerce themes, or you can select customize to change elements on your site easily. These customizations include repeat elements like site titles, logos, and more. You can also take a look at Plugins, below Appearance, for a list of extensions you can add to your WooCommerce store to expand functionality.
Complete Your WooCommerce Setup With the Right Hosting Foundation
When setting up your WooCommerce store, the last thing you want is to experience site slowdowns and configuration issues. While there are several ways to speed up your WooCommerce store, the most reliable solution is choosing the right hosting foundation.
Built on a platform trusted by experts, StoreBuilder by Nexcess allows you to reap all the benefit of our Managed WordPress and WooCommerce without the complexity.
No coding experience? No problem.
There’s no reason to start from scratch or feel overwhelmed by a blank screen. Just answer a few questions, and in minutes, you’ll have your own online store with an intuitive, easy-to-navigate homepage that’s optimized to convert your visitors to customers. Check it out!

