
Website migrations can be scary, but they don’t have to be. Here are 5 steps for making your moving experience as seamless as possible; starting from knowing what you need to back-up, and finishing with full DNS propagation and your new hosting solution going live.
It’s not every day you decide to change hosting providers or upgrade your solution. If you’re with a high-quality provider and haven’t had any problems, you may only ever do this a handful of times as your site grows.
We believe in seamless website migrations for everyone, which is why we’ve put together 5 steps for making sure your site migration is as easy and relaxed as possible.
1. Finish Your Website Migration Before Cancelling
When you do decide to go through with a migration, you will likely go through these five stages.
- Backing up your website
- Moving your website’s data
- Testing the new website
- Migrating your DNS
- Enjoying your new hosting environment
Each is as important as the last and you should not cancel your existing service until you have fully migrated. Canceling your old hosting provider before completing a migration can mean days or weeks of downtime; depending on how complex your migration is and whether you encounter any issues.
Moreover, in the event that your old hosting provider does not engage in daily backups or deletes them as soon as you leave, you could find yourself losing your entire site. Even if you do have a backup, your SEO value can plummet from extended downtime, and a whole host (pun intended) of other problems can occur.
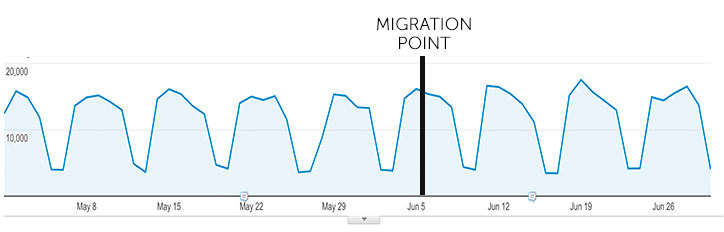
A good migration should mean consistent site traffic. Not a sudden drop or decline.


That’s why we always suggest making sure to…
2. Create a Local Backup
One of the first things you should do during a migration is to create a local backup of your website. Despite everyone’s best intentions, technology doesn’t always go to plan and a small database corruption can cause issues.
If you haven’t canceled with your previous provider, they may still have backups located on a third-party server. Nexcess offers daily hosting backups and archives them for 30 days. In most cases, you can use these backups to restore your site. However, it’s always a good idea to make sure you have a local one as well.
If you’re coming from a hosting provider with a cPanel interface, you can head to the page ‘Backup’ in your control panel. Here you’ll be able to download a copy of your “public_html” directory (which contains most of your site information). You can also grab a backup of your MySQL database too.
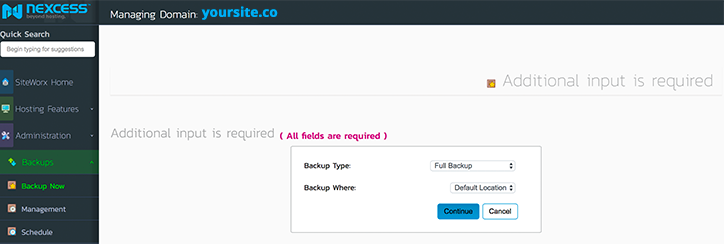
Nexcess provides full backups through our control panel. Click on Backups -> Backup Now, and then click continue. You can also select to only perform a partial backup if you prefer.

Most hosting providers will have an easy to access backup feature available. If you can’t find one, get in touch with their support team.
3. Test Your Site Before It Goes Live
“No, I don’t need to check. It’s ready, let’s go live,” is something every migration expert dreads hearing.
Going live without testing a site after a migration is like playing a game of Risk and not knowing what pieces you’ve got in play. While there’s a chance everything will work out well, there’s also a chance something will go wrong and you end up stuck with nowhere to go but start over.
A short checklist of what to test includes:

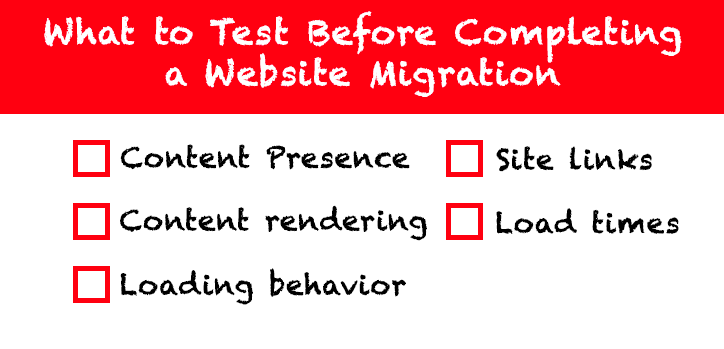
There may also be things you should check specific to your site. If you’re an ecommerce store, for instance, you may want to test the checkout process.
4. Switch to the New Nameservers
Do this by heading to your domain registration control panel and then “Domain Name Servers”. From here you’ll be able to see what your nameservers actually are.

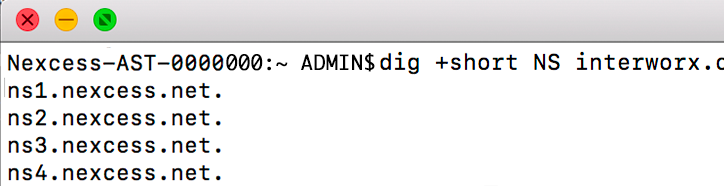
If you’re interested in checking this out on your own machine, open up a command prompt and enter
dig +short NS yoursite.com | sort.
If you’re using the Nexcess DNS service and have successfully repointed your domain, you should see at least one of those below:
- ns1.nexcess.net
- ns2.nexcess.net
- ns3.nexcess.net
- ns4.nexcess.net
- ns5.nexcess.net
- ns6.nexcess.net
- ns7.nexcess.net
- Ns8.nexcess.net
If you don’t see one of these, then don’t panic. It may be that you’re with an alternate DNS provider. It can also help to know how far along the path to full website migration you are (if you’re not the one in charge).
Remember that DNS record changes can take 12 to 24 hours, so don’t be surprised if this information doesn’t change immediately after you’ve altered your DNS. Just like with our first point, don’t cancel your old service before your new one is good to go.
5. Let Your DNS Complete Propagation
Once you’ve changed your DNS, you’re going to want to let it complete propagation. You shouldn’t experience any downtime during this period, but you will want to make sure that you don’t make any changes to your site.
There’s nothing worse than posting new content during the propagation cycle and finding you’ve lost it the next day.
If you’re interested in checking the status of your DNS propagation, try the Nexcess DNS checker to see how far it’s gotten.
Making Migration Easy
Remember, Nexcess offers free migration assistance on all of our solutions, meaning that making the switch from one provider to another couldn’t be easier. We make migrations easy and seamless.
Learn more about seamless, free migrations to Nexcess.

