

Magento product attributes help you describe product features such as material, fit, and feel. You can use them to improve the online shopping experience by empowering your customers to find the products they want quickly.
But creating a Magento product attribute can be challenging. The Magento attribute creation form is dynamic, with several options that can confuse you. And if misconfigured, product attributes can hurt the buyer experience instead of improving it.
To help you do it right the first time, we’ve compiled this guide to adding a product attribute in Magento 2.
Here’s everything we’ll cover:
- How to add a product attribute in Magento 2
- How to create an attribute set in Magento 2
- Final thoughts: How to add a product attribute in Magento 2
How to add a product attribute in Magento 2
You can add new Magento product attributes in two ways:
- Using the product creation form.
- Using the Stores menu.
The following tutorial covers the steps to add a Magento product attribute using the Stores menu. But you can follow the same process while working on a product, as both share the same workflow.
Step 1: Add a new attribute and configure basic properties


Log in to your Magento admin panel and navigate to Stores > Attributes > Product.
Click the Add New Attribute button to create a new Magento product attribute.


On the New Product Attribute creation page, enter a descriptive Default Label to identify your custom attribute.
Set Values Required to Yes if you want to force customers to select an option before they purchase a product that uses the attribute — such as for Magento 2 configurable products. Alternatively, leave it as No and proceed to the next step.
Step 2: Configure the attribute input type

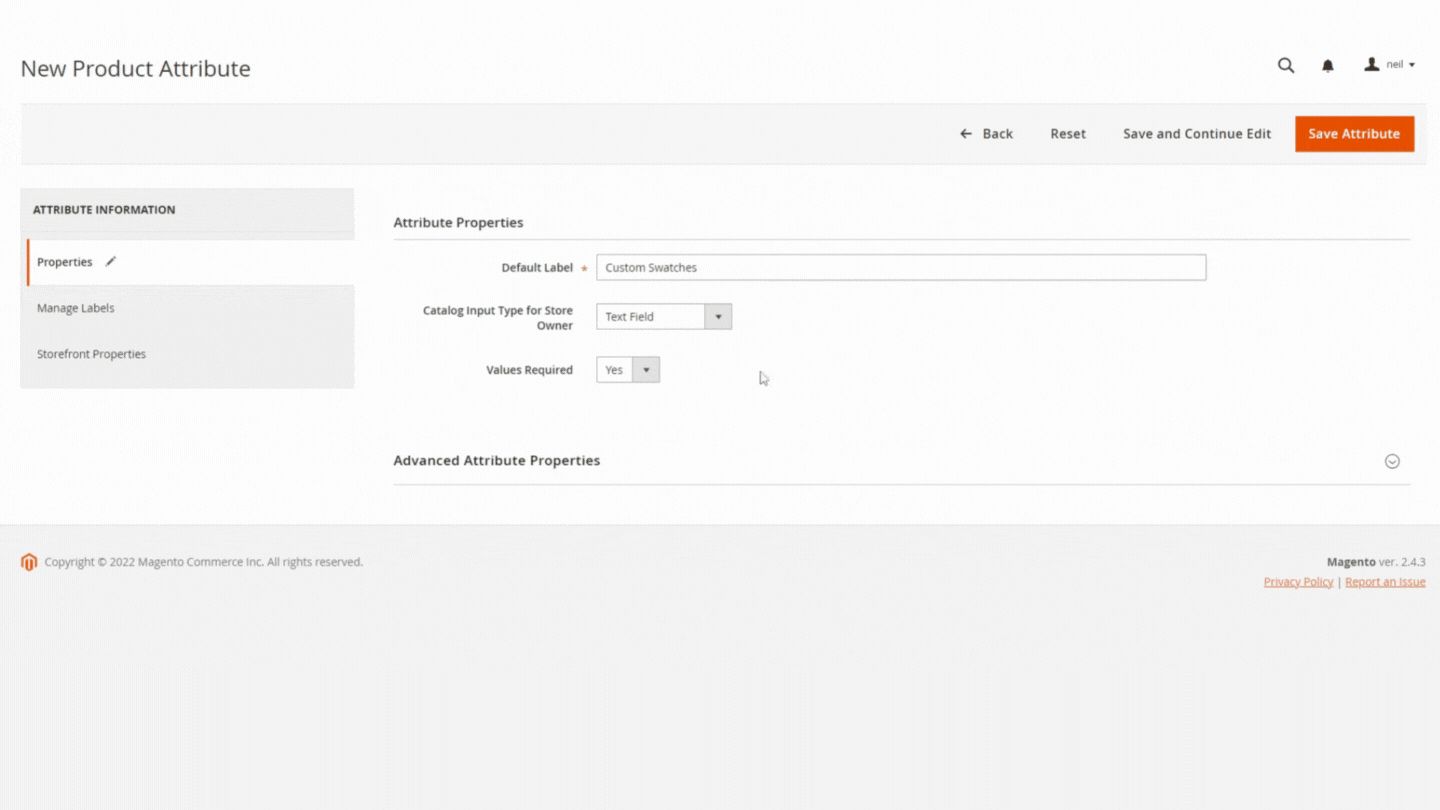
Choose an input type for your Magento product attribute using the Catalog Input Type for Store Owner dropdown menu. For this tutorial, we’ve chosen Visual Swatch.
After you select the input type, the page will update to display additional settings for that type. Use those settings to configure your attribute.
For instance, you can follow these steps to configure product swatches in Magento 2.
Set Update Product Preview Image to Yes to display the corresponding image when the attribute is selected and set Use Product Image for Swatch if Possible as No.
Then, in the Manage Swatch (Values of Your Attribute) section, click Add Swatch to add a custom swatch.
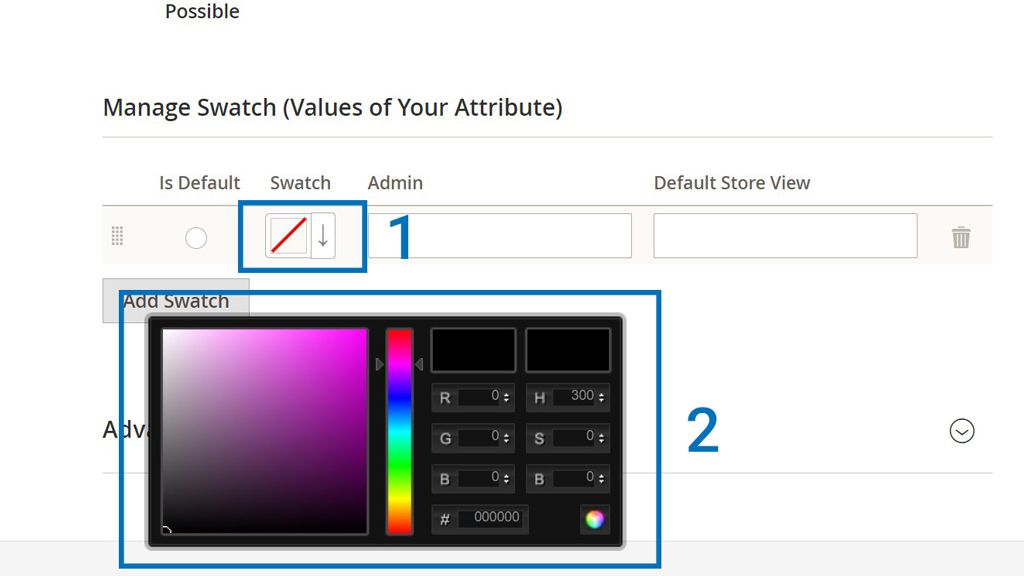
Click the downward arrow next to the newly added swatch in the Swatch column and select Choose a color. Use the color picker tool to choose a color in one of the following three ways:
- Enter a hexadecimal value in the text area next to the # field.
- Enter RGB and HSB values.
- Choose a color from the canvas area.
Once you’ve chosen a color, click on the Color Wheel in the bottom-right corner of the tool to save the swatch.
Optionally, you can upload an image swatch instead of selecting a color by clicking on the downward arrow next to the new swatch and selecting Upload a file.
Although your Magento 2 theme usually determines the final swatch display size and dimensions, you should upload a square image to preserve details like pattern and aspect ratio.

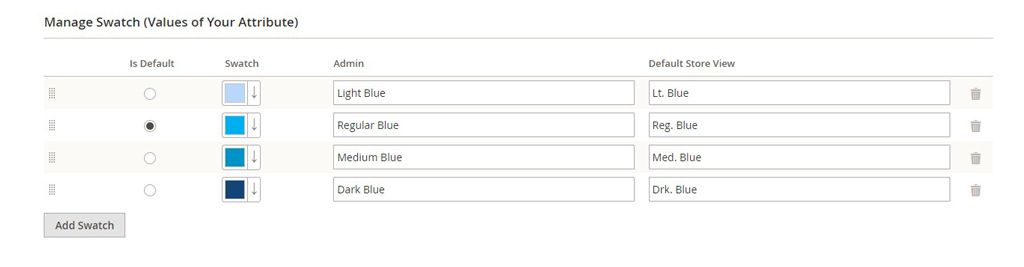
After configuring the swatch, enter a descriptive name in the Admin column. Magento automatically duplicates that value inside the Default Store View column.
You can use unique values for both columns as the Admin column defines the value visible to store administrators while the Default Store View value defines the storefront label. And if you’re using more than one store view, enter a default value for each store view.
Repeat the above process to add more swatches to your Magento product attribute.
Choose a swatch as the default option in the Is Default column. Optionally, rearrange the order of the swatches using the grid icon.
Finally, click Save Attribute to save your changes.
Step 3: Define advanced attribute properties (optional)
Advanced attribute properties let you control things like where and how an attribute is used in your Magento store. Here’s how you can configure them.

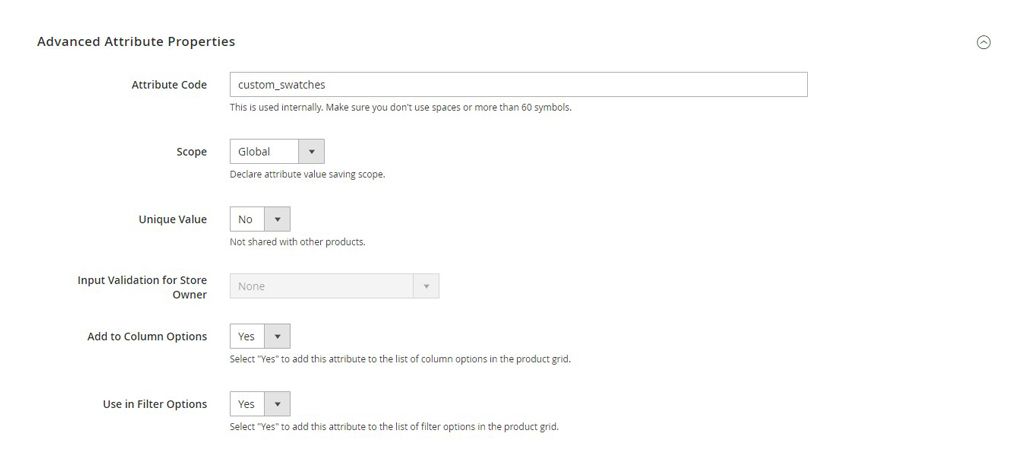
Expand the Advanced Attribute Properties section and enter an Attribute Code. Use lowercase letters without spaces, as that value is used internally.
Then, define where the attribute is used in the Scope dropdown menu. For example, you can assign the attribute to selective store views in a multi-store deployment. Alternatively, you can select Global to apply it to all store views.
Set Unique Value to Yes if you want the attribute value to differ from others within the same attribute. For instance, you should set this to Yes when creating an attribute such as SKU that will be used to identify products internally. Alternatively, set it as No.
You may notice that the Input Validation for Store Owner dropdown is grayed out. That’s because we’ve chosen the Visual Swatch input type. You can only configure input validation for compatible attribute types such as Text Field, Text Area, and Price.
Configure the following options to define how the attribute displays in the Magento admin Products list page:
- Add to Column Options: Set to Yes to display the attribute in a column on the Products list page.
- Use in Filter Options: Set to Yes to make the attribute filterable with the column header on the Products list page.
Step 4: Set the front end attribute label (optional)

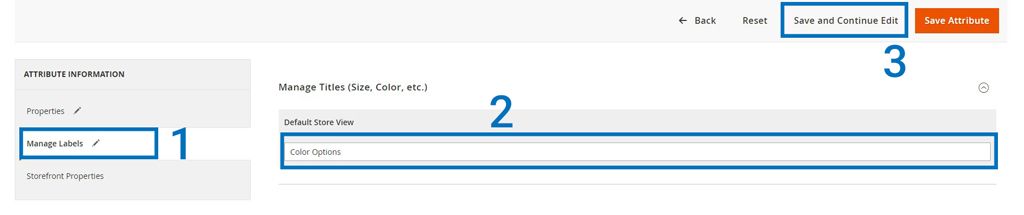
Use the left-hand menu to switch to the Manage Labels section, expand the Manage Titles setting, and enter a descriptive title to use as the default label. That value will display on the product detail page of your Magento store.
Here’s how that looks like on the product page:


If you’re using a multilingual setup, enter a translated value for each store view. Then, click Save and Continue Edit.
Step 5: Configure storefront properties

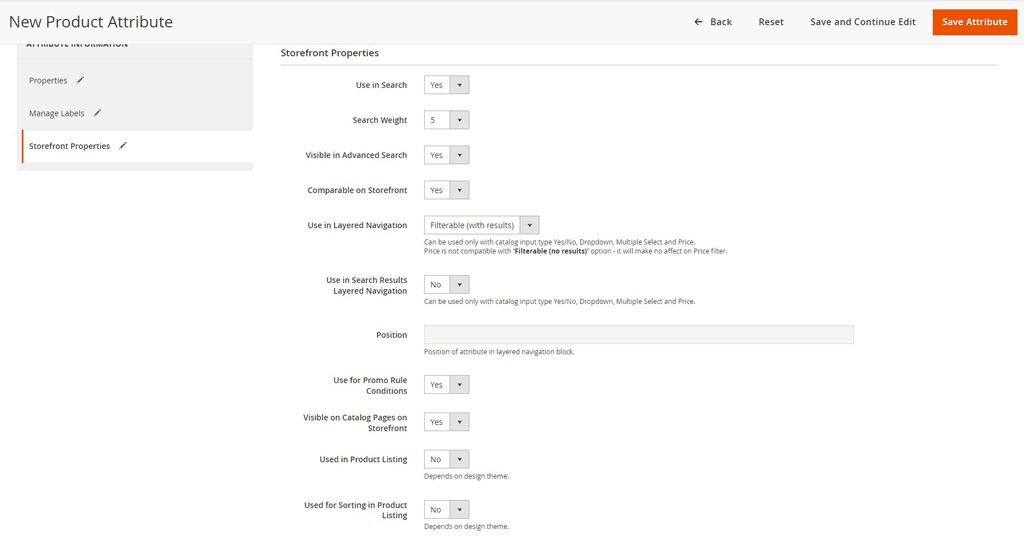
Click on Storefront Properties in the left-hand panel and configure the settings as necessary.
Set Use in Search as Yes to make the attribute searchable and configure the following two settings:
- Search Weight: Assign a value between 1 (low) and 10 (high) to control where the attribute displays in search results.
- Visible in Advanced Search: Add the attribute to the search criteria in Advanced Search.
You can also use the attribute for product comparison on your ecommerce store by setting Comparable on Storefront to Yes.
Set Use In Layered Navigation to one of the following values:
- No.
- Filterable (with results).
- Filterable (no results).
Setting any value besides No will make the attribute filterable on the category page.
Then, set Use In Search Results Layered Navigation to Yes or No. If you’ve set it to Yes, click Save and Continue to Edit to enable the Position setting option and enter a number in the Position text field to define the attribute’s location in the layered navigation block.
If you want to configure Magento 2 cart price rules, set Use for Promo Rule Conditions to Yes. Alternatively, use the default No value.
Set Visible on Catalog Pages on Storefront to Yes to show the attribute on the product page on the front end.
Optionally, if your theme supports it, configure the following two settings as described below:
- Used in Product Listing: Set to Yes to include in product listings.
- Used for Sorting in Product Listing: Set to Yes to use as a sort parameter for product listings.
Finally, click Save Attribute to save your Magento product attribute.
How to create an attribute set in Magento 2
Once you create a Magento product attribute, you can add it to an existing attribute set or create a new attribute set of one or more product attributes. That way, you can assign attributes to specific products and create attribute sets for different product types.
Follow these steps to create an attribute set in Magento.
Step 1: Create an Attribute Set


Log in to the Magento admin panel and navigate to Stores > Attributes > Attribute Set.
Click the Add Attribute Set button in the top-right corner of the page.


On the New Attribute Set page, enter a descriptive Name for your attribute set and use the dropdown menu next to Based On to use an existing attribute set as a template for the new set.
Click Save to create the attribute set.
Step 2: Configure Your Magento Attribute Set
Once the attribute set saves, you’ll see a new page with the following three columns:
- Edit Attribute Set Name: Displays the attribute set name and lets you change it.
- Groups: Shows attribute set groups and lets you add, edit, and delete groups.
- Unassigned Attributes: Lists Magento product attributes that aren’t assigned to the current attribute set.

You can add unassigned attributes to your new attribute set by dragging and dropping them from the Unassigned Attributes column into the Groups column.

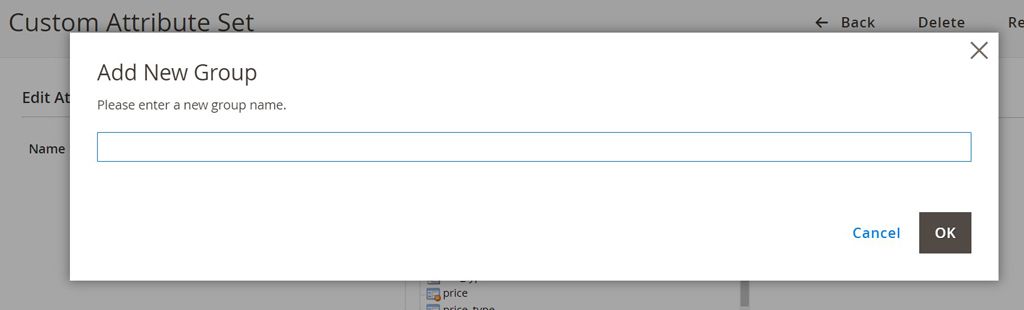
Optionally, you can create custom attribute groups by clicking on Add New in the Groups column, entering a Name for the group, and clicking OK.
Then, you can add an unassigned attribute to the group or drag an attribute from an existing group into the new group, as demonstrated above.
Step 3: Save the Magento Product Attribute Set

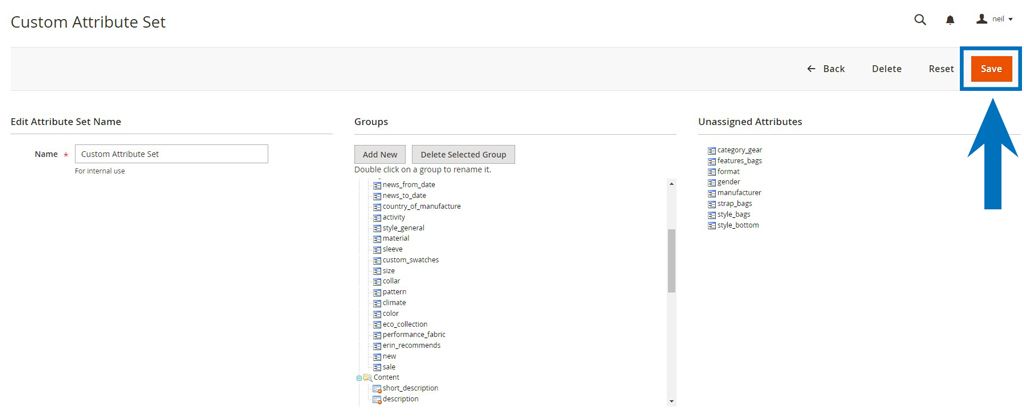
After configuring your new attribute set, click Save to update changes. The attribute set will now display in the Attribute Set dropdown menu on the New Product page.
Final thoughts: How to add a product attribute in Magento 2
Magento product attributes empower you to create custom attributes that describe your products. But adding too many attributes can impact your Magento store performance.
Make sure your hosting can support the attributes you need before you implement them. Better yet, migrate to Managed Magento Hosting with Nexcess and access flexible hosting plans that can scale with your ecommerce business.

