

When you're just getting started with Magento, you've likely already researched the best Magento 2 hosting providers. As an ecommerce business, Magento security is most likely top of mind, along with Magento pricing too.
After deciding on a host, you've likely installed and set up your software and made sure you're using the latest version of Magento.
Now what?
This is where you'll need to select and install a Magento theme — which may be more convoluted than it sounds.
Adobe deprecated the Web Setup Wizard in Magento 2.3.6 and later versions. You can no longer install a theme in Magento using the web browser. You can only do it from the command line in one of two ways: using an archive file or Composer.
The primary difference between the two methods is that theme files installed using an archive file are generally placed in the app/design directory. In contrast, those installed using Composer are loaded from external sources and placed in the vendor directory.
We’ll go through the steps for both methods. No matter which one you use, make sure you backup your website and set pre-install file permissions before you begin.
Ready to learn? Here’s what we’ll cover in this step-by-step tutorial:
- How To Install a Theme in Magento 2
- How To Install a Magento Theme Using Composer
- Final Thoughts: How To Install a Magento Theme
If you want a fast store with 24/7/365 expert Magento support, check out Nexcess managed hosting plans, including enterprise Magento hosting, today.
How To Install a Theme in Magento 2
- Upload the Magento theme files to your server.
- Extract and copy the theme files to the Magento filesystem.
- Clear generated data and switch Magento to developer mode.
- Disable the cache and install the theme.
- Verify the installation and apply the theme.
The steps to install a theme in Magento using an archive file can vary based on how the Magento developer has packaged their custom theme files.
Here’s how to install a Magento theme from a zip file:
Step 1: Upload the Magento Theme Files to Your Server

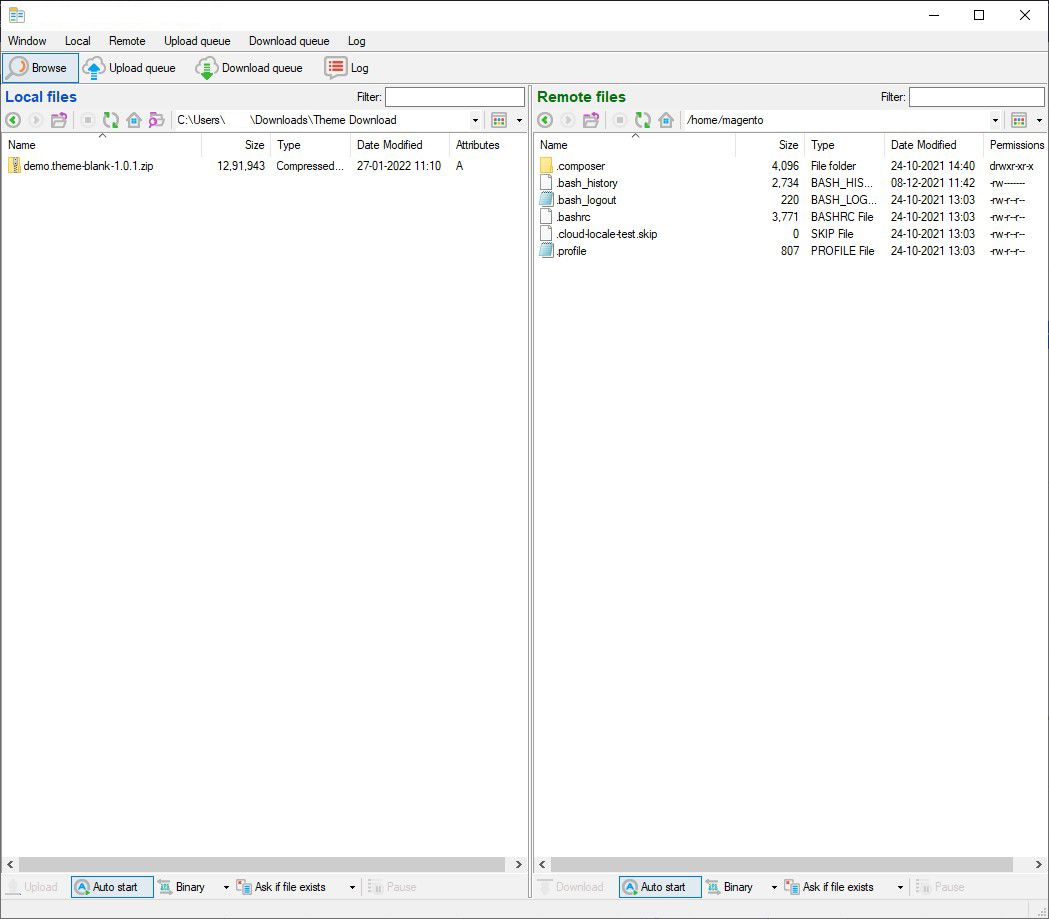
Log in to your server as the Magento file system owner and upload the theme files archive to the Magento file system owners home directory using an SFTP client such as FileZilla.
You can also upload the files to the Magento root directory directly. But uploading the theme files to your home folder lets you extract and verify the files before transferring them to the Magento filesystem.
Step 2: Extract and Copy the Theme Files to the Magento Filesystem
If you’ve uploaded the theme files as a tar archive (.tar or .tar.gz), use the following command to extract the theme files to a new subdirectory called theme-files:
<pre><code>

$ mkdir -p theme-files && tar -xf <archive>.tar -C theme-files

</pre></code>
If you’ve uploaded the files in a zipped folder, use this instead:
<pre><code>

$ unzip <archive>.zip -d theme-files

</pre></code>
After extracting the files, copy them to the Magento filesystem.
Magento theme files are generally placed in the app/ and pub/ folders.
Based on the folders in your extracted Magento theme, copy them to the root directory of your Magento installation using these commands:
<pre><code>

$ cp -R <path-to-extracted-folder>/app/* <magento-root>/app

$ cp -R <path-to-extracted-folder>/pub/* <magento-root>/pub

</pre></code>
Make sure you replace all placeholders before you copy and paste the commands in the terminal.
Step 3: Clear Generated Data and Switch Magento to Developer Mode
Clear previously generated classes and proxies to avoid errors when you install a theme in Magento using:
<pre><code>

$ rm -rf <magento-root>/generated/metadata/* <magento-root>/generated/code/*

</pre></code>
Switch Magento to the developer mode using:
<pre><code>

$ php bin/magento deploy:mode:set developer

</pre></code>
You can also put your ecommerce store in maintenance mode to disable bootstrapping during the Magento 2 theme installation:
<pre><code>

$ php bin/magento maintenance:enable

</pre></code>
Step 4: Disable the Cache and Install the Theme
Disable Magento cache and install the theme using the following commands:
<pre><code>

$ php bin/magento cache:disable

$ php bin/magento setup:upgrade

</pre></code>
Once complete, you can safely disable maintenance mode before proceeding.
Step 5: Verify the Installation and Apply the Theme

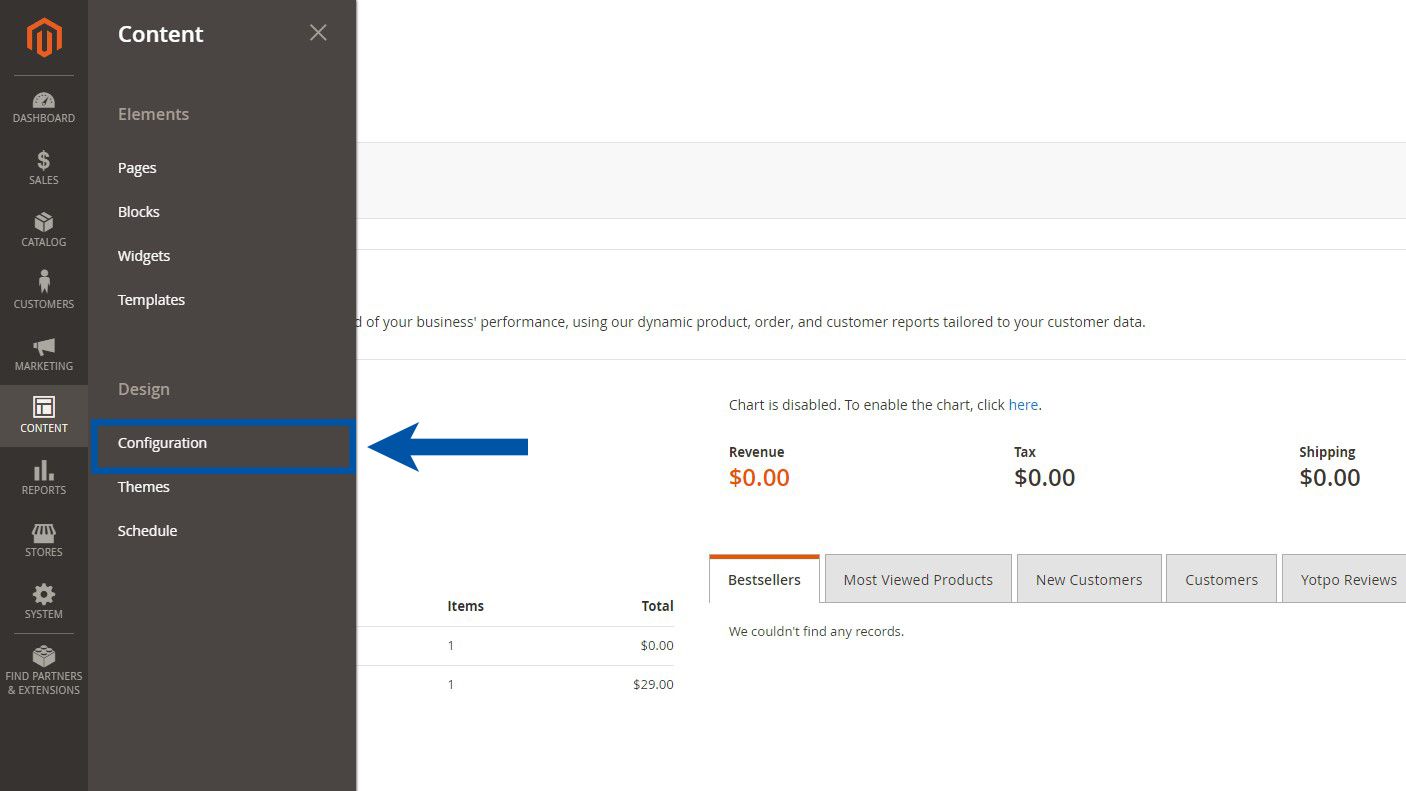
Log in to the Magento admin panel and go to Content > Design > Configuration.

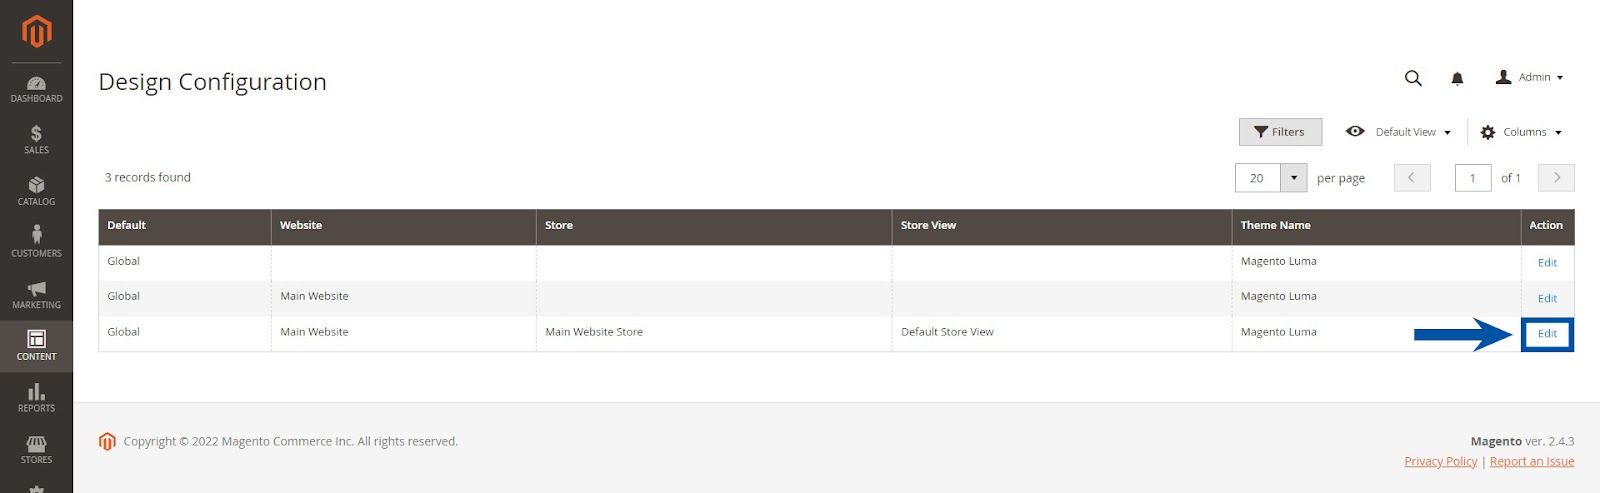
You’ll see the different store views listed in the Design Configuration section. Click on Edit under the Action column.

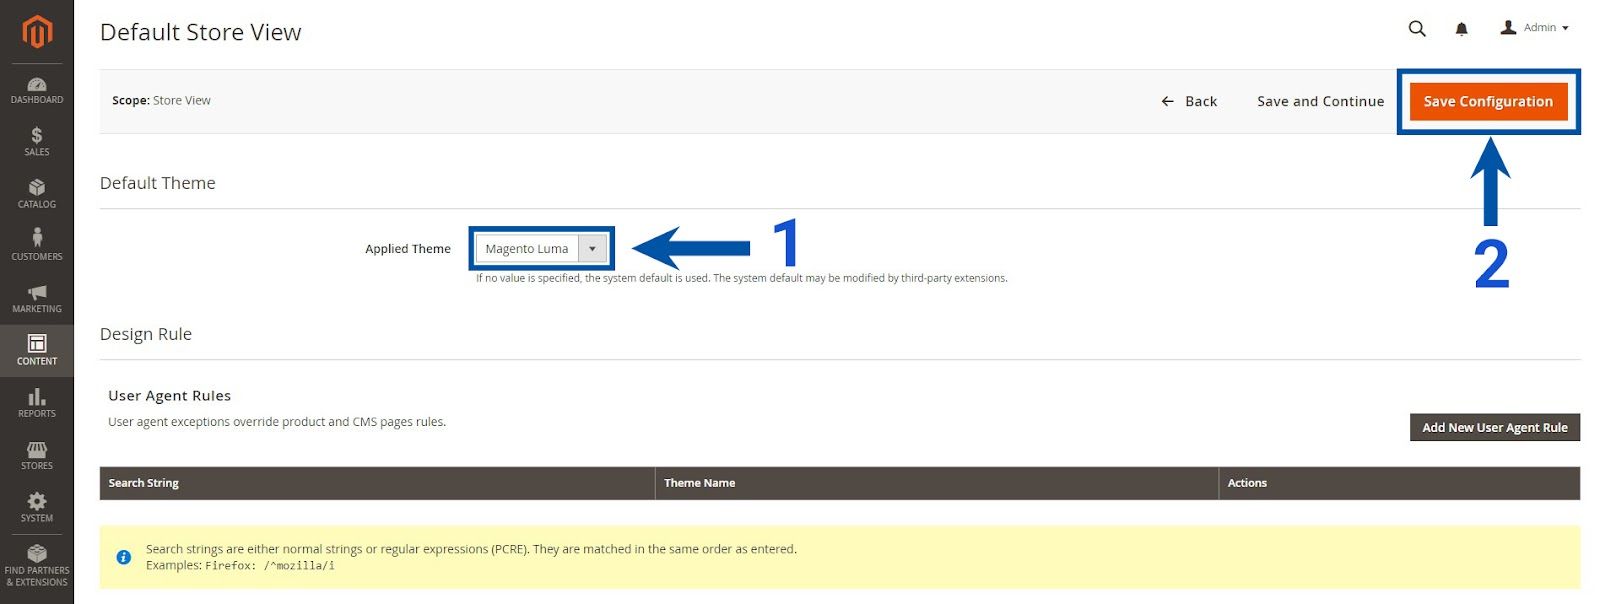
On the edit page, assign the theme using the Applied Theme dropdown menu that lists the installed themes in Magento, and click Save Configuration.
Make sure you update the file system permissions, switch the store back to production mode, and clear the cache after you’ve installed the theme using its archive file.
How To Install a Magento Theme Using Composer
Here’s how to install a theme in Magento from the Magento Marketplace — a repository of over 3,740 Magento extensions and themes.
Step 1: Get the Theme’s Composer Name and Version

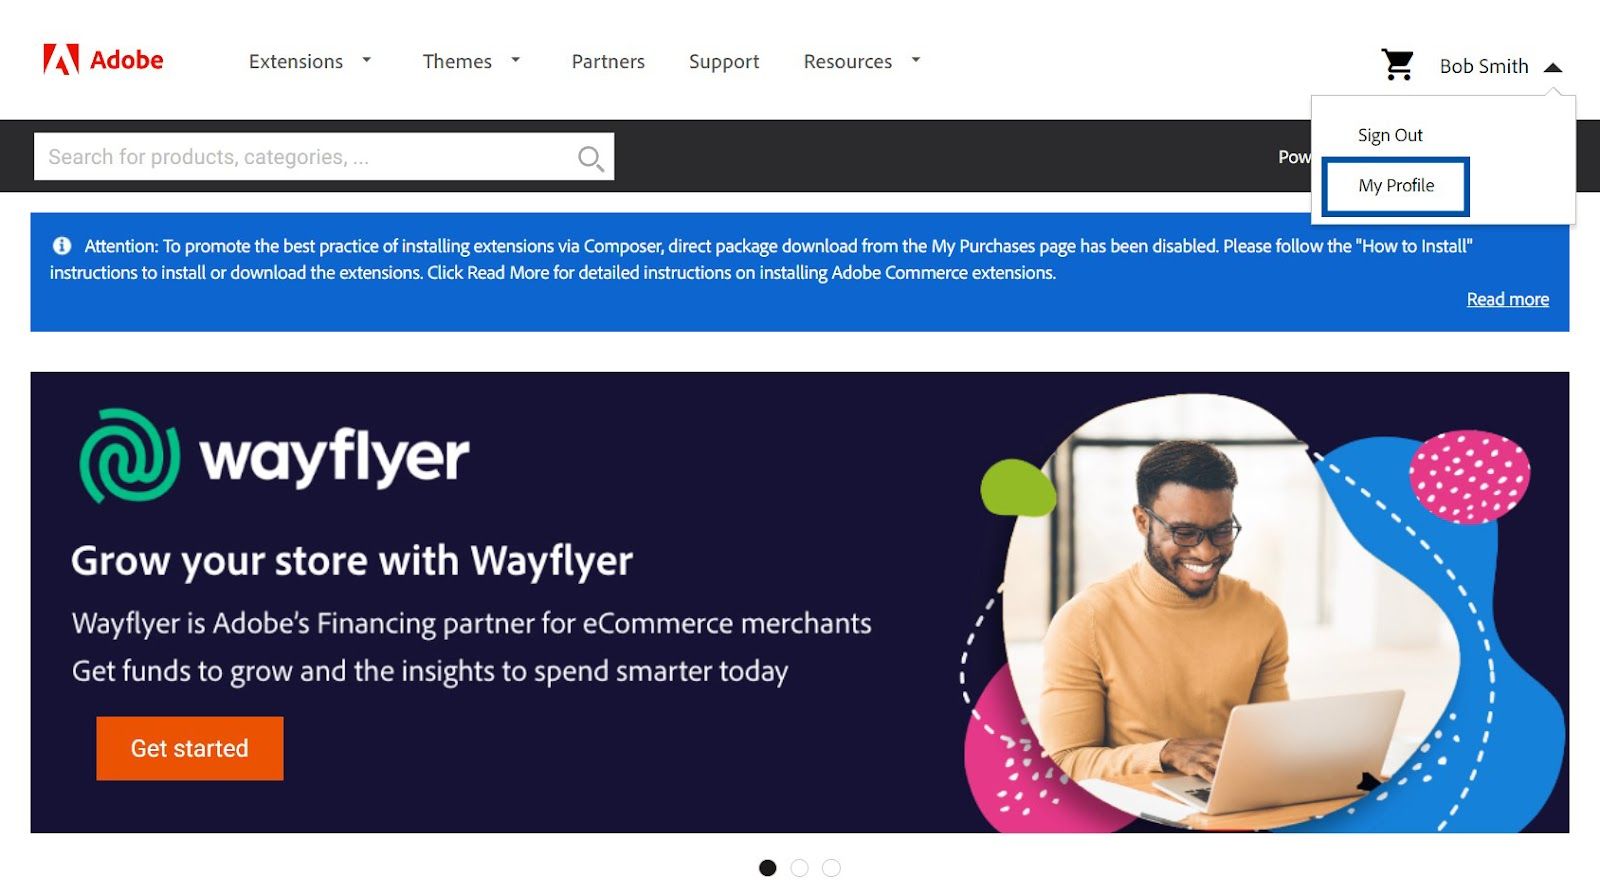
Log in to your Magento Marketplace account. Go to [Your name] > My Profile using the menu on the top-right corner of the screen.

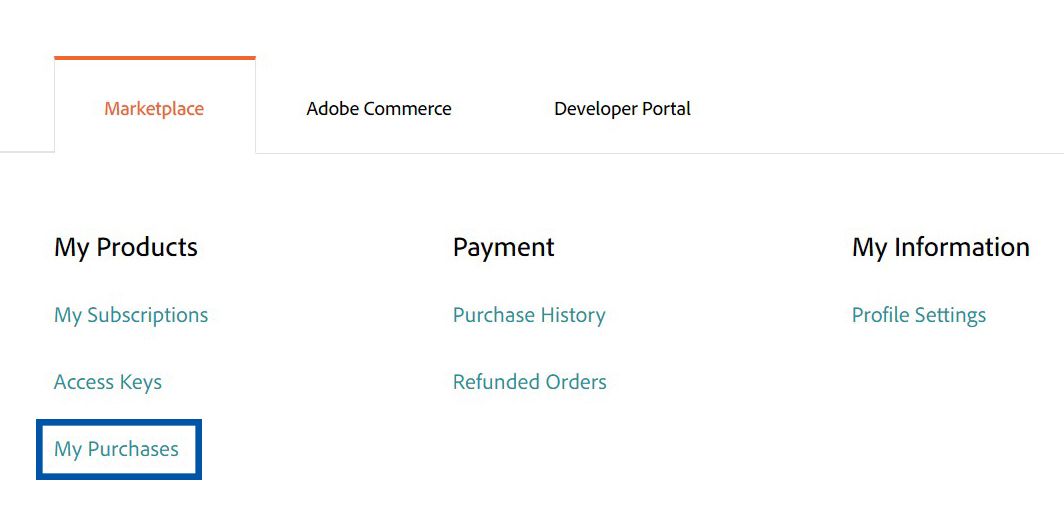
Click on My Purchases located under Marketplace > My Products.

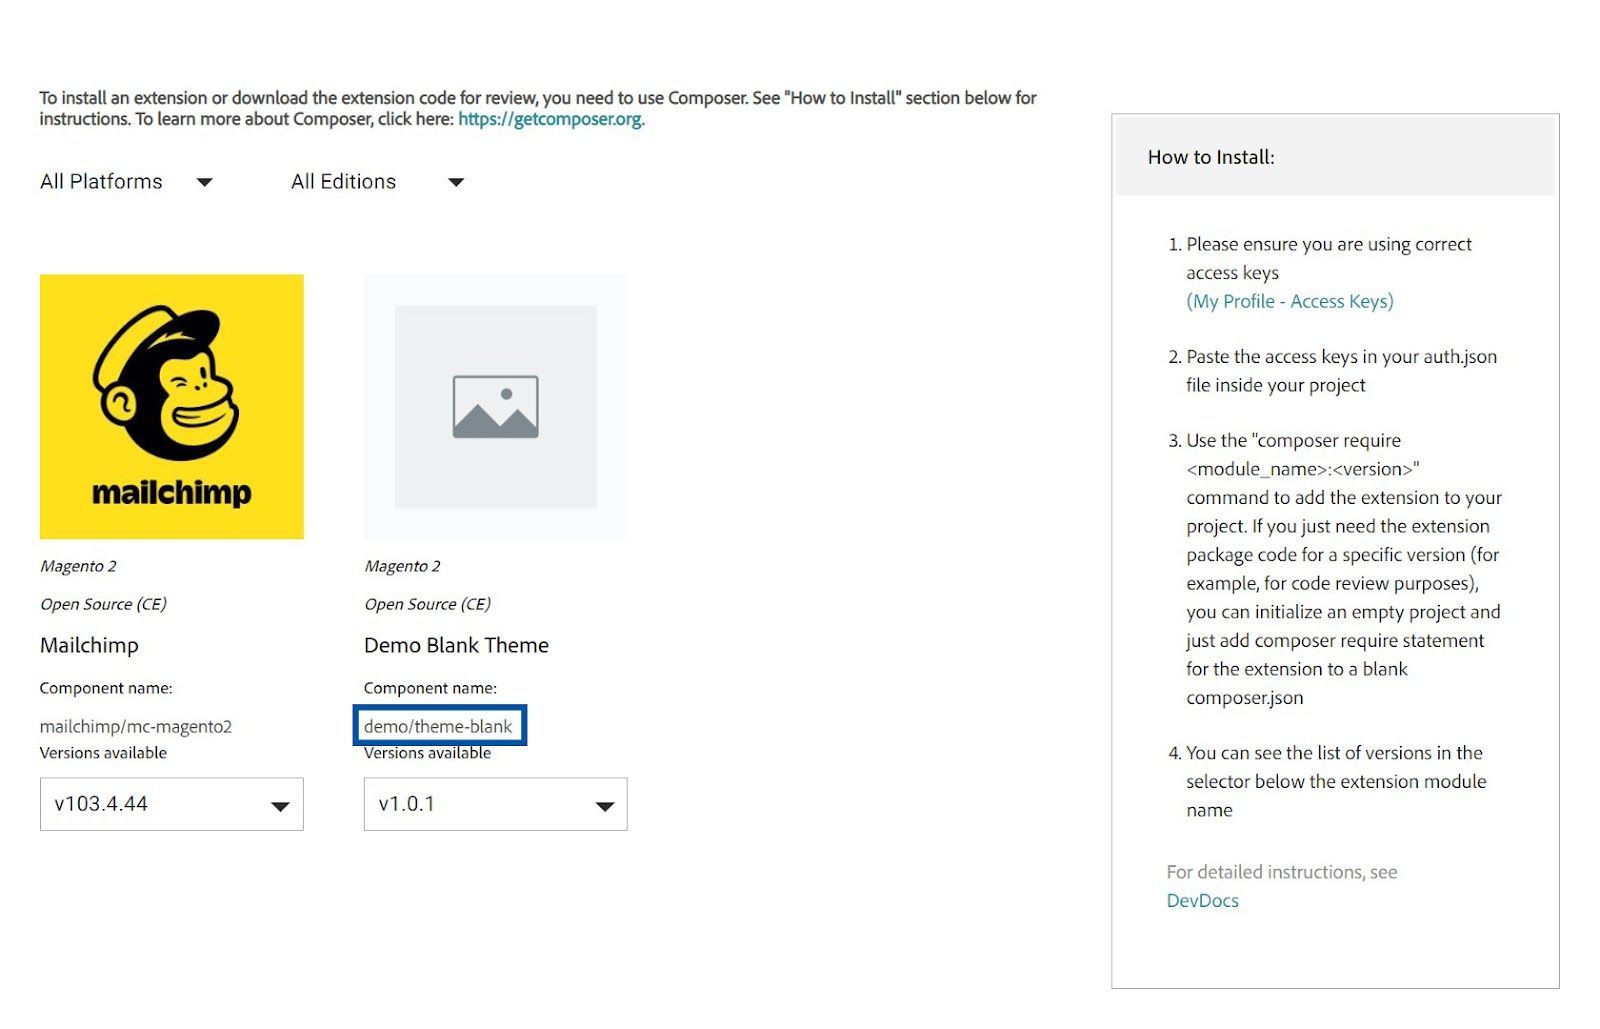
Find the Magento 2 theme you want to install and locate its Component name.
To install a specific version of the theme, expand the Versions available dropdown and find the version number.
Step 2: Clear Generated Data and Switch Magento to Developer Mode
Log in to your Magento server using SSH and clear previously generated classes and proxies to avoid errors during the Magento theme installation using:
<pre><code>

$ rm -rf <magento_root>/generated/metadata/* <magento_root>/generated/code/*

</pre></code>
Switch Magento to the developer mode using:
<pre><code>

$ php bin/magento deploy:mode:set developer

</pre></code>
You can also put Magento in maintenance mode to restrict access to the frontend during the installation process using:
<pre><code>

$ php bin/magento maintenance:enable

</pre></code>
Step 3: Update the Magento Composer File
Log in to your Magento server as the filesystem owner and update the composer.json file using:
<pre><code>

$ composer require <vendor>/<name>

</pre></code>
For example:
<pre><code>

$ composer require demo/theme-blank

</pre></code>
If prompted to enter your access keys, use the public key from your Magento account as the username and the private key as the password.
After this, Composer will update the Magento project dependencies.
Step 4: Disable the Cache and Install the Theme
Check the theme status before you install it using the following command:
<pre><code>

$ php bin/magento module:status <VendorName>_<ComponentName>

</pre></code>
If it’s disabled, enable it using:
<pre><code>

$ php bin/magento module:enable <VendorName>_<ComponentName>

</pre></code>
Then, clear the cache and install the Magento theme, using:
<pre><code>

$ php bin/magento cache:disable

$ php bin/magento setup:upgrade

</pre></code>
If you switched Magento to the maintenance mode in the previous step, disable it using:
<pre><code>

$ php bin/magento maintenance:disable

</pre></code>
Step 5: Verify the Install and Apply the Theme to the Storefront
Log in to the Magento admin and go to Content > Design > Configuration.
Click the Edit button for your preferred store view.
Assign the new theme using the Applied Theme dropdown, and click Save Configuration.
Make sure you switch back to production mode and clear the cache after installing a Magento theme.
Final Thoughts: How To Install a Magento Theme
We’ve described the steps to install a theme in Magento. But these steps may vary based on the theme you’re installing. You may also want to uninstall a Magento theme — refer to our guide for more on that.
Some Magento themes may need additional extensions. Check the theme developer’s documentation besides our installation guide to avoid unexpected errors after installation.
Want to offer your customers a fast Magento store without compromising on functionality? Sign up for managed Magento hosting with Nexcess today.

