

The Domain Name System (DNS) is a essential building block of the internet. By converting domain names to IP addresses, DNS ensures that each web resource can be found without remembering the location of the server that currently hosts it.
Using the Nexcess Global DNS allows you to use Nexcess nameservers to host your websites' DNS data — and comes with many inherit benefits. This configuration ensures fast record translation and eliminates needing third-party DNS services. In addition, the Nexcess Client Portal has a built-in interface for creating and editing DNS information, which allows you to manage all technical aspects of website hosting from one dashboard.
In this Nexcess Knowledge Base guide to Domain Name System management, you will learn how to create and edit DNS information in the Nexcess Client Portal. We will also give a brief overview of how DNS works, and the DNS records you will frequently use.
What is a DNS Zone?
A DNS Zone is a file that holds all DNS records for a particular domain and some additional information required for the correct work of the domain name resolution process. If you ever downloaded a DNS Zone, you could see that it resembles a simple text file, with each record listed on a new line.
Nameservers
DNS data is stored on special servers, also known as nameservers. Nameservers are the main components of the global DNS infrastructure. They have software installed that allows them to receive queries for DNS records and respond to them, providing the requested information.
There is typically a set of nameservers storing the same collection of DNS data and exchanging information with one another to keep it updated as DNS records are added, changed, or removed. This setup serves the purpose of redundancy, ensuring that the domain name resolution won’t be interrupted in any way, even if one of the nameservers is overloaded or goes offline.
DNS resolvers
DNS resolvers, also known as recursive resolvers, are a particular type of nameservers that do not store any DNS data but instead perform DNS queries on your behalf and return the information they receive.
You will most likely be using the resolvers configured and maintained by your Internet Service Provider (ISP) on your personal computer. However, you can change the resolver configuration and use those other organizations other — for example, Google resolvers (8.8.8.8) or Cloudflare resolvers (1.1.1.1).
Primary and secondary nameservers
Once a DNS Zone is updated, the changes are reflected on the primary nameserver. The primary nameserver defines which server is queried first. If it is unavailable, a request for DNS records will be sent to one of the secondary nameservers. Secondary nameservers communicate with the primary to ensure the DNS data they host is up to date by sending requests to it within the configured intervals.
Authoritative nameservers
Nameservers responsible for storing and DNS records of a particular domain name are called authoritative nameservers and can be configured at the domain’s registrar. Having authoritative nameservers configured ensures the internet knows where to find the DNS Zone of the domain in question.
Root Zone and Root Hints
A DNS Zone created for a particular website is maintained by the website owners, while DNS Zones for top-level domain names are managed by Internet Assigned Numbers Authority, or IANA.
Each recursive resolver has to store a file containing the addresses of all root nameservers. This file is known as Root Hints. On its official website, IANA also provides the Root Zone File, which contains the authoritative nameservers for top-level domains.
Nexcess Global DNS
Nexcess Global DNS is a network of nameservers that allows you to host your DNS records within Nexcess infrastructure. You can create and edit DNS setup in the Nexcess Client Portal. Nexcess Global DNS offers excellent redundancy and consists of the following nameservers:
- ns1.nexcess.net
- ns2.nexcess.net
- ns3.nexcess.net
- ns4.nexcess.net
You can point your domain name to Nexcess DNS services by having Nexcess DNS nameservers configured as authoritative for your domain name. Set nameservers for your website at your domain registrar or contact the Nexcess Support Team for assistance if you registered the domain name with Nexcess.
Nexcess Global DNS provides lightning-fast performance and low-latency domain name resolution for your customers, regardless of their geographic location. In addition, high redundancy ensures 100% uptime and demonstrates reliability.
Moreover, the Nexcess Support Team will be able to assist you with any DNS questions or issues that would involve DNS troubleshooting — or adding, changing, and removing DNS records. Having your website up quickly and running smoothly after migration or any development changes will no longer be an issue. You can easily edit or add a CNAME record to go live with your website.
Adding and editing DNS setup in the Nexcess Client Portal in 3 steps
You can easily manage your websites’ DNS from the Nexcess user interface and tools. First, let’s review the process of adding and editing them in the Nexcess Client Portal.
Step 1. Point your domain name to Nexcess DNS
Before you can begin managing DNS for your website in the Nexcess Client Portal, you must ensure that Nexcess nameservers are set up as authoritative for your domain name.
Use the instructions given in the previous section of this article. Remember to review and follow the steps with regard to logging in to your domain registrar portal and updating the domain registration information.
Please verify that your website's correct nameservers are configured by browsing its WHOIS information. You should see the following lines:
- Name Server: ns1.nexcess.net
- Name Server: ns2.nexcess.net
- Name Server: ns3.nexcess.net
- Name Server: ns4.nexcess.net
For more information related to WHOIS searches, refer to the What is WHOIS and why is it important in web hosting? article.
Step 2. Create a DNS Zone in the Nexcess Client Portal
Using your Nexcess Client Portal credentials, log in to your Nexcess account. If you cannot locate this information, click the Forgot Password? option on the Nexcess Client Portal login window or contact 24/7 Nexcess support for assistance.
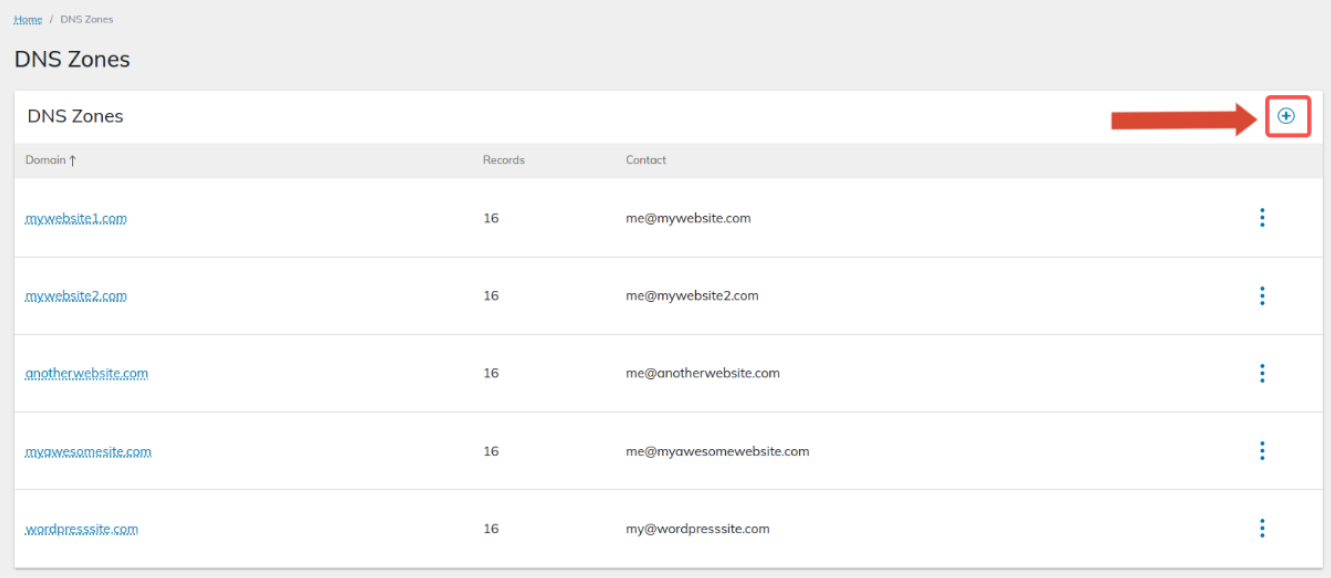
Navigate to the DNS tab by choosing DNS from the main menu. A new screen will appear in the user interface containing a list of all DNS Zones you have configured. So, if you're wondering what is a DNS Zone in the Nexcess Client Portal, it is simply a list of records hosted on the Nexcess Global DNS infrastructure, represented in a user-friendly way.
To create a new DNS Zone in the Nexcess Client Portal, click the Plus button in the top right corner:

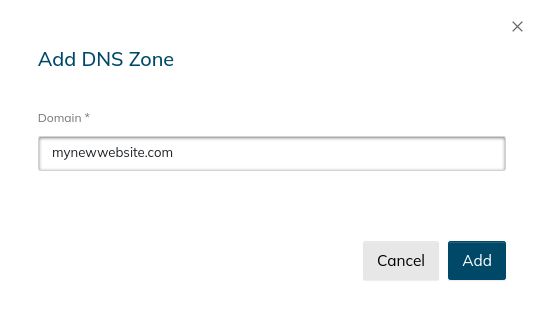
Click the Add button after entering your domain name. A new DNS Zone will appear on the list:

One of the most frequently asked questions Nexcess customers have had is whether importing an existing DNS Zone that you downloaded from your previous DNS provider is possible. Unfortunately, in the current state, the Nexcess DNS management interface does not allow it, so you will have to recreate all DNS records manually.
Step 3. Edit DNS Configuration in the Nexcess Client Portal
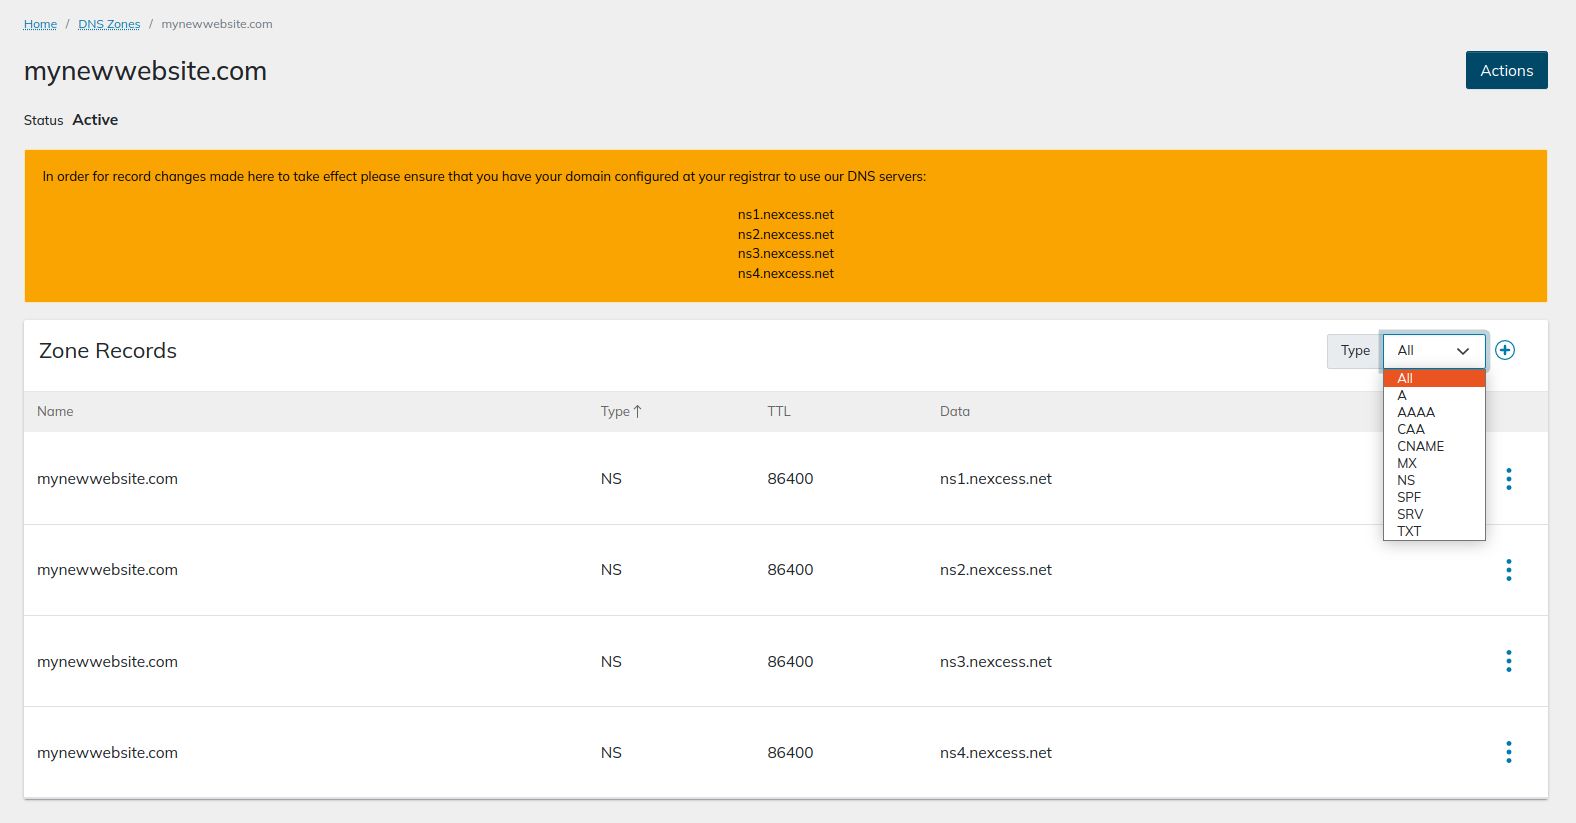
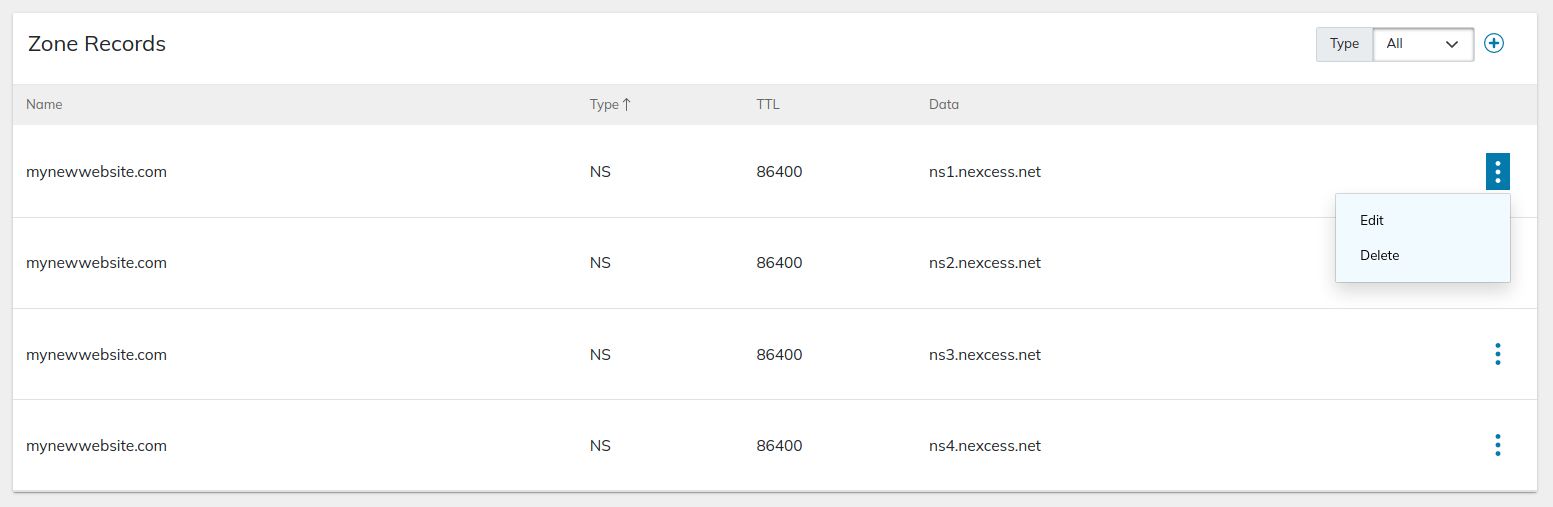
To view or edit an existing DNS Zone, click the domain name it has been configured for from the DNS tab of the Nexcess Client Portal. The requested DNS Zone will open in a new window, showing you the records it stores. For example, if you have just created a new DNS Zone for your website, it will contain just four NS records, each pointing to one of the four Nexcess nameservers.
Filter DNS records
When there are many DNS records added to your website, you can filter the list by choosing the DNS record type from the dropdown menu on the top right corner of the Zone Records section:

Modify or remove a DNS record
To change an existing DNS record or remove it, click the three dots icon to the right of the record in the user interface and choose the appropriate action:

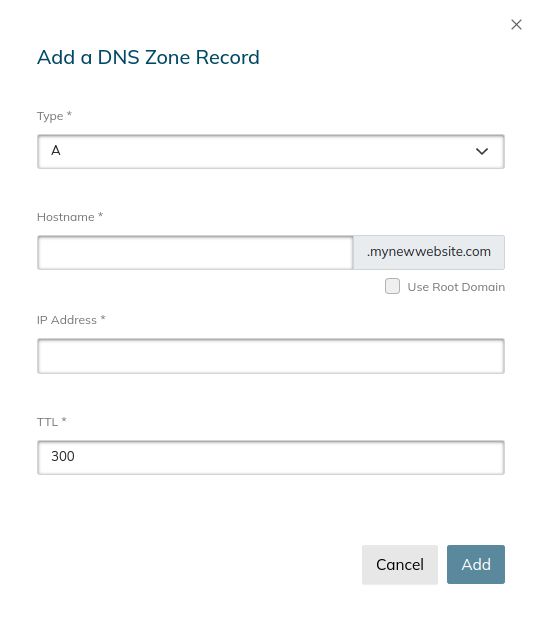
Add a new DNS record
To add a new DNS record, click the Plus button next to the dropdown menu where you filter the list of existing DNS records. Next, a new screen will appear, in which you must select the type of DNS record you would like to create, its name, and its value. Once you are ready to save the new record, click the Add button:

DNS record types
You can add the following DNS records in the Nexcess Client Portal:
- A record. A records are used to map a domain name to an IP address. Provide the IP address of the Nexcess host that your website should resolve to. You can locate the IP address in the Plans menu of the Nexcess Client Portal.
- AAAA record. AAAA records serve the same purpose as A records but allow you to add an IPv6 address instead of IPv4.
- CNAME record. CNAME records allow you to add an alias for a domain name — for example, the www version of the website. At Nexcess, we recommend you use a CNAME record for pointing your domain name to the temporary domain name assigned to it by Nexcess.
- Adding a CNAME target for your website has multiple benefits, including quicker migrations and attack mitigation — among many others.
- MX record. MX (mail exchange) records allow you to point your domain to the email services you have configured for your website. You will typically have multiple MX records pointing to mail servers with different priorities.
- NS record. NS records reflect the authoritative nameservers for your website, which Nexcess includes by default once a new DNS Zone is created. However, you may want to use another set of nameservers as authoritative for a subdomain. In this case, just add new NS records for the chosen subdomain.
- SPF record. An SPF record, which stands for Sender Policy Framework, allows you to manage your email reputation by configuring a list of IP addresses and hosts that can send email on behalf of your website’s email accounts.
- SRV record. SRV records allow you to add the host and IP address of a specific service your website uses. This DNS record, however, is used very rarely nowadays.
- TXT record. TXT records are custom DNS records that are often used to confirm the ownership of a domain name. SSL providers can ask you to add a TXT record as part of the verification process. You will use this record type if you wish to add a DKIM (DomainKeys Identified Mail).
Hostname
If you want to add a DNS record for a subdomain configured for your website, enter it in the Hostname field. If and when a new record needs to be generated for the main domain name, check the Root Domain option.
TTL (Time to Live)
The TTL value of a DNS record represents the amount of time in seconds that DNS resolvers worldwide need to store the record in its cache. If you need to facilitate DNS propagation, lower the TTL value, setting it to 3600 (one hour) or less. Nexcess Client Portal defaults TTL to as low as 300 seconds (18 minutes) for each new record.
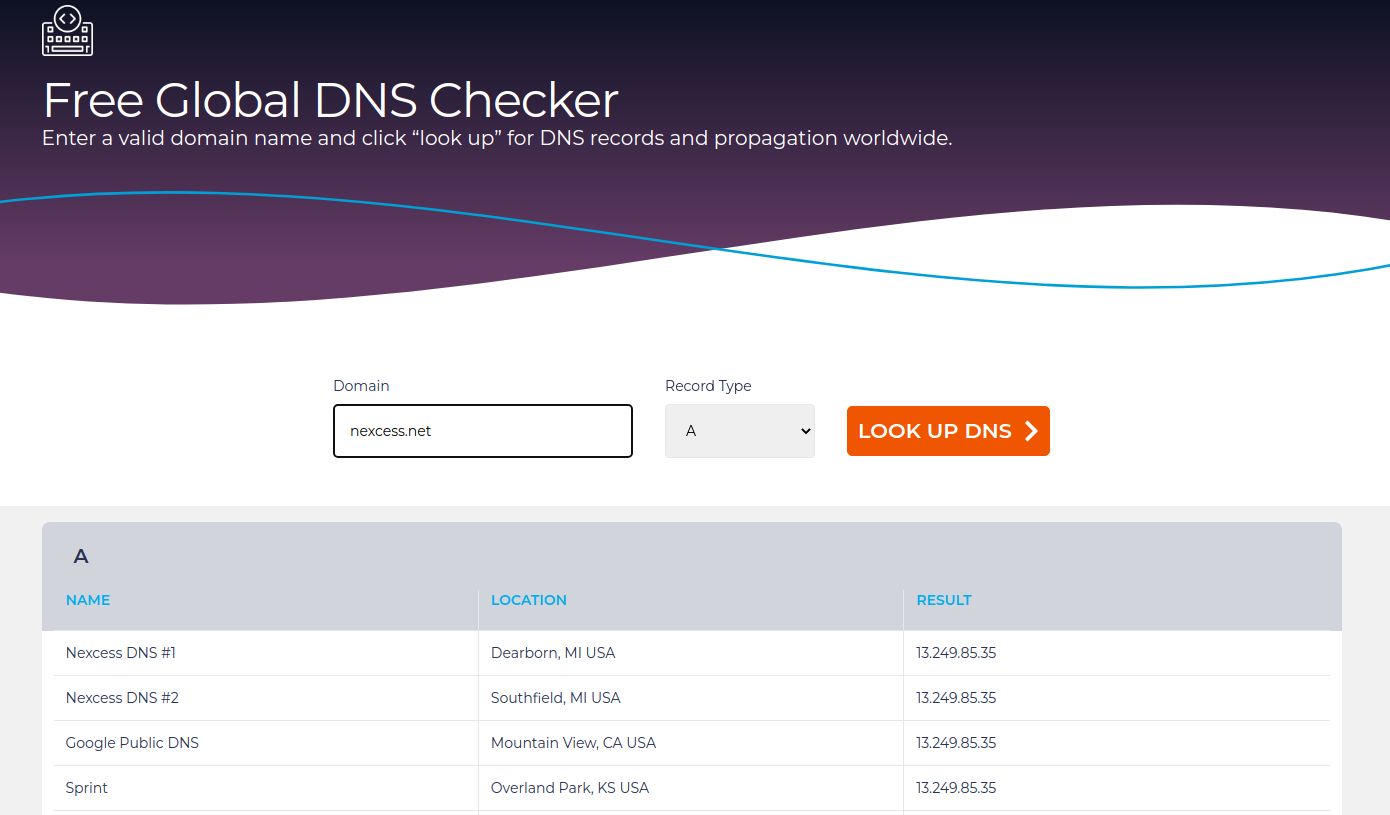
Checking DNS
After a new DNS is created, or you add records to an existing one, you should track the process of DNS propagation — having DNS records updated across the internet. Our Nexcess free DNS checker allows you to perform DNS lookups without using the command line interface.
With our convenient tool, simply enter a domain name and choose the record you want to see. And then, click the Look Up DNS button. The output will show you what results from nameserver checks done all over the world answer with:

Conclusion
DNS is one of the most critical components of today’s global network. By connecting a large number of nameservers globally, DNS ensures that all web resources on the internet can be identified by both a domain name and location — the host server's IP address. Running a website is only possible with DNS, and Nexcess offers a great way to manage it from the Nexcess Client Portal.
Freedom. Flexibility. Expert Support.
We’ve optimized hosting for the industry’s leading commerce and content platforms. That means speed, security, scalability and support are built in. Backed by free migrations and 30-day money-back guarantee, let us show you why we’re the best.
Nexcess Client Portal allows managing all technical aspects of website hosting from one dashboard. The DNS management interface offers excellent options for administering your DNS, including adding, modifying, and removing DNS records for your website. Point your domain name to Nexcess Global DNS to leverage all benefits of hosting DNS with Nexcess.
Nexcess has been powering businesses from around the globe for over two decades, and we are ready to accommodate your needs, offering cloud and high-availability enterprise hosting for all modern Content Management Systems (CMSs). An enterprise-level technology stack, unrivaled performance, and award-winning support make us different. So check out Nexcess managed hosting plans to start out today!
Note about the original publication date
This article was originally published in September 2019. It has since been updated for accuracy and comprehensiveness.


